background image

5

3-90-70744R11_05/13

To ensure a safe installation, it is recommended 

WKDW WKLV IXUQDFH EH LQVWDOOHG E\ D TXDOL¿HG

installer.

The sheet metal top and sides can be easily 
remo ed to reduce the chance of dents or scratches 
on the painted surfaces  

7R UHPRYH WKH VKHHW PHWDO ¿UVW OLIW RII WKH WRS

section   ow  the sides can be remo ed by lifting 
up and out away from the furnace
 
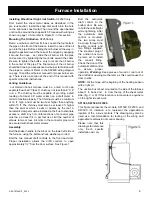
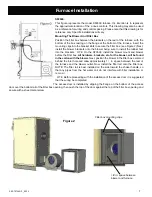
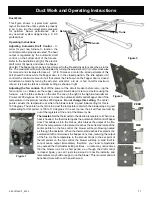
To lighten the SF2600  the oil burner heat exchanger 

VKRXOG EH UHPRYHG 'R VR E\ ¿UVW UHPRYLQJ WKH

sheet metal as described abo e  Remo e the front 

VKHHWPHWDOE\¿UVWUHPRYLQJWKHEXUQHUFROODU1RZ

remo e the the two long bolts on each side of the 
heat exchanger (Figure B) The entire unit can now 
be lifted off and mo ed separately  

Caution: This furnace must not be installed 
closer than 24 inches at the sides and 30 inches 
from the rear to combustible materials. The unit 
may only be installed on a non-combustible 

ÀRRUVXUIDFHVXFKDVFRQFUHWHÀRRURUFRQFUHWH
SDGRQGLUWÀRRU7KHKRWDLUSOHQXPPXVWEHD

minimum of 2 inches from the ceiling or other 
combustibles above the plenum.

Locate the furnace as close to the chimney as possible while still maintaining 
the abo e clearances   o more than   feet of sto epipe should be used  
including two or less 90  elbows  All hori ontal runs of pipe should ha e a 
minimum 1/4 in  rise per foot  All sto e pipe must be 24 gauge or thicker  

When re-installing the heat exchanger  inspect the gasket around the 
furnace opening  and replace if necessary  (Figure A) Place the heat 
exchanger in position and secure with the long bolts and nuts  Be sure the 
gasket is compressed e enly

Re-install the sheet metal by sliding the groo e on the bottom of each side 
panel o er the steel lip on the furnace  The top sheet metal piece holds the 
sides in place  The SF2600 front co er gets installed by angling the bottom 

HGJHRYHUWKHOLSRQWKHWRSRIWKH¿UHER[7KHVLGHHGJHVPXVWVOLGHLQWR
WKHJURRYHVRQHDFKVLGHDQGSXVKHGLQÀXVKZLWKWKHVLGHVDQGWRS7KLV

front piece is held in place by the black ring which gets tightened around 
the burner pipe  Do not o er tighten as this will push the sheet metal in 
too far

Furnace Installation

Figure A

Figure B

Inspect Gasket prior to re-
installing heat exchanger

(4) 12in  bolts  two on 
each side  attach the heat 
exchanger to the furnace

Содержание SF1500A

Страница 1: ...IRE MAY RESULT FOR YOUR SAFETY FOLLOW INSTALLATION DIRECTIONS CONTACT LOCAL BUILDING OR FIRE OFFICIALS ABOUT RESTRICTIONS AND INSTALLATION INSPECTION REQUIREMENTS IN YOUR AREA CONTACT YOUR LOCAL AUTHO...

Страница 2: ...g 13 Maintenance 14 6SHFL FDWLRQV Coil Installation 16 Oil Burner Setup 18 Service Parts 19 Warranty 27 Contains updated information Harman Central Heating Appliances are built and tested to be comple...

Страница 3: ...unction Boxes Relay High Limit Snap Disc 4 1 4 X 3 4 bolts 4 Filter Box Mounting Clips 36 Flex Conduit 1 Straight Conduit Fitting 1 Elbow Conduit Fitting Ash Pan Shaker Handle Owner s Manual Warranty...

Страница 4: ...an Switch not on SF3500 Thermostat Junction Box Relay 4 1 4 X 3 4 bolts 4 Filter Box Mounting Clips 36 Flex Conduit 1 Straight Conduit Fitting 1 Elbow Conduit Fitting Ash Pan Shaker Handle Owner s Man...

Страница 5: ...es above the plenum Locatethefurnaceasclosetothechimneyaspossiblewhilestillmaintaining the abo e clearances o more than feet of sto epipe should be used including two or less 90 elbows All hori ontal...

Страница 6: ...nit from it s box Loosen the four bolts in the pipe on the front of the furnace Insert the nose of the oil gun into the pipe Before sliding the oil burner all the way in apply the gasket around the no...

Страница 7: ...d blower EHIRUH WKH OWHU ER All hardware brackets etc for the blower will be found in the carton with the blower 1H W SRVLWLRQ WKH EORZHU LQ WKH OWHU ER FHQWHUHG behind the inlet hole and allow approx...

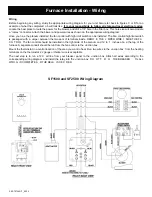
Страница 8: ...high limit switch is packaged with a umper between the two sets of terminals inside REMO E THE J MPER WIRE I SIDE THE FA CO TROL The fan control should be installed in the right side of the plenum and...

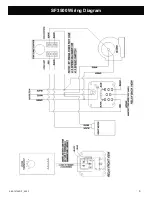
Страница 9: ...9 3 90 70744R11_05 13 SF3500 Wiring Diagram...

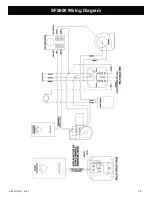
Страница 10: ...10 3 90 70744R11_05 13 SF2600 Wiring Diagram...

Страница 11: ...t is the high limit ad ustment 3UH VHW DW GHJUHHV LW V IXQFWLRQ LV WR FORVH WKH DXWRPDWLF GUDIW FRQWURO DSSHU GRRU LI WKH temperature in the plenum reaches 200 degrees Do not change this setting The c...

Страница 12: ...r using the same method as before always closing the bottom door before opening the top door 1RZ ORDG WKH UHER ZLWK ZRRG WR WKH GHVLUHG IXOOQHVV OO Harman furnaces may be loaded with wood as full as p...

Страница 13: ...from the door Whene er the bottom door is open it should be closed before opening the loading door This is to increase draft through the loading door and pre ent excess smoke from escaping 7KH UHER VK...

Страница 14: ...f a brick is broken and has fallen out of place it should be replaced immediately 7KH UHEULFN XVHG LQ WKH DUPDQ IXUQDFHV DUH LQH SHQVLYH and easy to replace The blower manufacturer recommends the blow...

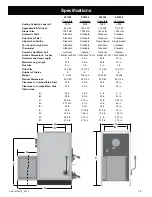
Страница 15: ...l Optional Firebox Dimensions Inches 16Wx22Lx20 5H 1 Wx26Lx21 5H 1 Wx26Lx21 5H 1 Wx30Lx25H Recommended Log Length 1 in 22 in 22 in 27 in Maximum Log Length 22 in 26 in 26 in 30 in Flue Size 6 in 7 in...

Страница 16: ...ele ated if necessary to allow for proper thermo siphon action The method by which hot water will circulate automatically through the system A Shut off the water heater and the water supply to it Dra...

Страница 17: ...n the tank completely B Remo e the Temp Presure relief al e and discard Install a short 3 4 in nipple and tee 1 along with a new relief al e C Remo e the drain al e at the bottom of the tank Install a...

Страница 18: ...ion Air C o 1 to 1 Draft Inches of water column 06 to 0 Tests for CO must be made without a fire in the wood coal firebox and with all doors and draft controls completely closed The burner should be f...

Страница 19: ...of new home construction warranty co erage begins on the date of first occupancy of the dwelling or six months after the sale of the product by an independent authori ed HHT dealer distributor whiche...

Страница 20: ...warranty does not co er the following KDQJHV LQ VXUIDFH ILQLVKHV DV D UHVXOW RI QRUPDO XVH V D KHDWLQJ DSSOLDQFH VRPH FKDQJHV LQ FRORU RI LQWHULRU DQG exterior surface finishes may occur This is not a...

Страница 21: ...29 3 90 70744R11_05 13...

Страница 22: ...ach product to a standard not a price Signature of Boxer Your premium quality hearth product designed and assembled by the experienced and skilled members at Harman in Halifax PA USA Proudly Printed O...

Отзывы: