background image

6

11. OK

• 

Press to confirm your selection.

12. 

• 

Toggle Optical / Aux as an input source.

13. Microphone

4 INSTALLATION

4.1  Place the LINK BAR on the table

Place the LINK BAR on its rubber feet on a stable and level 
surface.

TV

NOTES:


Remove any interference from both sides of the LINK BAR so the side-

firing bass port can react correctly.


To avoid wireless interference, keep other wireless devices 1-3ft (0.3-

0.9m) away from the LINK BAR.


Make sure there is an AC outlet nearby.


Do not place any objects on the top of the LINK BAR.

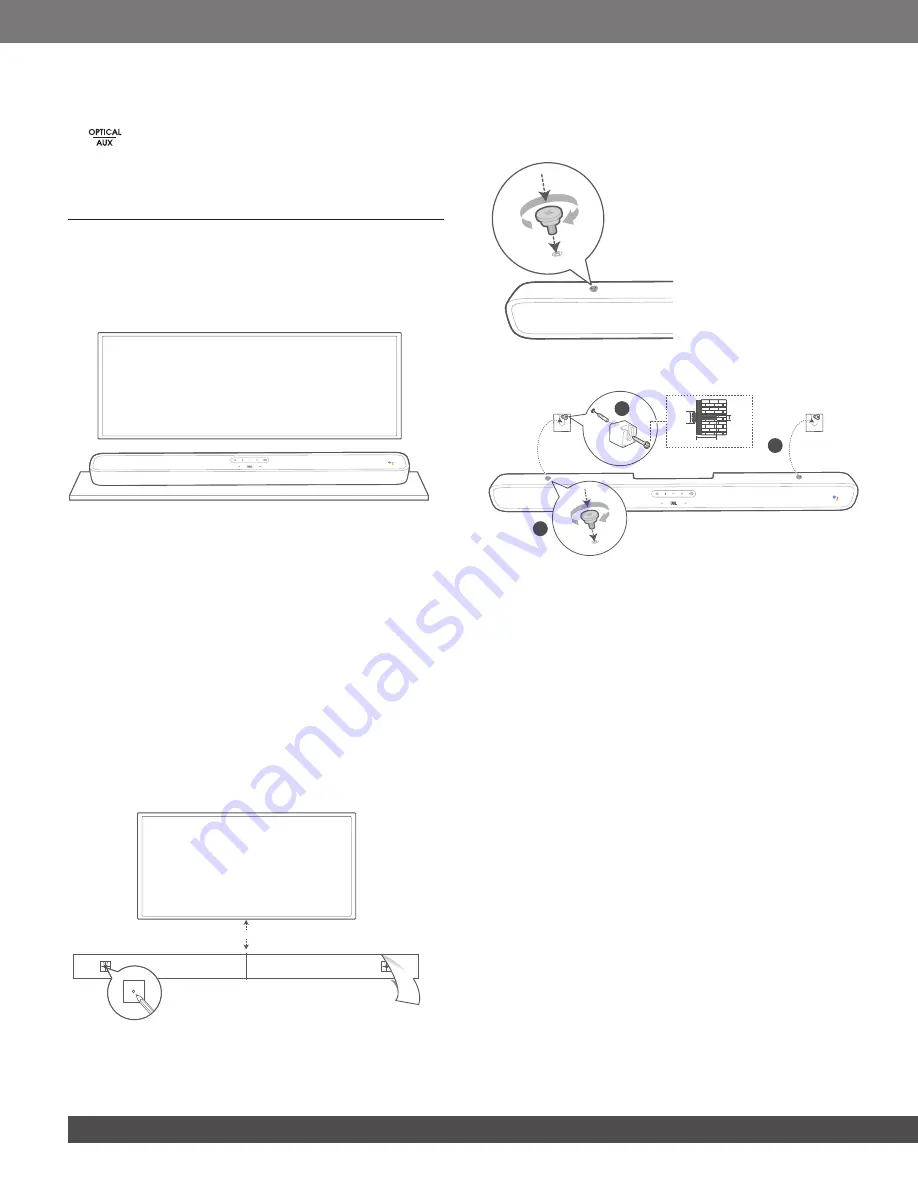
4.2  Wall-mount the LINK BAR

1. 

Use tape to stick the wall-mount paper guide on the wall, push 
a pen tip through the center to mark the wall-mount bracket 
location and remove the paper.

2. 

Keep a minimum distance of 2” (50mm) for TV clearance.

3.  Use an appropriately sized drill bit, drill a hole in the wall at 

each pen marking.

TV

2-D=4mm

Min. 2” (50mm)

4. 

Screw the wall mount brackets on the pen mark.

5. 

Screw the threaded mounting post into the back of the LINK 

BAR.

6.  Hook the LINK BAR to the brackets attached to the wall.

3

≤8 mm/

0.31"

4mm/

0.16"

≥35 mm/1.4"

1

2

NOTES:


Before mounting on a wall, make sure the wall can support the weight 

of this unit.


Install on a vertical wall only.


For  the  wall-mounting,  avoid  a  location  with  high  temperature  or 
humidity.


Connect cables from the unit to the external devices before installing 

on the wall.


Make sure the power cord is unplugged from the AC outlet before the 
installation. Otherwise, it may cause an electric shock.


Before connecting the power cord to your LINK BAR to the wall outlet 

make sure all connections between components are connected.


Before moving the unit, make sure to unplug the power cord first.

Содержание JBL LINK BAR

Страница 1: ...LINK BAR OWNER S MANUAL ...

Страница 2: ... used with this product As with all electrical devices do not run power cords under rugs or carpets or place heavy objects on them Damaged power cords should be replaced immediately by an authorized service center with a cord that meets factory specifications Handle the AC Power Cord Gently When disconnecting the power cord from an AC outlet always pull the plug never pull the cord If you do not i...

Страница 3: ...R 7 6 2 POWER ON THE JBL SW10 SUBWOOFER SOLD SEPARATELY 8 6 3 PAIR WITH THE JBL SW10 WIRELESS SUBWOOFER OPTIONAL 8 7 TALKING TO GOOGLE ASSISTANT 9 7 1 ACTIVATE THE HOTWORD 9 7 2 EXAMPLES OF VOICE COMMANDS THAT CAN WORK ON LINK BAR 9 8 USING YOUR LINK BAR 9 8 1 ANDROID TV 9 8 2 THE GOOGLE ASSISTANT 9 8 3 GOOGLE PLAY STORE 9 8 4 PLAY VIDEO OR MUSIC WITH CHROMECAST 9 8 5 PLAY MUSIC WITH BLUETOOTH 10 ...

Страница 4: ... questions about this product the installation or the operation please contact your JBL retailer or customer service or visit us at www jbl com 2 WHAT S IN THE BOX Carefully unpack the box and check if the following parts are included If any part is damaged do not use it contact your retailer or customer service Main unit Remote control with 2 AAA batteries Power cord Power cord quantity and plug ...

Страница 5: ...r digital device 3 AUX input Connect to an audio device 3 5mm jack 4 ETHERNET Connect to the Internet 5 HDMI 1 HDMI 2 HDMI 3 input Connect to HDMI output on a digital device 6 HDMI OUT TV ARC Connect to the HDMI ARC input on your TV 7 SERVICE for service personnel only 8 SUBWOOFER PAIRING Press to enter the subwoofer pairing mode 9 SUBWOOFER PAIRING LED 3 3 Remote Control 1 2 3 4 5 6 7 8 9 10 12 1...

Страница 6: ...of 2 50mm for TV clearance 3 Use an appropriately sized drill bit drill a hole in the wall at each pen marking TV 2 D 4mm Min 2 50mm 4 Screw the wall mount brackets on the pen mark 5 Screw the threaded mounting post into the back of the LINK BAR 6 Hook the LINK BAR to the brackets attached to the wall 3 8 mm 0 31 4mm 0 16 35 mm 1 4 1 2 NOTES Before mounting on a wall make sure the wall can support...

Страница 7: ...ox DVD Blu ray player or games console to your LINK BAR through a single HDMI connection Connect the HDMI cable from the HDMI IN jack on the back of the LINK BAR to the HDMI OUT jack on your digital device Press the button on the top panel of the LINK BAR or the button on the remote control to select the HDMI mode HDMI OUT HDMI 1 HDMI 2 HDMI 3 NOTE For the best use always choose a High Speed type ...

Страница 8: ...ome 6 2 Power on the JBL SW10 subwoofer Sold separately 1 Plug one end of the power cord into the POWER connector on the back of the subwoofer 2 Plug the other end of the power cord into an AC mains outlet 6 3 Pair with the JBL SW10 wireless subwoofer Optional To manually pair with the subwoofer 1 Power on both the LINK BAR and the SW10 Wireless Subwoofer 2 Press the SUBWOOFER PAIRING button on th...

Страница 9: ... fun fact Reminders Remind me to buy milk at 7pm Shopping Add movie tickets to the shopping list Smart Home Dim the lamp turn on lights 8 USING YOUR LINK BAR 8 1 Android TV 8 2 The Google Assistant The Google Assistant is your personal assistant there are four major areas 1 Enjoy entertainment Play your favorite shows songs and movies and discover new ones just with your voice 2 Control your smart...

Страница 10: ...AR is no longer connected to the device follow these steps to get your remote re connected 1 To put the LINK BAR device into pairing mode press and hold the physical Bluetooth button on the LINK BAR device for several seconds 2 Once you see the searching for accessories screen or connect new device screen press and hold the HOME BACK buttons on your LINK BAR remote for three seconds This will put ...

Страница 11: ...lect Device Preference Reset What are the sound modes on the LINK BAR There are 4 sound modes you can select in the settings menu Sound EQ mode a Standard b Movie c Music d Voice Standard sound mode is the default settings Will my LINK BAR enter low power mode automatically You can set the standby in the settings menu No sound from the LINK BAR Make sure that the LINK BAR is not muted Make sure to...

Страница 12: ...ed trademarks owned by the Bluetooth SIG Inc and any use of such marks by HARMAN International Industries Incorporated is under license Other trademarks and trade names are those of their respective owners The Wi Fi CERTIFIED Logo is certification marks of the Wi Fi Alliance Google Android Android TV Chromecast and other related marks and logos are trademarks of Google LLC Chromecast built in may ...

Страница 13: ...idge CA 91329 USA www jbl com 2019 HARMAN International Industries Incorporated All rights reserved JBL is a trademark of HARMAN International Industries Incorporated registered in the United States and or other countries Features specifications and appearance are subject to change without notice ...

Отзывы: