background image

User Manual - CTC-1402


33


Firmware Upgrade 

The CTC-1402 uses KIT files for firmware upgrade. 


Before Starting 

1.


Verify that you have the latest version of NetLinx Studio on your PC. 

2.


Download the latest firmware (KIT) file to your PC. (Place KIT files on a local drive for the fastest throughput.) 

3.


Verify the following: 
a.


Verify that an Ethernet/RJ-45 cable is connected from CTC-1402 to the same network as the control system.  

b.


Verify the CTC-1402 unit is powered ON. 

4.


Launch NetLinx Studio and open the Online Tree. 

5.


Bind the target device to the integrated Controller: select and right-click the CTC-1402: from the context sensitive menu, 
select “

Network Bind/Unbind Device

” (be sure the check box is selected), click “

OK

”.  

6.


Launch Web UI page before upgrading the firmware to determine the current upgrade status. For more information, refer to 

UPGRADE STATUS

” in the Web UI Control section. 

Transferring KIT Files 

Important Upgrade Information: 

Upgrading the firmware is a serious action in that if the upgrade fails, it can leave the system completely non-operational. Please 
ensure no power-off during the upgrade process. 
The system will be non-operational during the upgrade procedure below. 
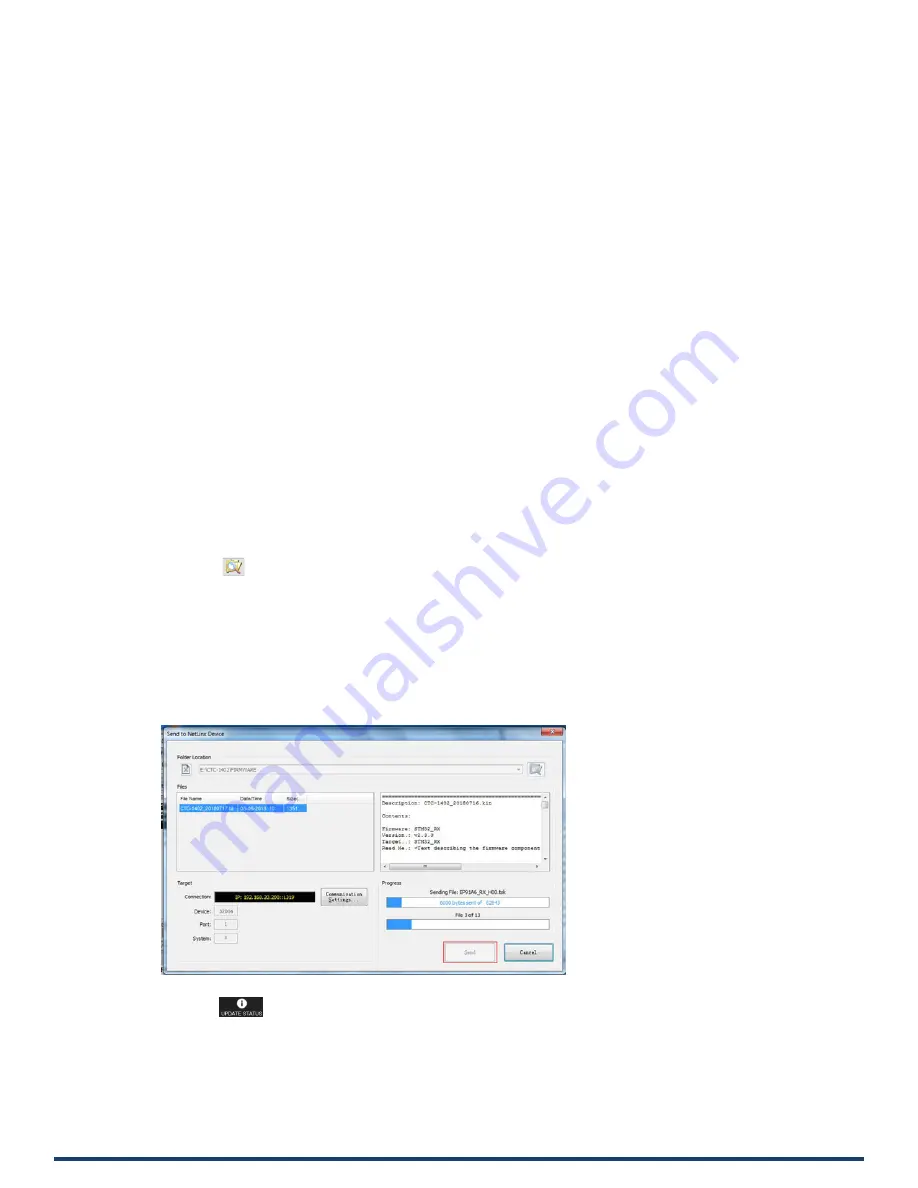
1.


In NetLinx Studio from the Tools menu, select “

Firmware Transfers

 > 

Send to NetLinx Device

”, select “

Stop 

Communications

” in the following box, and then enter the Send to NetLinx Device dialog box. 

2.


Click 

 to navigate to the target directory. The selected directory path is displayed in the Location text box. KIT files in 

the target directory display under File Name. 

3.


Select the appropriate KIT file from the File Name list. 

4.


Enter the Device and System numbers (see Device Number and Ports part of NetLinx Programming section) for the target 
module in the Device and System text boxes. 

• 

The number of NetLinx Controller is 3.  

• 

The Device number assigned to the integrated control ports is 32004.  

Note: 

Use the 

Online Device Tree

 to determine if the device’s assigned IDs have been changed. 


5.


Click “

Send

” to send the file to NetLinx Controller and upgrade the firmware on the CTC-1402.  

6.


Click

web UI to check progress of the firmware upgrade.  

The device will restart automatically. Do not power cycle.  

Note:  


The upgrade process will last 1 hour.  


Do not power off the Device until the upgrade has been successfully completed.  


The device will restart two times to resume normal operation. 

Содержание AMX CTC-1402

Страница 1: ......

Страница 2: ......

Страница 3: ......

Страница 4: ...ing 16 Brackets Installation 16 Wiring 16 OSD 18 Input Source Switching 19 Auto Switching 19 Manual Switching 19 USB Control 20 NetLinx Control 22 Device Number and Ports 22 Send Commands to Control a...

Страница 5: ...8bit HDMI In Out Supports HDMI 2 0 and HDCP 2 2 Provides a variety of interfaces including USB C to simplify meeting room devices management Supports USB hosts like Desktop and Laptop USB devices lik...

Страница 6: ......

Страница 7: ......

Страница 8: ......

Страница 9: ......

Страница 10: ......

Страница 11: ......

Страница 12: ......

Страница 13: ......

Страница 14: ...User Manual CTC 1402 15 AUDIO OUT Connect to an audio system such as an amplifier with the 3 pole 3 5mm captive screw connector Wire as shown below...

Страница 15: ...height can be adjusted Up Down The bracket can face up or down 2 The bracket is attached to the enclosure as shown 3 Repeat steps 1 2 for the other side of the unit 4 Attach the brackets to a surface...

Страница 16: ...he USB DEVICE ports of TX and RX Note For more information refer to USB Control section USB C is automatically recognized when the USB C input is selected The PC can be connected to other US 6 Connect...

Страница 17: ...onvey its IP address Follow these steps to initiate OSD 1 Hold and Press the HDMI 1 and HDMI 2 buttons on the front panel of RX for at least 3 seconds 2 The IP address of the CTC 1402 will display on...

Страница 18: ...and the front panel button Power off protection When Auto Switching or Manual Switching are selected before powering off the device will remain in the same mode after powering back on When Auto Switc...

Страница 19: ......

Страница 20: ......

Страница 21: ...ransmitter Port 1 RS 232 P Port 2 RS 232 C Port 4 IR RX Port 5 USB Device Port 6 DP IN 2 Port 7 VGA IN 1 Audio IN 1 Port 8 HDMI IN 3 Port 9 USB C IN 4 Port 10 USB Host 1 Port 11 USB Host 2 Receiver Po...

Страница 22: ...Device Click Diagnostics on the menu bar choose Control a Device A window will display as follows enter a command in the textbox and click Send To Device For API commands see the Section API Command S...

Страница 23: ...If Launch TELNET Window via User Defined Program is selected it may be required to enable Telnet as follows 1 Go to Start Control Panel Programs and Features 2 On the left select Turn Windows features...

Страница 24: ...accessed through NetLinx Studio Access the Web Interface To get access to Web UI 1 Connect your PC and the LAN port of the CTC 1402 to the same local area network 2 In NetLinx Studio s Online Tree sel...

Страница 25: ...PLAY RELAY AUDIO VOLUME RESOLUTION LOGO NETWORK SYSTEM The top of the interface includes REFRESH FACTORY DEFAULT REBOOT UPGRADE STATUS and Firmware VERSION Refresh Click to refresh the status of devic...

Страница 26: ...s Firmware VERSION Click to check the current firmware version Auto Switch Users can enable or disable the Auto Switch function in this column Auto Switch ON is the default For more information refer...

Страница 27: ...OLLOW Select to follow the output display s HDCP compatibility for the HDMI Out which will transmit content with the same HDCP compatibility as that of the output display default setting HDCP 2 2 Sele...

Страница 28: ...2 control mode Local default Local sending of commands to control the projector Netlinx Sending commands via NetLinx studio to control the projector DEVICE When Netlinx is selected click the down arro...

Страница 29: ...screen and click to drop the projector screen down Latch Level triggered Momentary Pulse triggered The delay time can be set 1 10 seconds Audio Volume Output Volume Move the slider to set the output a...

Страница 30: ...l output to the display Default setting 2 DRAG TOP LEFT Select to set the logo picture to shuttle slowly between the center and the top left of the display screen when there s no signal output to the...

Страница 31: ...the connected DHCP server Static When the CTC 1402 fails to obtain or detect an IP address from the network it is connected to select Static to set up the IP address manually APPLY Click to initiate t...

Страница 32: ...for the settings to take effect CONNECTION MODE includes four options NDP Auto IP URL TCP URL UDP The default setting is NDP CONTROLLER URL Input the connected controller s URL SYSTEM NUMBER Use the...

Страница 33: ...ick to execute the setting SSH Account SSH Account is used to configure the user name and password of the account For SSH Account the default user name is admin the default password is password Note R...

Страница 34: ...ower off during the upgrade process The system will be non operational during the upgrade procedure below 1 In NetLinx Studio from the Tools menu select Firmware Transfers Send to NetLinx Device selec...

Страница 35: ...rmallywhendirectlyconnectingasourcetoadisplaydevice 4 Cable Plug in and out HDMI Cat X cable or try another HDMI Cat X cable Ensurethecable lengthbeingused is withinavailabletransmissionrangeaccording...

Страница 36: ......

Страница 37: ......

Страница 38: ......

Страница 39: ......

Страница 40: ......

Страница 41: ......

Страница 42: ......

Страница 43: ......

Страница 44: ......

Страница 45: ......

Страница 46: ......

Страница 47: ......

Страница 48: ......

Страница 49: ......

Страница 50: ......

Страница 51: ......

Страница 52: ......

Страница 53: ......

Страница 54: ......

Страница 55: ......

Страница 56: ......

Страница 57: ......

Страница 58: ......

Страница 59: ......

Страница 60: ......

Страница 61: ......

Страница 62: ......

Страница 63: ......

Страница 64: ...re deployed worldwide in conference rooms classrooms network operation command centers homes hotels entertainment venues and broadcast facilities among others AMX is part of the HARMAN Professional Gr...

Отзывы: