User Manual - CTC-1402
17
1.
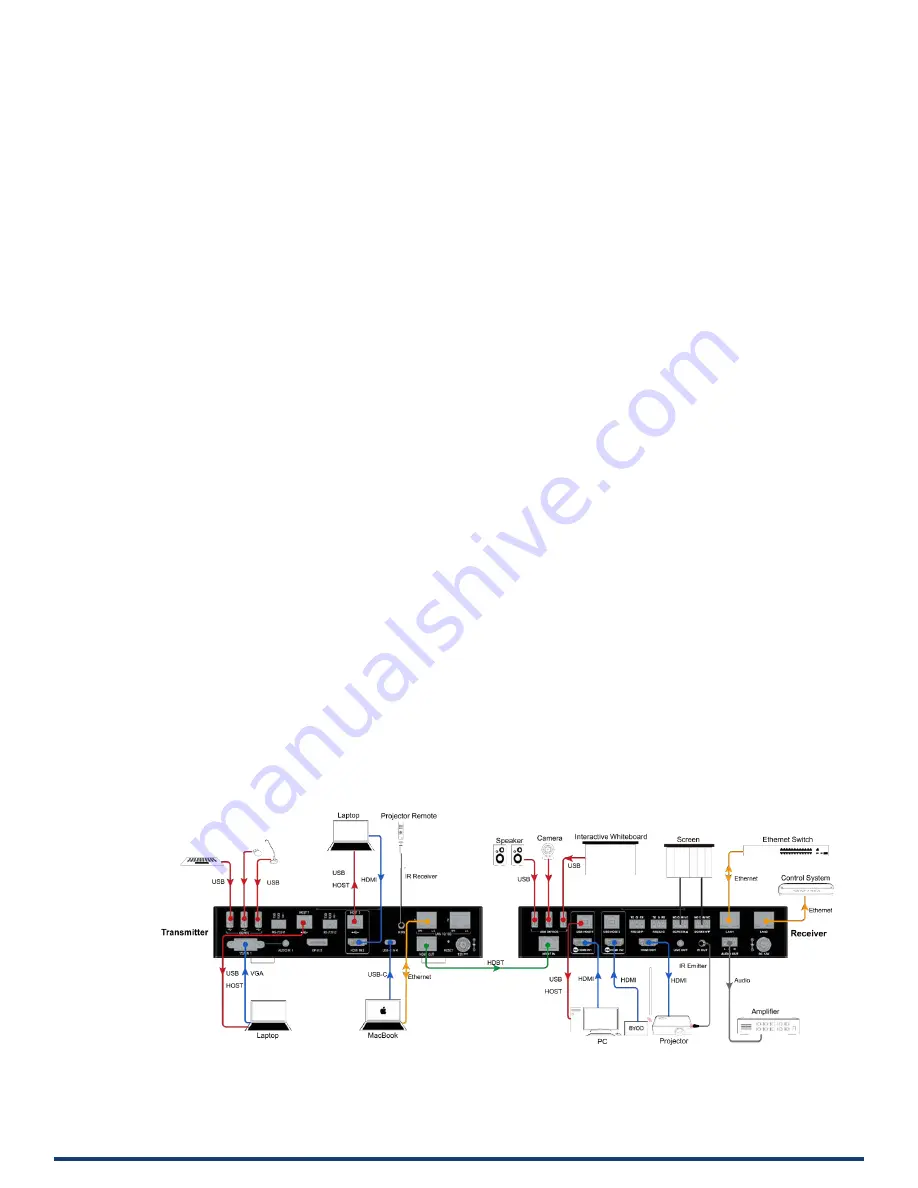
Connect input sources
Connect HDMI/VGA/DP/USB-C sources to HDMI IN/VGA IN/DP IN/USB-C IN ports of TX or RX.
Note:
The CTC-1402 allows users to connect BYOD wireless systems to HDMI IN as a source.
Note:
For USB-C Video sources the use of a USB 3.0 cable with minimum transfer data rate of 5 Gbps is required.
Connect the BYOD system HDMI display to the CTC-1402 HDMI IN port.
2.
Connect display
Securely connect display devices such as a TV to HDMI OUT ports of the RX, ensuring both source and display devices
are compatible and correctly configured to accept the signal.
3.
Connect TX and RX
Connect a good quality, well-terminated shielded Cat 6A/7 cable with an RJ45 connector wired to the 568B standard
at both ends from the HDBT OUT ports of TX to the HDBT IN ports of the RX.
Note:
For more information regarding cabling, refer to the Cable Specification section.
4.
Connect USB HOST devices.
Connect a PC to USB HOST ports with USB cables.
5.
Connect USB devices to the USB DEVICE ports of TX and RX.
Note:
For more information, refer to “USB Control” section. USB-C is automatically recognized when the USB-C input
is selected. The PC can be connected to other US.
6.
Connections additional control options:
1)
IR
Plug the IR emitter into the IR OUT port of RX and plug the IR broadband receiver into the IR IN port of TX. Users can
control the display, such as a projector, which is located at RX side with its remote.
2)
LAN Control (Telnet/Web UI)
Connect the LAN ports to an Ethernet device such as an Ethernet switch.
3)
RS232-P
Connect an RS232-enabled device to the RS232-P port of TX (or RX) and connect an RS232-enabled device to the
RS232-P port of RX (or TX) for RS232 pass through.
4)
RS232-C
Connect an RS232-enabled client device (e.g. projector) to the RS232-C port and connect the projector screen to
RELAY port (1-2). Send commands to RS232-C via NetLinx Studio.
7.
Connect power to the TX and RX. Power on all input sources and displays.
Note:
When power is restored, the CTC-1402 will automatically switch to the source selected before power was
restored.
After power up, the front panel LEDs will show the matrix model name indicating the matrix is ready for operation.
Содержание AMX CTC-1402
Страница 1: ......
Страница 2: ......
Страница 3: ......
Страница 6: ......
Страница 7: ......
Страница 8: ......
Страница 9: ......
Страница 10: ......
Страница 11: ......
Страница 12: ......
Страница 13: ......
Страница 19: ......
Страница 20: ......
Страница 36: ......
Страница 37: ......
Страница 38: ......
Страница 39: ......
Страница 40: ......
Страница 41: ......
Страница 42: ......
Страница 43: ......
Страница 44: ......
Страница 45: ......
Страница 46: ......
Страница 47: ......
Страница 48: ......
Страница 49: ......
Страница 50: ......
Страница 51: ......
Страница 52: ......
Страница 53: ......
Страница 54: ......
Страница 55: ......
Страница 56: ......
Страница 57: ......
Страница 58: ......
Страница 59: ......
Страница 60: ......
Страница 61: ......
Страница 62: ......
Страница 63: ......


