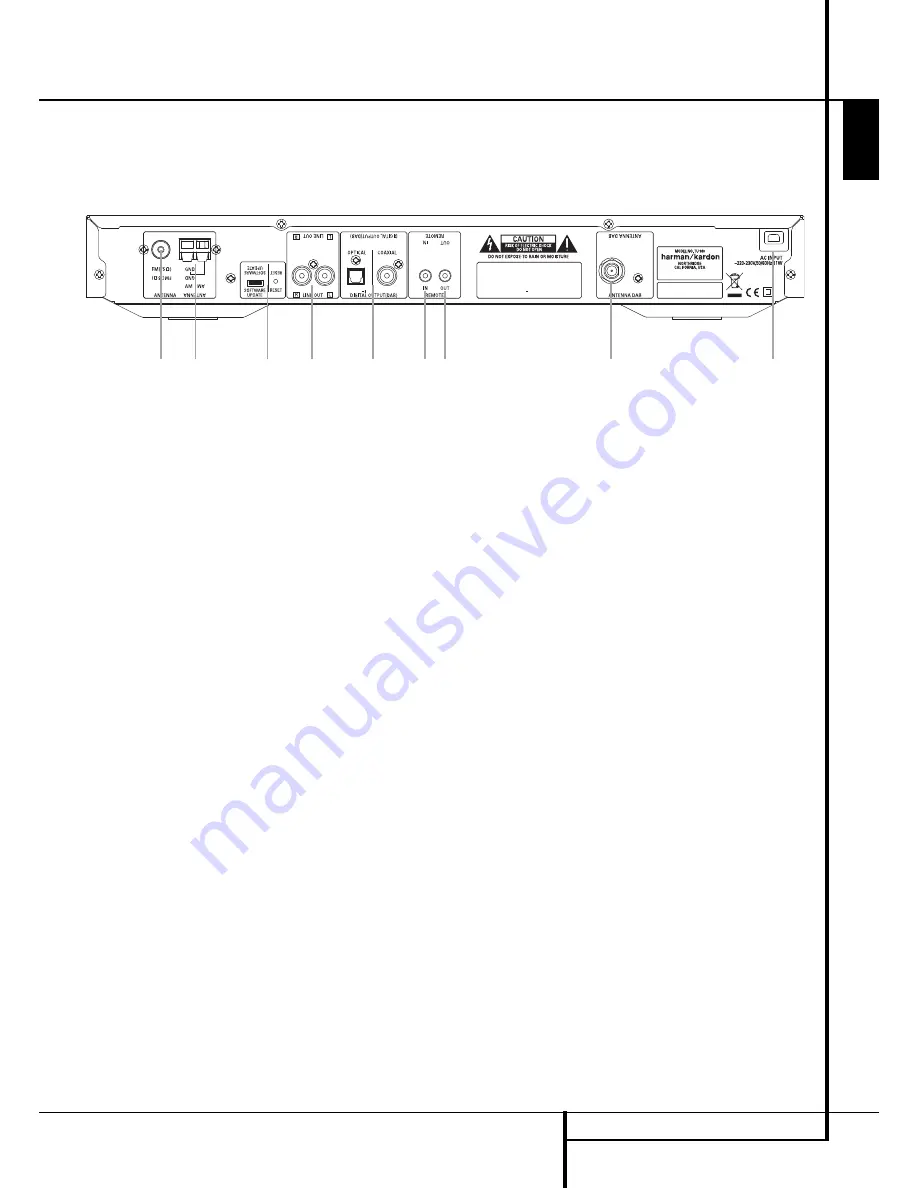
REAR PANEL CONNECTIONS
5
Rear Panel Connections
7 6
3
8
5
4
2
1
0
Optical and Coaxial Digital Outputs
FM Antenna
AM Antenna
Analog Audio Outputs
DAB Antenna
AC Power Cord
Remote Control Output
Remote Control Input
Software Update and Reset Button
Optical and Coaxial Digital Outputs:
Connect one of these jacks to the optical or
coaxial digital input of your pre amplifier or
integrated amplifier, if available.
Note that these digital outputs only contain the
digital signal from the DAB stations. For FM/AM
reception, you will have to connect the analog
outputs at all times.
FM Antenna:
Connect an indoor or exter-
nal FM antenna to this terminal.
AM Antenna:
Connect the AM loop
antenna supplied with the receiver to these
terminals. If an external AM antenna is used,
make connections to the
AM
and
GND
terminals in accordance with the instructions
supplied with the antenna.
Analog Audio Outputs:
Connect these
jacks to the tuner input of your pre amplifier or
integrated amplifier for analog audio playback.
Be certain to observe proper channel
connections using the color-coded cables and
connectors so that red connects right channels
and white connects left channels.
NOTE:
Before making any audio connections,
unplug all components of your audio system
from their AC power outlets. To reduce the
possibility of hum or noise in your system, place
all audio interconnection cables away from both
AC power cords and speaker wires.
DAB Antenna:
Connect a DAB antenna to
this terminal.
AC Power Cord:
Connect this plug to an
AC outlet. If the outlet is controlled by a switch,
make certain that it is in the ON position.
Remote Control Output:
Connect this
jack to the infrared (IR) input jack of another
compatible Harman Kardon remote controlled
product to have the built-in Remote Sensor on
the tuner provide IR signals to other compatible
products.
Remote Control Input:
Connect the
output of a remote infrared sensor, or the
remote control output of another compatible
Harman Kardon product, to this jack. This will
enable the remote control to operate even when
the front panel Remote Sensor on the tuner is
blocked. This jack may also be used with
compatible IR remote control-based automation
systems.
Software Update and Reset Button
(for Service Stations Only):
This specialized
connector may be used with your personal com-
puter in case Harman Kardon offers a software
upgrade for the tuner at some time in the
future. The Reset Button is only used during a
software upgrade. A standard processor reset is
performed by pressing and holding the front-
panel Function/FM Mode Button.
ENGLISH
harman/kardon
TU 980 Service Manual
Page 3 of 32
Содержание TU 980/230
Страница 11: ...harman kardon TU 980 Service Manual Page 11 of 32...
Страница 12: ...harman kardon TU 980 Service Manual Page 12 of 32...
Страница 13: ...harman kardon TU 980 Service Manual Page 13 of 32...
Страница 23: ...harman kardon TU 980 Service Manual Page 23 of 32...
Страница 25: ...harman kardon TU 980 Service Manual Page 25 of 32...
Страница 29: ...harman kardon TU 980 Service Manual Page 29 of 32...
Страница 32: ...TU 980_MP LOGIC_0116 sch 1 Mon Apr 07 16 05 01 2008 harman kardon TU 980 Service Manual Page 32 of 32...


