Owner’s Manual
Manuel d’utilisation
Bedienungsanleitung
Manual del usuario
取扱説明書
2019
Published 5/2019
Printed in Vietnam
Pitchclip 2+
CLIP-ON TUNER
保証規定(必ずお読みください)
本保証書は、保証期間中に本製品を保証するもので、付属品類(ヘッドホンなど)は保証の対象になりません。保証
期間内に本製品が故障した場合は、保証規定によって無償修理いたします。
1. 本保証書の有効期間はお買い上げ日より1か年です。
2. 次の修理等は保証期間内であっても有償修理となります。
◦消耗部品(電池など)の交換。 ◦お取扱い方法が不適当のために生じた故障。◦天災(火災、浸水等)によって
生じた故障。 ◦故障の原因が本製品以外の他の機器にある場合。 ◦不当な改造、調整、部品交換などにより生
じた故障または損傷。 ◦保証書にお買い上げ日、販売店名が未記入の場合、または字句が書き替えられている
場合。 ◦本保証書の提示がない場合。
尚、当社が修理した部分が再度故障した場合は、保証期間外であっても、修理した日より3か月以内に限り無償修
理いたします。
3. 本保証書は日本国内においてのみ有効です。
This warranty is valid only in Japan.
4. お客様が保証期間中に移転された場合でも、保証は引き続きお使いいただけます。詳しくは、お客様相談窓口ま
でお問い合わせください。
5. 修理、運送費用が製品の価格より高くなることもありますので、あらかじめお客様相談窓口へご相談ください。
発送にかかる費用は、お客様の負担とさせていただきます。
6. 修理中の代替品、商品の貸し出し等は、いかなる場合においても一切行っておりません。
本製品の故障、または使用上生じたお客様の直接、間接の損害につきましては、弊社は一切の責任を負いかねます
のでご了承ください。本保証書は、保証規定により無償修理をお約束するためのもので、これによりお客様の法律
上の権利を制限するものではありません。
---------------------------------------------------------------------------------------------------------
部件名称
有毒有害物质或元素
铅
(pb)
汞
(Hg)
镉
(Cd)
六价铬
(Cr(VI))
多溴联苯
(PBB)
多溴二苯醚
(PBDE)
电路板
×
○
○
○
○
○
壳体
○
○
○
○
○
○
○ : 表示该有毒有害物质或元素在该部件所有均质材料中的含量均在GB/T26572标准规定的限量要求以下。
× : 表示该有毒有害物质或元素至少在该部件的某一均质材料中的含量超出GB/T26572标准规定的限量要求。
English
Thank you for purchasing the Korg Pitchclip 2+ Clip-on Tuner.
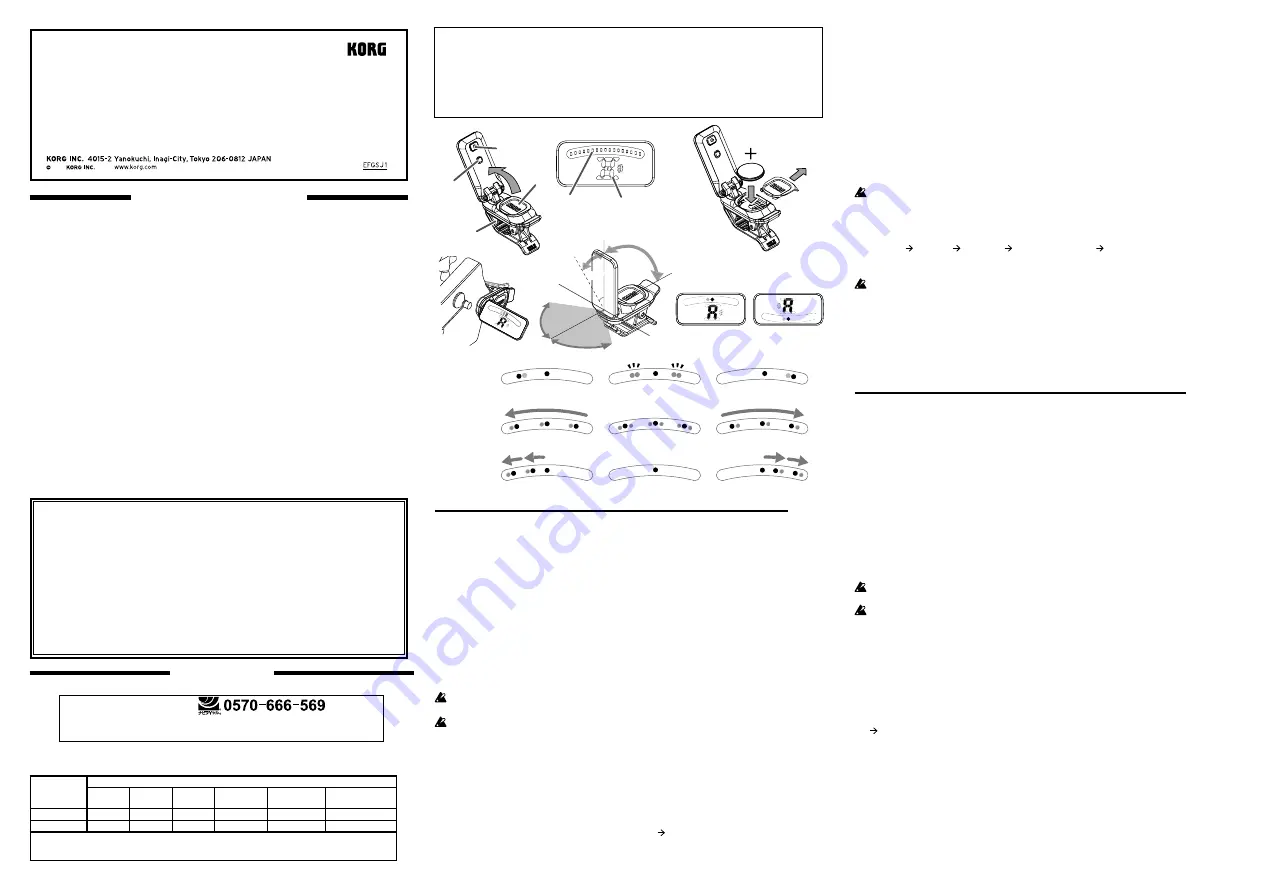
Parts of the Pitchclip 2+
(Fig.1)
a.
Power button
b.
DISPLAY/CALIB button
c.
Clip
d.
Battery cover
e.
Display
f.
LED meter
g.
Note name
Installing the battery
(Fig.2)
Open the battery cover by sliding it off. Place the battery in the compartment with the “+” side fac-
ing up, and then replace the battery cover. When the battery runs low, the note name indicator will
blink, and the LED meter will no longer operate smoothly. When this occurs, install a fresh battery as
soon as possible.
Attaching the Pitchclip 2+
(Fig.3)
Attach the Pitchclip 2+ to the headstock of your guitar or bass. Adjust the display to the angle that
provides the best visibility. For the range of movement, refer to
Fig.4
.
Pitchclip 2+ may be damaged if you apply excessive force within its range of motion, or attempt to
move it beyond its intended range of motion.
Do not leave the Pitchclip 2+ attached to your instrument for extended periods of time. Leaving the
Pitchclip 2+ attached for long periods of time may damage the finish of your instrument.
Tuning
(Fig.5)
1.
Press the power button to turn on the power. Holding down the power button for longer than one
second will vertically reverse the display
(Fig.5b)
.
2.
Play a single note on your guitar or bass. The display will indicate the note name that is closest to
the pitch that you played. Tune your instrument to the correct pitch so that the desired note
name appears on the display.
3.
Tune the instrument by playing a single note and checking the meter. The tuning indications dif-
fer depending on the selected meter display setting (
Meter display setting
).
4.
To turn off the power, press the power button. If approximately three minutes pass without the
Pitchclip 2+ detecting any sound, the power will turn off automatically (Auto power-off).
SUPPLIER’S DECLARATION OF CONFORMITY (for USA)
Responsible Party : KORG USA INC.
Address : 316 SOUTH SERVICE ROAD, MELVILLE, NY
Telephone : 1-631-390-6500
Equipment Type : CLIP-ON TUNER
Model : PC-2+
This device complies with Part 15 of FCC Rules. Operation is subject to the following two conditions:
(1) This device may not cause harmful interference, and (2) this device must accept any interference received, including
interference that may cause undesired operation.
■お願い
1. 保証書に販売年月日等の記入がない場合は無効となります。記入できないときは、お買い上げ年月日を証明でき
る領収書等と一緒に保管してください。
2. 保証書は再発行致しませんので、紛失しないように大切に保管してください。
コルグ
Pitchclip 2+
保証書
本保証書は、保証規定により無償修理をお約束するものです。
お買い上げ日
年 月 日
販売店名
アフターサービス
修理および商品のお取り扱いについてのご質問、ご相談は、お客様相談窓口へお問い合わせください。
お客様相談窓口
PHS等一部の電話ではご利用できません。固定電話または携帯電話からおかけください。
受付時間:月曜~金曜 10:00 ~ 17:00(祝祭日、窓口休業日を除く)
● サービス・センター:〒168-0073 東京都杉並区下高井戸1-18-16 2F
a
d
c
e
f
g
b
Fig.1
Fig.2
5a
5b
Fig.5
7a
7c
7b
8a
8c
8b
6a
6c
6b
Fig.3
90°
60°
60°
30°
Fig.4
Français
Merci d’avoir choisi l’accordeur à pince Pitchclip 2+ de Korg.
Parties du Pitchclip 2+
(Fig.1)
a.
Bouton
d’alimentation
b.
Bouton
DISPLAY/CALIB
c.
Pince
d.
Couvercle du
compartiment à pile
e.
Ecran
f.
Indicateur à diodes
g.
nom de la note
Installation de la pile
(Fig.2)
Ouvrez le couvercle du compartiment à pile en le faisant coulisser. Placez la pile dans le
compartiment en orientant sa face “+” vers le haut puis refermez le couvercle du comparti-
ment. Quand la pile faiblit, l’affichage de la note clignote et l’indicateur à diodes ne fonc-
tionne plus correctement. Remplacez alors la pile aussi vite que possible.
Attacher le Pitchclip 2+
(Fig.3)
Attachez le Pitchclip 2+ à la tête de votre guitare ou basse. Ajustez l’angle de l’écran pour
obtenir une lisibilité optimale. Voyez la
Fig.4
pour la plage de mouvement.
N’ouvrez pas le Pitchclip 2+ de plus de 120 degrés. N’exercez pas de force excessive car cela en-
dommagerait le produit.
Ne laissez pas le Pitchclip 2+ trop longtemps sur l’instrument. Si vous laissez le Pitchclip 2+ fixé
trop longtemps à l’instrument, la finition de ce dernier risque d’en souffrir.
Accord
(Fig.5)
1.
Appuyez sur le bouton d’alimentation pour mettre l’appareil sous tension. Maintenez le
bouton d’alimentation enfoncé durant plus d’une seconde pour inverser l’affichage verti-
calement
(Fig.5b)
.
2.
Jouez une note isolée sur la guitare ou la basse. L’écran affiche alors le nom de la note
dont la hauteur se rapproche le plus de celle de la note jouée.
3.
Accordez votre instrument en jouant une seule note et en vous aidant des indications de
l’affichage. Les indications sur l’affichage varient selon le mode d’affichage actif
(
Réglage du mode d’affichage
).
4.
Appuyez sur le bouton d’alimentation pour mettre l’appareil hors tension. Si après envi-
ron trois minutes, le Pitchclip 2+ n’a détecté aucun son, il se met automatiquement hors
tension (Mise hors tension automatique).
Réglage du mode d’affichage
(Fig.6, Fig.7, Fig.8)
Chaque pression du bouton DISPLAY/CALIB change de mode d’affichage. Quand vous cessez
d’appuyer sur le bouton pendant 2 secondes, le dernier réglage est sauvegardé. Les réglages
sont conservés même quand le Pitchclip 2+ est mis hors tension.
1.
Affichage traditionnel:
L’instrument est accordé quand la diode centrale est allumée. Les diodes
gauche et droite clignotent deux fois quand la hauteur de la note est correcte
(Fig.6b)
. L’éclai-
rage des diodes passe du centre vers la gauche si la note est trop basse
(Fig.6a)
ou du centre vers
la droite si la note est trop haute
(Fig.6c)
.
Meter display setting
(Fig.6, Fig.7, Fig.8)
Each time you press the DISPLAY/CALIB button, the meter display changes. If the button is not pressed
for two seconds, the new setting is saved. Settings are remembered even when the power is off.
1.
Regular meter: Tune your instrument so that the center LED of the meter display is lit up. The
left and right LED blink twice when in tune
(Fig.
6b).
The LED illumination will move from the
center toward the left if the note is flat
(Fig.6a)
, or from the center toward the right if the
note is sharp
(Fig.6c)
.
2.
Strobe meter: Tune your instrument so that the illumination stops flowing in the meter dis-
play
(Fig.7b)
. Since the strobe meter has higher precision, it allows you to tune with greater
accuracy. The illumination will flow from right to left if the note is flat
(Fig.7a)
, or from left to
right if the note is sharp
(Fig.7c)
.
3.
Half-strobe meter: Tune your instrument so that the stream stops and only the center LED is
lit up
(Fig.8b)
. The left side of the meter display will strobe if the note is flat
(Fig.8a)
, and the
right side of the meter display will strobe if the note is sharp
(Fig.8c)
.
Settings will be initialized when you replace the battery (Default=1: Regular meter).
Changing the reference pitch
(calibration)
Hold down the DISPLAY/CALIB button to enter calibration mode. Each time you press the DIS-
PLAY/CALIB button, the reference pitch changes in 1 Hz increments.
0 (440Hz) 1 (441Hz)
...
5 (445Hz) 6 (436Hz) ...9 (439Hz) 0 (440Hz)...
If the button is not pressed for two seconds, the new setting is saved, and the Pitchclip 2+ re-
turns to tuner mode. Settings are remembered even when the Pitchclip 2+ is turned off.
Settings will be initialized when you replace the battery. (Default= 0: 440Hz)
Specifications
Scale:
12-note equal temperament
Detection range (sine wave):
A0 (27.50Hz)–C8 (4186.0Hz)
Precision:
+/-0.1 cent
Reference pitch:
A4=436–445 Hz (1 Hz steps)
Power supply:
coin-type lithium battery (CR2032)
x 1
Battery life:
approximately 18 hours (continuous A4 input)
Dimensions(W x D x H):
51 x 24 x 38 mm /
2.01 x 0.94 x 1.50 inches
Weight:
19g / 0.67oz. (including battery)
Included items:
Owner’s manual, coin-
type lithium battery (CR2032) x 1
* Specifications and appearance are subject to change without notice
for improvement.
Fig.6
Fig.7
Fig.8


