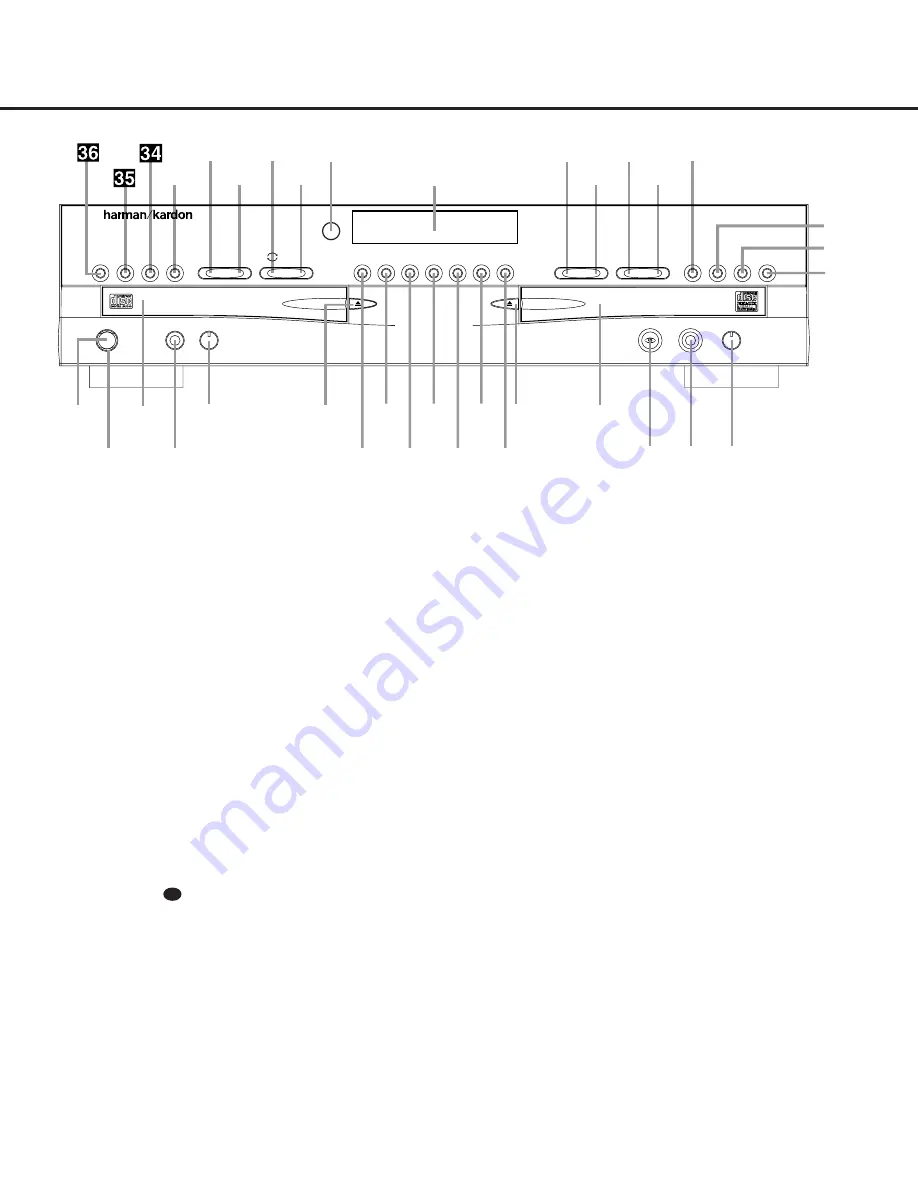
FRONT-PANEL CONTROLS
1
Power Switch:
Press this switch to apply power
to the CDR 26. When the unit is first turned on, the
Status Mode Indicator
2
surrounding the switch
will turn green. Once the unit has been turned on with
this switch, it may be operated from either the front
panel or remote control. Press the switch again to turn
the unit completely off.
2
Status Mode Indicator:
When the CDR 26 is in
the ON mode, this indicator will glow green. When the
unit has been placed in the Standby mode by pressing
the
Power-Off Button
on the remote, the indi-
cator will glow amber, indicating that the unit is still
connected to the AC main supply and is ready to be
turned on from the remote control.
3
Play Deck:
This disc deck is used to play back
conventional CD discs and CD-R or CD-RW discs that
have been finalized.
4
Headphone Jack:
Connect standard headphones
to this jack for private listening.
5
Headphone Level Control:
Turn this control to
adjust the volume level to the headphones. Note that
the use of this control will not change the analog out-
put levels at the rear-panel audio output
¡
.
6
Play-Deck Open:
Press this button to open the
Play Deck
3
.
7
Record Button:
Press this button to begin the
recording process. See pages 19–22 for more infor-
mation on CD recording.
8
Synchronous Recording (CD Sync) Button:
Press this button once to begin an automated record-
ing of a single track from an external CD player when
a digital connection is used. Press it twice to begin
automated recording of an entire disc. See page 20
for more information on CD Sync recording.
9
Dubbing:
Press this button to begin the process
of making a complete copy of the disc in the
Play
Deck
3
to a CD-R or CD-RW disc in the
Record
Deck
%
. See page 19 for more information on
dubbing.
)
Speed:
Press this button to select the recording
speed for internal dubs. See page 19 for more infor-
mation on selecting the proper speed.
!
Track Increment:
Press this button during
recording to insert a new track marker at that point
in the recording. The current track number will be
incremented by one.
@
Erase:
Press this button to erase one or more
tracks or the entire contents of an unfinalized CD-RW
disc. When a CD-RW disc has already been finalized
you may erase the entire disc or you may “unfinalize”
the disc by erasing the
TOC
data. See page 21 for
more information on erasing CD-RW discs.
#
Finalize:
Press this button when a recording
is complete to initiate the finalization process. The
Play/Select Button
Ój
must be pressed within
three seconds to activate finalization. Until this button
is pressed and the finalization process is complete,
CD-R discs may not be played on conventional CD
machines. See page 21 for more information on
finalization.
30
1
Power Switch
2
Status Mode Indicator
3
Play Deck
4
Headphone Jack
5
Headphone Level Control
6
Play-Deck Open
7
Record Button
8
Synchronous Recording (CD Sync) Button
9
Dubbing
)
Speed
!
Track Increment
@
Erase
#
Finalize
$
Record-Deck Open
%
Record Deck
^
Optical Digital Input
&
Coaxial Digital Input
*
Analog-Record Level Control
(
Record-Deck Stop
Ó
Record-Deck Play/Select
Ô
Record-Deck Pause
Record-Deck Program Button
Ò
Record-Deck Next
Ú
Record-Deck Previous
Û
Input Select
Ù
Record-Deck Time Display Select
ı
Information Display
ˆ
Remote Sensor
˜
Play-Deck Time Display Select
¯
Continuous Play
˘
Play-Deck Next
¸
Play-Deck Previous
˝
Play-Deck Program Button
Play-Deck Pause
Play-Deck Play
Play-Deck Stop
STOP
CDR 26
PLAY
PAUSE
PROGRAM
Í‹‹
››Í
Í‹‹
››Í
TIME
Record
Power
Phones
Phones Level
Optical In
Sync Rec.
Dubbing
Track Inc.
Speed
Erase
Finalize
TIME
INPUT
PROGRAM
2
1
3
5
6
7
8
9
)
!
#
@ $
%
*
&
^
4
Ó
Ú
Û
Ù
ı
ˆ
˜
¯
¸
˝
˘
Ô
Ò
(
PAUSE
PLAY/SELECT
STOP
Coaxial In
Analog Rec. Level
FRONT-PANEL CONTROLS
5
Содержание CDR 26
Страница 28: ...28 IC403 IC403 2 8 IC402 ...
Страница 47: ......
Страница 51: ...6 436 079 441 076 441 071 080 2 072 436 072A 072A A08 ...
Страница 71: ...71 UIT BOARD DIAGRAMS TOP SIDE LOCATION GUIDE ...
Страница 72: ...72 IN P C BOARD BOTTOM SIDE LOCATION GUIDE ...
Страница 73: ...TOP SIDE ARD LOCATION GUIDE 4 I O P C BOARD BOTTOM SIDE 73 ...
Страница 74: ...74 GRAM UIT DIAGRAM ...
Страница 75: ...75 RAM ...
Страница 76: ...76 ...
Страница 77: ...77 GRAM ...
Страница 78: ...78 M ...
Страница 79: ...79 ...
Страница 80: ...80 ...


