background image

5

BDS

English

Connections and Receiver Setup 

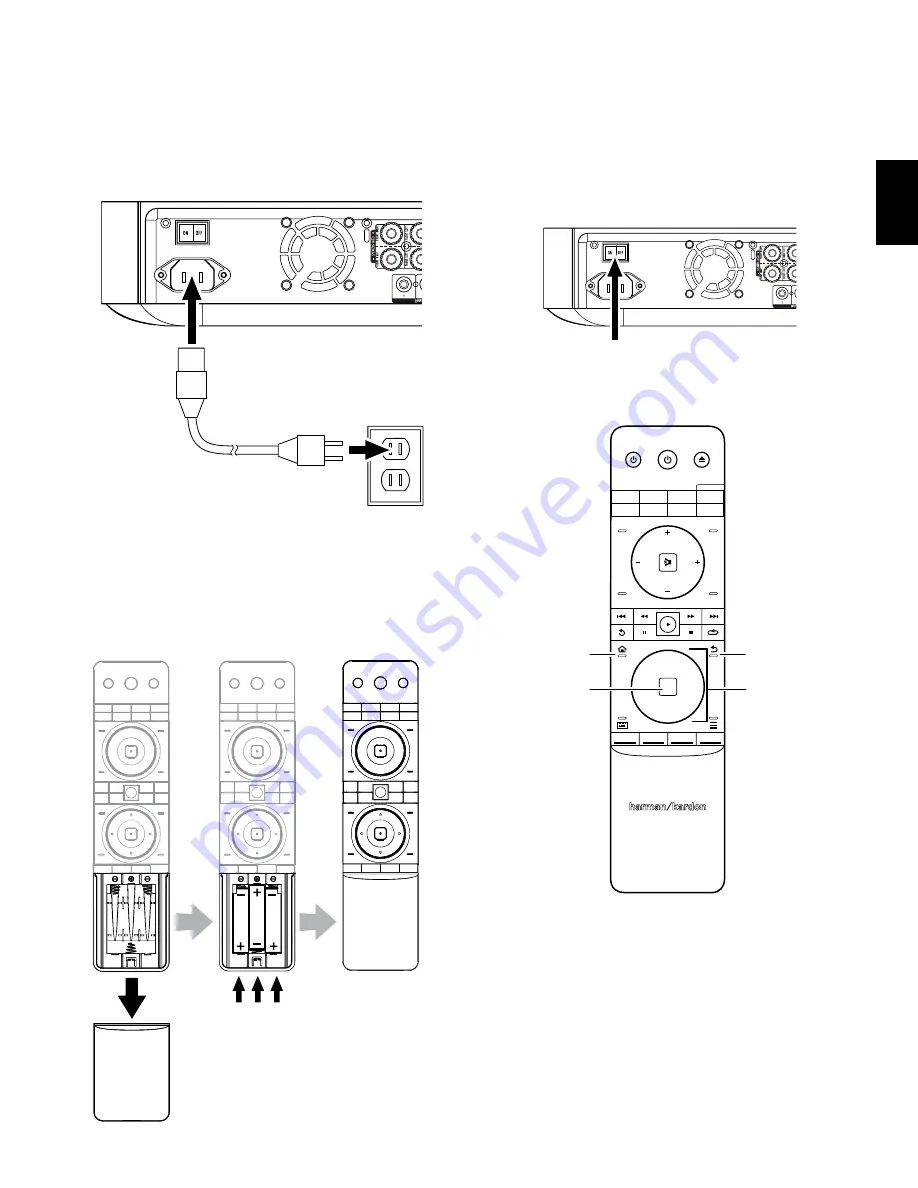
Connect the AC Power

110V – 240V, 

50Hz/60Hz

Receiver

Set Up the Receiver

Install the Batteries in the Remote Control

1.

2.

3.

Turn On the Receiver

Set the receiver’s Main Power switch in the “On” position.

Receiver

Main Power 

Switch

To set up your BDS receiver you will use the remote to navigate through the on-screen 

menus and to make selections from them.

OK

PROGRAM

BOOKMARK

THUMBNAIL

ZOOM

TOP MENU

SURROUND

VOL

VOL

POP-UP

DISPLAY

POWER

TV

DISC

HDMI 1

HDMI 2

HDMI 3

COMP

USB

AUX

RADIO

EJECT

APPLE

CH

CH

Home  

Button

OK  

Button

Cursor  

Controls

Back 

Button

•  Use the Cursor Up/Down buttons to navigate through the menu list. When an item is 

highlighted, a blue border will appear around it.

•  To select a highlighted item, press the OK button. The screen will change depending 

on your selection. 

•  To return to the previous screen, press the Back button.

Содержание BDS 277

Страница 1: ...Quick Start Guide Audio video receiver BDS 275 BDS 277 BDS 575 BDS 577 FPO BDS X75 ...

Страница 2: ... play Blu ray Discs that contain region code A and DVD discs that contain region code 1 Connections Connect the Satellite Speakers CAUTION Before making any connections to the BDS receiver ensure that the receiver s AC cord is unplugged from the receiver and the AC outlet Making speaker connections with the receiver plugged in and turned on could damage your speakers Speakers and receivers have co...

Страница 3: ...If your TV supports the HDMI Audio Return Channel and you have HDMI devices such as an Internet connection already connected directly to your TV you can feed their sound to the BDS receiver via the HDMI Monitor Out connector s Audio Return Channel and they will not require additional connections to the receiver Connect to Your Home Network To Internet Network Modem Cat 5 5E Connecting Your HDMI So...

Страница 4: ...l Digital Audio Source Devices Optical Digital Equipped Source Device Remove Caps To Optical Digital Audio Output Optical Digital Audio Cable not supplied Connecting Your Coaxial Digital Audio Source Device Coaxial Digital Equipped Source Device To Coaxial Digital Audio Output Coaxial Digital Audio Cable not supplied Connecting Your Analog Audio Source Devices To Stereo Analog Audio Output Stereo ...

Страница 5: ...ugh the on screen menus and to make selections from them OK PROGRAM BOOKMARK THUMBNAIL ZOOM TOP MENU SURROUND VOL VOL POP UP DISPLAY POWER TV DISC HDMI 1 HDMI 2 HDMI 3 COMP USB AUX RADIO EJECT APPLE CH CH Home Button OK Button Cursor Controls Back Button Use the Cursor Up Down buttons to navigate through the menu list When an item is highlighted a blue border will appear around it To select a high...

Страница 6: ... receiver will select the optimal resolution for you Setup Wizard Please select the best aspect ratio that fits your TV Please see the owner s manual for additional explanation 16 9 Full 16 9 Normal 4 3 Pan Scan 4 3 Letterbox Page 4 5 Next Previous OK After selecting the aspect ratio that best fits your TV press the OK button to save your settings and then press it again to exit the Setup Wizard C...

Страница 7: ...the Testing message on the screen will change to Test failed please make sure the speaker is connected correctly and room is silent then retest Press the Back button make sure all speakers are correctly connected and perform the test again from Step 6 Make sure that the room remains silent during the test Using the BDS Receiver Press the remote s Home button to display the Home Menu screen Home Me...

Страница 8: ......

Отзывы: