


AVR 700/AVR 70/AVR 70C
15
Set Up the AVR, continued
consult the technical specifications for your system’s main left and right speakers and
locate the frequency response, usually given as a range, e.g., 80hz – 20khz (±3db).
note the lowest frequency that the speakers are capable of playing (80hz in the above
example). note: this frequency is not the same as the crossover frequency that may
also be listed in the specifications.
use the remote’s left and right arrow buttons to select the crossover frequency that
most closely matches the low frequency specification that you noted above. the AVr
will divide the source signal at this crossover point, will send all information above the
crossover point to your system’s speakers, and all information below the crossover point
to the subwoofer. this way, each loudspeaker in your system will perform at its best,
delivering a more powerful and enjoyable sound experience. record the setting in table
A2 of the Appendix, on page 21.
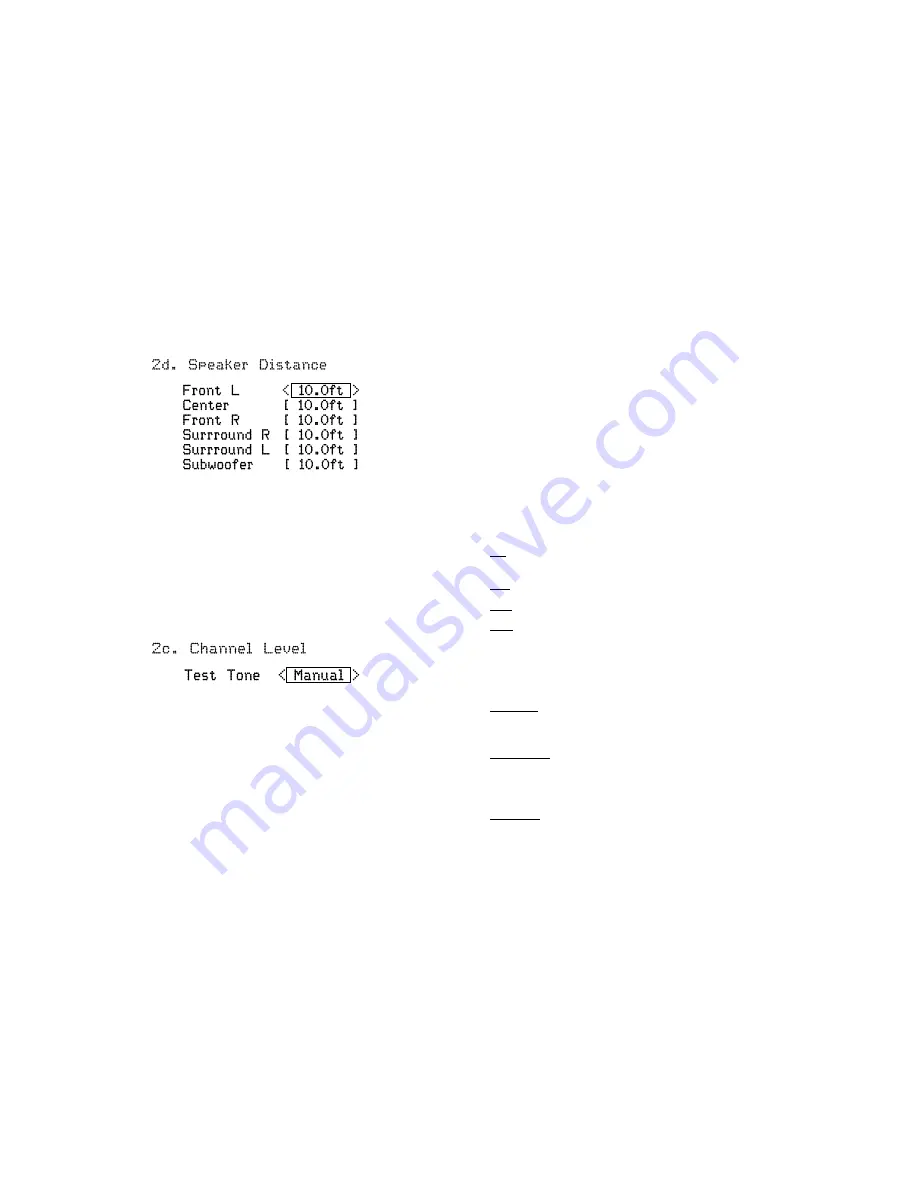
7. press the bAck button and select “Speaker distance.” the Speaker distance menu
will appear.
8. measure the distance from each speaker in your system to the listening position.
record the distances in table A3 of the Appendix, on page 21.
9. use the remote’s left and right arrow buttons to change the distance setting for each
speaker so it matches the distance you wrote down in step 8. when you’re finished,
press the remote control’s bAck button to return to the Speaker Setting menu.
10. Select “channel level.” the channel level menu will appear. use the remote’s left
and right arrow buttons to set test tone to “manual” and press the remote’s ok
button. After the on-screen countdown you will hear test noise through the front left
speaker.
11. Sit in the main listening position and adjust the AVr’s volume control so the test noise
is moderately loud. note the volume of the test noise through the first speaker. press
the remote’s down arrow button to advance the test noise to each of your system’s
speakers and note the volume level of the noise in each speaker.
12. As you advance the test noise through the speakers, use the remote’s left and right
arrow buttons to adjust the volumes of the channels until all of them play at the
same volume.
Notes on Setting Speaker Volumes in Home Theater Systems:
while setting your system’s individual speaker volume levels is ultimately up to your
personal taste, here are some ideas you may find helpful:
• For films and video-music programs, your overall goal should be to create an
enveloping, realistic sound field that draws you into the film or music program
without drawing your attention away from the action on the screen.
• For multichannel music recordings, some music producers will create a sound field
that places the musicians all around you; others will create a sound field that places
the musicians in front of you, with more subtle ambience in the surround speakers
(as you would experience in a concert hall).
• In most 5.1-channel film soundtracks, the surround speakers are not intended to be
as loud or as active as the front speakers. Adjusting the surround speakers so they
are always as loud as the front speakers could make dialogue difficult to understand
and will make some sound effects sound unrealistically loud.
Notes on Setting Subwoofer Volume:
• Sometimes the ideal subwoofer volume setting for music is too loud for films, while
the ideal setting for films is too quiet for music. when setting the subwoofer volume,
listen to both music and films with strong bass content and find a “middle ground”
volume level that works for both.
• If your subwoofer always seems too loud or too quiet, you may want to place it in
a different location. placing the subwoofer in a corner will always tend to increase
its bass output, while placing it away from any walls or corners will always tend to
lessen its bass output.
13. when you’re finished, record the settings in table A3 of the Appendix, on page 21,
then press the remote’s Setup button to turn off the on-screen menus.
Additional Setup Menu Items
you can also adjust the following settings:
HDMI Set:
Selecting Arc/cec on will send audio from the tV to the AVr via the hdmI
Audio return channel (Arc) connection (which is in the hdmI cable connecting the AVr
to the tV). this way, whenever you’re watching a source that is connected directly to
your tV (such as an Internet connection), you can listen to the sound through the AVr by
selecting tV as the AVr source device. Selecting on also allows the communication of
control information among the hdmI devices in your system (cec).
Audio Settings:
Selecting Audio Settings allows you to adjust the following audio
settings:
• Night Mode works with specially encoded Dolby
®
digital discs or broadcasts,
compressing the audio so that louder passages are reduced in volume to avoid
disturbing others, while dialogue remains intelligible. press the left/right arrow
buttons to advance through the following drc (dynamic range control) settings:
off: no compression is applied. loud passages in the program remain as they were
recorded.
mid: loud passages in the program are reduced moderately in volume.
max: loud passages in the program are reduced more in volume.
Auto: Automatically compresses the audio a specific amount in response to
instructions encoded in the dolby digital program.
• PLII Music: Additional adjustments are avalable that allow you to fine-tune the Dolby
pro logic II music surround mode’s performance for your listening room and personal
taste:
panorama: with the panorama mode turned on, some of the sound from the front
speakers is moved to the surround speakers, creating an enveloping “wraparound”
effect. each press of the left or right arrow buttons toggles the setting on or off.
center width:
this setting affects how vocals sound through the three front speakers.
A lower number focuses the vocal information tightly on the center channel. higher
numbers (up to 7) broaden the vocal soundstage. use the left/right arrow buttons to
adjust this setting.
dimension:
this setting affects the depth of the surround presentation, allowing you
to “move” the sound toward the front or rear of the room. the setting of “0” is a
neutral default. “+” settings move the sound toward the front of the room, while “–”
settings move the sound toward the rear. use the left/right arrow buttons to adjust it.
See
Audio Processing and Surround Sound,
on page 17, for more information about
dolby pro logic II.
Auto Power Control:
this setting allows you to set the AVr to automatically enter the
Standby mode after a period of inactivity, saving energy. the available settings are off
(default), 2 hours, 4 hours and 6 hours.
Speaker On/Off:
use this setting to turn the speakers off when you are listening through
headphones.


