background image

AVR 700/AVR 70/AVR 70C

14

Set Up the AVR

Set Up the AVR

Turn On the AVR

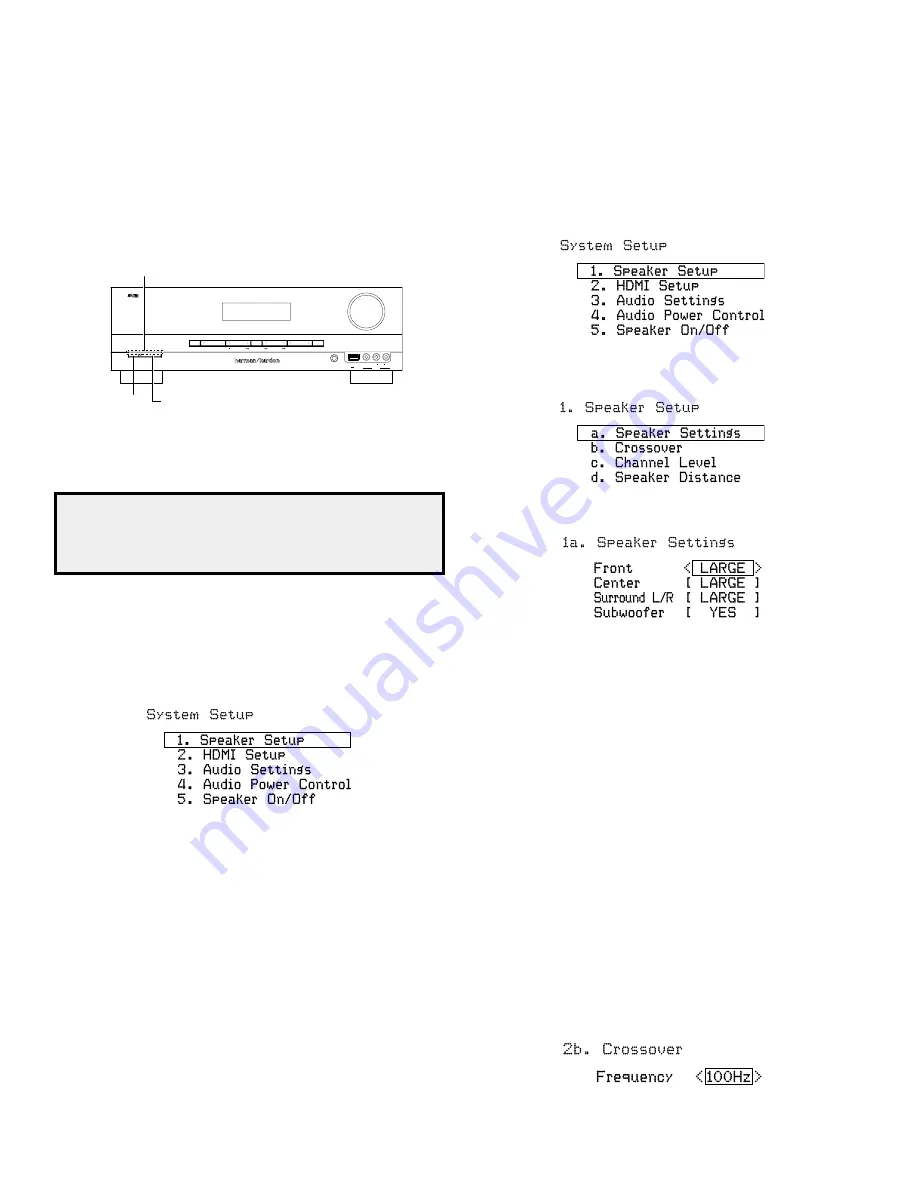
1.  Set the front-panel main power switch to “on.” (the front-panel Standby indicator 

will glow amber.)

2.  press the front-panel on/Standby switch.

Phones

USB

Video 3

Video

R

L Audio

Stereo

Power

Surr.Select

Tuning

AM/FM

Preset

Source

Memory

Folder

5V        500A    

on/Standby 

button

main power 

Switch

Standby 

Indicator

unless you will not be using the AVr for an extended period of time, leave the main power 

switch set to “on.” when the main power switch is turned off, any settings you have 

programmed will be preserved for up to two weeks.

IMPORTANT NOTE: If the PROTECT message ever appears in the Message 

display, turn off the AVR and unplug it. Check all speaker wires for a short 

circuit (“+” and “–” wires touching). If none is found, bring the unit to an 

authorized Harman Kardon service center for inspection and repair before 

using it again.

Using the On-Screen Menu System

Although it’s possible to configure the AVr using only the remote and the front-panel 

message display, it is easier to use the on-screen menu system.
to access the menu system, turn on your tV and select the tV’s composite video input 

where you connected the AVr in 

Connect Your TV or Video Display,

 on page 11.

press the remote control’s Setup button. the AVr’s on-screen display (oSd) System 

Setup menu will appear on the tV.

the System Setup menu consists of five submenus: Speaker Set, hdmI Set, parameter, 

Auto power control and Speaker on/off.
use the up/down/left/right buttons on the remote to navigate the menu system, and 

press the ok button to select a menu or setting line, or to enter a new setting.
the current menu, setting line or setting will appear in the front-panel message display, 

as well as on screen.
to return to the previous menu, press the remote’s bAck button. to exit the menu 

system, press the Setup button.
follow the instructions in this 

Set Up the AVR

 section to configure your home theater 

system. you may return to these menus at any time to make additional adjustments.
before you begin initial setup, all loudspeakers, a video display and all source devices 

should be connected to the AVr. you should be able to turn on the AVr and view the 

System Setup menu when you press the Setup button. If necessary, reread the 

Making 

Connections

 section and the beginning of this section before continuing.

Configure the AVR for Your Speakers

1.  turn on your tV and select the tV’s composite video input where you connected the 

AVr in 

Connect Your TV or Video Display,

 on page 11.

2.  press the remote control’s Setup button. the AVr’s on-screen display (oSd) System 

Setup menu will appear on the tV.

3.  use the remote’s arrow and ok buttons to select “Speaker Setup.” the 

Speaker Setup 

menu will appear.

4.  Select “Speaker Settings.” the Speaker Settings menu will appear.

5.  use the remote’s left and right arrow buttons to select off, SmAll or lArge for the 

front, center and Surround speaker positions, depending on the speakers you have 

connected to the receiver. 

off: Select this setting if you have not connected a speaker in that position (not available 

for the front speakers).
SmAll: Select this setting if the speaker is not capable of producing clean, deep bass 

energy at output levels that match those produced by a powered subwoofer. All bass 

below the crossover frequency (see Step 6, below) in that channel is removed from that 

speaker and is sent to the subwoofer (or to the front speakers if Subwoofer is set to no). 

most speakers (unless they are large and powerful) should be considered SmAll.
lArge: Select this setting if the speaker is capable of producing clean, deep bass energy 

at output levels that match those produced by a powered subwoofer. All bass in that 

channel is sent to that speaker. 
note: If your system has a subwoofer and you set the front speakers to lArge, the 

subwoofer may not output audio except for dolby digital- and dtS-encoded program 

material that contains lfe channel information. If you set your front speakers to lArge 

and you want your subwoofer to reproduce bass from all program material, set the 

Subwoofer to pluS (see below).
for Subwoofer, select yeS (if your system has a subwoofer), no (if your system does not 

have a subwoofer), or pluS (if your system has a subwoofer, you set your front speakers 

to lArge and you want your subwoofer to reproduce bass from all program material). 
when you’re finished, record your settings in table A2 of the Appendix, on page 21, then 

press the remote control’s bAck button to return to the Speaker Setting menu.
6.  (note: If your system does not have a subwoofer, skip to step 7.) press the bAck button 

and select “crossover.”  the crossover menu will appear 

Содержание AVR 700

Страница 1: ...Audio video receiver AVR 700 AVR 70 AVR 70C Owner s Manual...

Страница 2: ...our Speakers 11 Connect Your Subwoofer 11 Connect Your TV or Video Display 11 Connect Your Source Devices 11 Connect the Radio Antennas 13 Connect to AC Power 13 INSTALL BATTERIES IN the Remote Contro...

Страница 3: ...heavy objects on them Damaged power cords should be replaced immediately by an authorized service center with a cord meeting factory specifications Handle the AC Power Cord Gently When disconnecting...

Страница 4: ...le short circuit the and conductors touching each other or both touching the same piece of metal If a short circuit is not found bring the unit to an authorized Harman Kardon service center for inspec...

Страница 5: ...make any additional audio connections for devices you connect via HDMI connections See Connect Your Source Devices on page 11 for more information Notes on using the HDMI Out connector When connectin...

Страница 6: ...u Button OK Button Channel Level Button Number Buttons Memory Button Repeat Random Button Transport Control Buttons Display Dim Button Preset Station Up Down Buttons Left Right Up Down Buttons AVR But...

Страница 7: ...owing the currently active source Test Tone sequence button Press this button to activate the test tone for calibrating channel volume levels by ear Audio Input Select button Press this button to sele...

Страница 8: ...lby Pro Logic DTS DTS HD High Resolution Audio DTS HD Master Audio DTS DTS 96 24 DTS Neo 6 HARMAN International Analog Surround Modes Theater Hall Stadium Club Arena Stereo Modes 2 channel stereo and...

Страница 9: ...red so that only the low frequencies pass through it Don t connect this output to any device other than a subwoofer Source Device Connections Audio and video signals originate in source devices compon...

Страница 10: ...each device Digital Video Connections If you have already connected a source device to one of the AVR s HDMI input connectors you have automatically made a video connection for that device since the H...

Страница 11: ...the AVR s OSD menus you need to connect its Composite Monitor Out connector to your TV even if you are not connecting any composite video source devices to the AVR Composite Video Cable not supplied T...

Страница 12: ...Composite Video Cable not supplied To Composite Video Output Composite Video Equipped Source Device Optical digital audio devices If your source devices have optical digital outputs connect them to th...

Страница 13: ...ectors AVR Composite Video Connectors Connect the Radio Antennas Connect the supplied FM antenna to the AVR s FM 75 Radio Antenna connector For the best reception extend the FM antenna as far as possi...

Страница 14: ...ss the SETUP button If necessary reread the Making Connections section and the beginning of this section before continuing Configure the AVR for Your Speakers 1 Turn on your TV and select the TV s com...

Страница 15: ...Setting Subwoofer Volume Sometimes the ideal subwoofer volume setting for music is too loud for films while the ideal setting for films is too quiet for music When setting the subwoofer volume listen...

Страница 16: ...components involved the complexity of the required communication between HDMI components may cause delays of up to a minute in the completion of some actions such as input switching or switching betw...

Страница 17: ...Dolby TrueHD 7 1 DTS HD High Resolution Audio 7 1 DTS HD Master Audio 7 1 DTS 5 1 DTS 96 24 5 1 2 channel PCM modes in 44 1kHz 48kHz 88 1kHz 96kHz or 176 4kHz and 5 1 or 7 1 multichannel PCM Your AVR...

Страница 18: ...turn the AVR on If this procedure doesn t help reset the AVR s processor as described below NOTE Resetting the processor will erase all user configurations including speaker and level settings and tu...

Страница 19: ...ntact your local Harman Kardon service center No sound from center or surround speakers Incorrect surround mode Program material is monophonic Incorrect speaker configuration Program material is stere...

Страница 20: ...1 3 V 13 2dBf Signal to noise ratio mono stereo 65dB 62dB Distortion mono stereo 0 2 0 3 Stereo separation 35dB 1kHz Image rejection 80dB IF rejection 80dB AM Tuner Section Frequency range 520 1720kHz...

Страница 21: ...3 Input Portable audio device camcorder game console Video 3 Video 3 Analog Audio Input on front panel Video 3 Coaxial Video Iinput on front panel CD player Aux Aux Analog Inputs Any one available co...

Страница 22: ...nel Tuner PCM 32kHz 44 1kHz 48kHz 96kHz MP3 WMA Dolby Pro Logic II Music Variant of Dolby Pro Logic II that is optimized for music selections Allows adjustment of sound field presentation in three dim...

Страница 23: ...48kHz 96kHz MP3 WMA Stadium Creates an expansive soundfield as heard in stadiums Good for watching sporting events like baseball or soccer Analog two channel AM FM radio PCM 32kHz 44 1kHz 48kHz 96kHz...

Страница 24: ...AVR 700 AVR 70 AVR 70C 24 Appendix Refer to the numbered buttons when using the Remote Control Function List...

Страница 25: ...play Mode Select Display Mode Select 22 TEST Test Tone On Off Pop Up Menu 23 VOL Volume Down Volume Down 24 DIGITAL Input Type Select Options Menu 25 SETUP Setup Menu On Off Settings BD Setup DVD 26 U...

Страница 26: ...the double D symbol and Pro Logic are registered trademarks of Dolby Laboratories MLP Lossless is a trademark of Dolby Laboratories Manufactured under license under U S Patent Nos 5 956 674 5 974 380...

Отзывы: