background image

7

ENGLISH

ADVANCED FuNCTIONS

The setting for the surround back speakers includes a third option: Zone 
2. The AVR 760/AVR 660 is capable of multizone operation, supporting 
placement of a pair of speakers in another room. The AVR 760/AVR 660’s 
assignable surround back amplifier channels make multizone operation 
easier than ever, since an external power amplifier is not required. Select the 
Zone 2 option at this line, and connect the Surround Back Speaker Outputs to 
loudspeakers located in the remote room. The main room will be configured 
automatically for up to 5.1 channels. See the Multizone Operation section for 
more information.

NOTE

: When the Surround Back speakers are set to “Zone 2”, they will not 

be configured during the EzSet/EQ II process. To use the speakers in the 
main listening area, configure them as “On”, and run the EzSet/EQ II process 
for a 7.1- or 7.2-channel system. If the speakers will only be used during 
multizone operation, configure them manually, as explained below.

The settings in this menu affect the remainder of the speaker setup process 
and the availability of various surround modes at any time.

When you have finished, select the Back option or use the Back/Exit Button. 

Adjust Crossover Frequencies Menu

After you have programmed the number of speakers, the AVR will return 
to the Speaker Setup Position menu (see Figure 28). Navigate to the 
Crossover (Size) line and press the OK Button to display the Adjust Crossover 
Frequencies menu (see Figure 30).

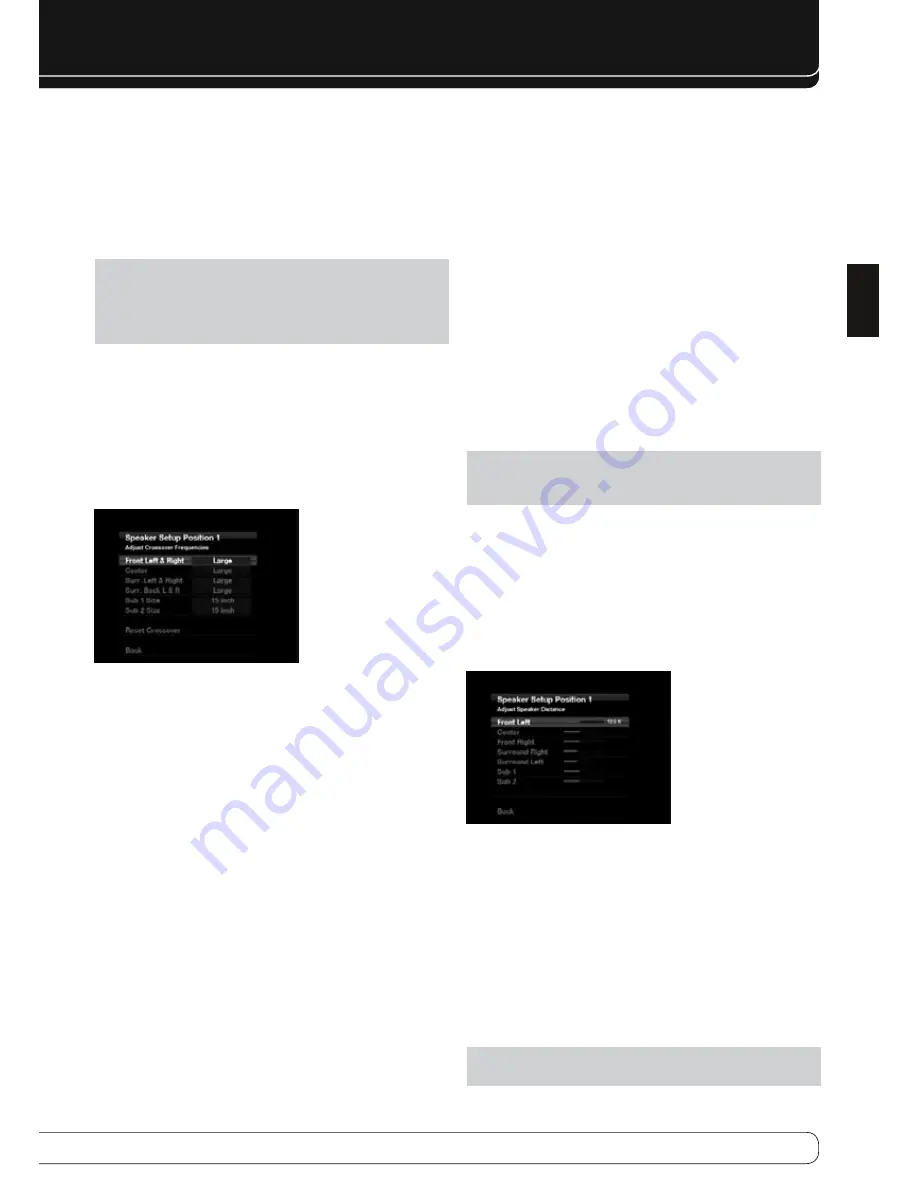
Figure 30 – Adjust Crossover Frequencies Menu

The AVR will only display those speaker groups programmed in the Number of 
Speakers menu.

Refer to Table A3 for each speaker’s crossover. For the main speakers, this is 
the lowest frequency the speaker reproduces well.

For each main speaker, select one of the seven crossover frequencies: 40Hz, 
60Hz, 80Hz, 100Hz, 120Hz, 150Hz or 200Hz. If the crossover frequency is 
below 40Hz, select the first option, “Large”. This setting doesn’t refer to the 
speaker’s physical size, but to its frequency response, which is also called “full 
range”. 

Specify the size of the subwoofer’s transducer as 8, 10, 12 or 15 inches (20, 
25, 30 or 38 cm). The AVR always sets the subwoofer crossover to 100Hz, but 
uses the transducer size for equalization. Write down the settings in Table A3 
in the appendix.

When you have finished entering the settings, select Back, or press the Back/
Exit Button.

Sub Mode

Move the cursor to the Sub Mode line. This setting depends upon how you 
programmed the front left and right speakers. 

If you set the front speakers to a numeric crossover frequency, the 


subwoofer setting will always be LFE. All low-frequency information 
will always be sent to the subwoofer. If you don’t have a subwoofer, 
either upgrade to full-range speakers or add a subwoofer at the earliest 
opportunity.

If you set the front speakers to LARGE, select one of the three settings for 


the subwoofer.

L/R+LFE


: This setting sends all low-frequency information to the 

subwoofer, including both information that would normally be 
played through the front left and right speakers, and the special low-
frequency effects (LFE) channel information.

Off


: Select this setting when no subwoofer is in use. All low-

frequency information will be sent to the front left and right speakers. 

LFE


: This setting plays low-frequency information contained in the 

left and right program channels through the front speakers, and 
directs only the LFE channel to the subwoofer.

NOTE

: If you are using a Harman Kardon HKTS Series speaker system, 

select the appropriate numeric crossover frequency for the Main Speaker 
groups, and the subwoofer will automatically be set to LFE.

Adjust Speaker Distance Menu

Placing the speakers at different distances from the listening positions can 
muddy the sound, as sounds are heard earlier or later than desired. 

Even if all of your speakers are placed the same distance from the listening 
position, do not skip this menu.

On the Speaker Setup Position menu, move the cursor to the Distance line and 
press the OK Button to display the Adjust Speaker Distance menu. See Figure 
31.

Figure 31 – Adjust Speaker Distance Menu

Enter the distance from each speaker to the listening position, as measured 
in Step Two – Measure Speaker Distances and recorded in Table A4 in the 
appendix (see page 17).

The default unit of measurement is feet. To change the unit to meters, return 
to the main AVR menu. Select the System Settings menu, then scroll down 
to the General AVR Settings section and select the Unit of Measure line. Press 
the OK Button to change the setting.

Select a speaker, then use the 

M N

 Buttons to change the measurement. The 

values vary between 0 and 10 meter, with a default of 4 m for all speakers 
except the Surround Left and Right Speakers, for which the default is 3,3 
meter. 

NOTE

: If the surround back channels are assigned to the multizone 

system, you will not be able to adjust their delay settings.

Содержание AVR 660

Страница 1: ...AVR 760 AVR 660 AUDIO VIDEO RECEIVER OWNER S MANUAL Advanced Functions ...

Страница 2: ...th arrowhead symbol within an equilateral triangle is intended to alert the user to the presence of uninsulated dangerous voltage within the product s enclosure that may be of sufficient magnitude to constitute a risk of electric shock to persons The exclamation point within an equilateral triangle is intended to alert the user to the presence of important operating and maintenance servicing instr...

Страница 3: ...rsion 2 Reference or Wide 2 channel Dolby Headphone Version 2 up to 96kHz DTS HD High Resolution Audio DTS HD Master Audio DTS 5 1 DTS Stereo DTS ES 6 1 Discrete and Matrix DTS 96 24 DTS Stereo DTS Neo 6 Cinema 5 6 or 7 channel Music 5 6 or 7 channel up to 96kHz Logic 7 Movie Music and Game up to 96kHz 5 or 7 Channel Stereo up to 96kHz Surround Off DSP or Analog Bypass ADVANCED FUNCTIONS 4 Audio P...

Страница 4: ...raordinarily distortion free especially at high frequencies Surround Modes Surround mode selection is dependent upon the format of the incoming audio signal as well as personal taste Table A13 offers a brief description of each mode and indicates the types of incoming signals or digital bitstreams the mode may be used with Additional information about the Dolby and DTS modes is available on the co...

Страница 5: ... Digital DTS Dolby TrueHD or DTS HD Master Audio For 2 channel materials the AVR defaults to Logic 7 Movie mode If you prefer a different surround mode select the surround mode category Virtual Surround Stereo Movie Music or Video Game Press the OK Button to change the mode Each category is set to a default surround mode Virtual Surround Dolby Virtual Speaker Reference Stereo 7 channel stereo Movi...

Страница 6: ...er Each loudspeaker in your system performs at its best delivering an enjoyable sound experience STEP TWO Measure Speaker Distances Ideally all of your speakers would be placed in a circle with the listening position at the center However you may have had to place some speakers a little further away from the listening position than others Sounds that are supposed to arrive simultaneously from diff...

Страница 7: ...ck or press the Back Exit Button Sub Mode Move the cursor to the Sub Mode line This setting depends upon how you programmed the front left and right speakers If you set the front speakers to a numeric crossover frequency the subwoofer setting will always be LFE All low frequency information will always be sent to the subwoofer If you don t have a subwoofer either upgrade to full range speakers or ...

Страница 8: ...he next channel several seconds later as indicated by the highlight bar Adjust the level for any channel when the test tone is paused there using the M N Buttons Use the KL Buttons to move the cursor to another line and the test tone will follow the cursor When this setting reads MANUAL the test tone will not move to the next channel until you use the KL Buttons Individual Channels If you are usin...

Страница 9: ... Widescreen 16 9 images are displayed on a full screen 4 3 device in letterbox format Black bars may appear above and below the image When displaying full screen images on a widescreen device black or gray bars may appear to the left and right of the image pillarboxing Plasma and CRT monitors may suffer from burn in when the same image such as the horizontal or vertical bars is left on screen for ...

Страница 10: ...om to display the picture settings as shown in Figure 35 Figure 35 Video Modes Custom Processing With a color bar test pattern from a test disc or other source on screen the following adjustments may be made The color intensity setting on your TV Color adjustments using the color bars which may be left to right black white yellow cyan turquoise green magenta red blue black The color transition see...

Страница 11: ...fferent source from the main listening area However if the same source has been selected for both the main listening area and the remote zone listeners in both areas will hear the same content NOTE Only analog audio sources including The Bridge II are available to the multizone system The USB Network and Internet Radio sources are also available To hear digital devices such as a CD player in the r...

Страница 12: ...ty rating of 88dB 8 ohms 1 watt 1 meter If your loudspeakers have a higher sensitivity rating increase the Dolby Volume Calibration setting by the difference between your speakers sensitivity and 88dB If your speakers have a lower sensitivity decrease the Dolby Volume Calibration setting by the difference between 88dB and your speakers sensitivity Menu Appearance Menu Transparency Select whether v...

Страница 13: ... Activities are used to program sequences of up to 20 commands that are executed with a single button press Activities are well suited for power on and off commands to send out a multidigit channel number with one button press or to control another device with more flexibility than the built in punch through controls Up to 11 activities may be programmed NOTE Use caution when programming complicat...

Страница 14: ...D player Or while using the remote to control video functions on your TV you may use your cable box to change channels To program punch through control while operating any device Press and hold the AVR Settings Button for 3 seconds The remote will 1 enter Program mode and its Main Menu will be displayed Use the 2 KL Buttons to scroll to the Punch Through option and press the OK Button Use the 3 KL...

Страница 15: ...camcorder cassette deck AUX Coax Front Analog Front Composite Front not used for audio only devices Recorder Source D Coaxial 2 input and Coaxial Output Analog 4 inputs and outputs Composite OR S Video 2 input and output iPod The Bridge II None The Bridge II The Bridge II for photo and video capable iPod models Make this connection only when using the TV source for a non display device Do not conn...

Страница 16: ...dium Low Medium Medium Medium Medium Low Medium Record Out Analog Analog Analog Analog Analog Analog Analog Analog Video output resolution may vary for HDMI connections Table A2 Source Setting Defaults continued USB Internet Radio Network Source A Source B Source C Source D Surround Modes Auto Select Logic 7 Movie Logic 7 Music Logic 7 Music Logic 7 Movie Logic 7 Movie Logic 7 Movie Logic 7 Movie ...

Страница 17: ...t Level 0dB 0dB Surround Right Level 0dB 0dB Surround Back Right Level 0dB 0dB Surround Back Left Level 0dB 0dB Surround Left Level 0dB 0dB Sub Level 0dB 0dB Note When the Tone Mode setting is Off the 6 8 Channel Inputs are direct inputs whose signals are passed directly to the volume control without any bass management processing The speakers remain full range and cannot be adjusted When the Tone...

Страница 18: ...ued USB Internet Radio Network Source A Source B Source C Source D Device Type USB Drive N A Surround Modes Video Input USB N A Network Audio Input USB Internet Radio Network Resolution to Display Adjust Lip Sync Change Name Audio Auto Polling N A N A N A Zone 2 Audio USB Internet Radio Network Zone 2 Video N A N A N A Trigger 2 Dolby Volume Record Out Table A6 Audio Effects Settings Default Cable...

Страница 19: ...gs continued USB Internet Radio Network Source A Source B Source C Source D Dolby Volume Tone Control Treble Bass LFE Trim EQ Speaker Setup Table A7 Video Modes Settings continued USB Internet Radio Network Source A Source B Source C Source D Video Mode Brightness Contrast Color Sharpness Picture Adjust Overscan Noise Reduction MPEG Noise Reduction Cross Color Suppressor Flesh Tone Enhancement Bla...

Страница 20: ...es continued USB Internet Radio Network Source A Source B Source C Source D Auto Select Virtual Surround Stereo Movie Music Game Center Width Dimension Panorama Note These settings are only available when Dolby Pro Logic II or IIx Music mode has been selected Access these settings by selecting the Edit option Table A9 Remote Control Codes Source Input Device Type if changed Product Brand and Code ...

Страница 21: ...ansparency Medium Volume Status Messages 3 seconds Menus 1 minute Setup and Slide In Menus 15 minutes Screen Saver 10 minutes Software Version Check your product Table A12 Zone 2 Settings Source Input Default Your Settings Status Off Source FM Radio Volume 25dB Surround Back Amps Main Room Carrier Out Zone 2 Table A11 Network Settings Setting Your Settings ID Network Settings IP Address Subnet Mas...

Страница 22: ...hile delivering fully lossless audio that is a true reproduction of the studio master recording Blu ray Disc or HD DVD encoded with Dolby TrueHD delivered via HDMI Dolby Digital Stereo Delivers a 2 channel downmix of Dolby Digital materials Dolby Digital 1 0 0 or 1 2 0 0 or 1 3 0 0 or 1 2 1 0 or 1 2 2 0 or 1 3 2 0 or 1 Dolby Digital EX Dolby Pro Logic II Mode Group Analog decoder that derives five...

Страница 23: ...Dolby Virtual Speaker Wide When only two main speakers are present the Reference mode virtualizes a full surround presentation with accurate localization Dolby Digital uses only two speaker mode when signal does not contain center channel information Analog 2 channel Tuner PCM 32kHz 44 1kHz or 48kHz DTS Digital Using a different encoding decoding method than Dolby Digital it also provides up to fi...

Страница 24: ...e See below Logic 7 Movie Especially suited to 2 channel sources containing Dolby Surround or matrix encoding Logic 7 Movie mode increases center channel intelligibility Analog 2 channel Tuner PCM 32kHz 44 1kHz 48kHz 96kHz Logic 7 Music The AVR 760 AVR 660 is programmed at the factory to default to this mode for 2 channel signals Logic 7 Music mode is well suited to conventional 2 channel music re...

Страница 25: ... 39 40 41 42 28 29 32 37 33 34 35 5 10 11 12 13 14 6 7 9 8 15 16 17 43 45 44 46 47 48 49 50 52 53 54 55 56 57 58 51 ENGLISH APPENDIX Refer to the numbered buttons in Figure 38 when using the Function List Figure 38 Remote Control Function List Reference ...

Страница 26: ...7 Last Last Last Last Prev Ch Last Prev Ch 28 0 0 0 0 0 0 0 0 0 29 Activity Activity Activity Activity Activity Activity Activity Activity Activity 30 Back Exit Back Exit Back Exit Back Exit Clear Back Back Exit Bypass 31 Menu Menu Menu Menu Menu Menu Menu Menu Menu 32 Up Up Tune Up Tune Up Up Up Up Up Up 33 Left Left Preset Down Preset Down Left Left Left Left Left 34 OK OK OK OK Enter Enter OK O...

Страница 27: ...Activity Activity Activity Activity Activity Activity Activity Activity Activity 30 Back Exit Clear Exit Cancel Exit Exit Cancel Back Exit Back Exit 31 Menu Start Menu Menu Menu Menu Menu Menu 32 Up Up Up Up Up Up Up Up 33 Left Left Left Left Left Left Left Left 34 OK Select Enter Setup Select Enter OK OK 35 Right Right Right Right Right Right Right Right 36 Light Light Light Light Light Light Lig...

Страница 28: ...8500 Balboa Blvd Northridge CA 91329 www harmankardon com 2009 Harman International Industries Incorporated All rights reserved Part No CQX1A1308Z A ...

Отзывы: