Harken Riggers Winch 200 Скачать руководство пользователя страница 6

Riggers Winch 200 

01/03/19

Installation

A. PLAN INSTALLATION

The adapter plate can be affixed in a number of ways dependant on the environment and industry; these 

include ratchet straps, fibre slings and strops and karabiners, making for a truly universal and adaptable lifting 

solution.

It is the installer’s responsibility to carry out all structural tests needed to ensure that the mounting surface 

can withstand the load.

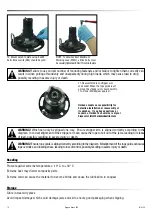
Lifting Rope - Entry Angle

The winch plate must be installed so that the line can be led through the rope guide to the winch drum, with 

no more than 30

o

 of line deflection in any plane. The installation should use pulley deflectors if necessary to 

ensure a fair lead to the winch. The rope guide should not take any significant angle load. (See diagram)

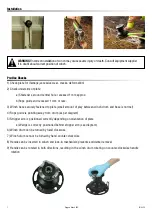
Mounting Plate  - Attachment

Ensure the plate is securely attached to the mounting surface, so that it can operate under load without 

significant movement. 

The following illustrate some possible ways that the plate can be mounted.

Riggers Winch 200 - Location

The Winch kit must be installed in a position to allow sufficient working space around the unit, so not to 

impede operation of the handle.

The stripper arm must be in a 4 o’clock position once the plate is mounted.

The Winch kit must be installed in a position to ensure visibility of the lift trajectory by the operator at all times.

The following illustrate some possible ways that the plate can be mounted.

WARNING! 

Leading the rope directly on to the drum can cause overrides and damage winch or make winch 

inoperable, leading to loss of control, possibly resulting in severe injury or death. Always lead the rope 

through the rope guide 

30

o

max. deflection

30

o

max. deflection

Содержание Riggers Winch 200

Страница 1: ...m manuals PLEASE SAVE THESE INSTRUCTIONS RIGGERS WINCH 200 Installation Manual Intended for specialized personnel or expert users INRW200_A 03 19 Introduction Safety Precautions 3 Applications Limitat...

Страница 2: ...2 Riggers Winch 200 01 03 19...

Страница 3: ...pts no responsibility for damage or harm caused by not observing the safety requirements and instructions in the service manual See limited warranty general warnings and instructions at www harkenindu...

Страница 4: ...onally workequipment whichisnotspecificallydesignedforthepurposeofliftingpersonsmaybeusedforthatpurpose providedappropriate actionhasbeentakentoensuresafetyinaccordancewithnationallegislationand orpra...

Страница 5: ...rrying gears and pins are 17 4PH stainless steel for strength and durability Planetary gears are bronze to avoid stainless on stainless galling Winches can be disassembled and serviced on the mounting...

Страница 6: ...angle load See diagram Mounting Plate Attachment Ensure the plate is securely attached to the mounting surface so that it can operate under load without significant movement The following illustrate s...

Страница 7: ...arm is positioned correctly depending on orientation of plate a Wedge is correctly positioned behind stripper arm see diagram 6 Winch drum can be turned by hand clockwise 7 Winch drum cannot be turned...

Страница 8: ...pping Excessive turns at base of winch Rope override WARNING Never allow rope to override on winch drum This can cause rope to jam and can prevent load from being lifted lowered Tension on loaded rope...

Страница 9: ...tion of load direction of load direction of load direction of load LOWERING LOAD We recommend using a safety device such as a grab rope mechanism eg Prussic knot rope grab clutch 1 Engage grab rope me...

Страница 10: ...equently Maintenance WASH Wash winch frequently with fresh water Do not allow cleaning products or other caustic solutions to come into contact with winch especially anodized chrome plated or plastic...

Страница 11: ...remove the drum 1 Unscrew the central screw 2 Nm 18 in lb 2 Slide off the hub n 20 and the cover n 19 3 Unscrew the three screws n 17 4 Nm 35 in lb 4 Remove the self tailing arm n 18 by rotating and l...

Страница 12: ...screw the screw n 10 and remove the washer n 9 4 Nm 35 in lb 2 Remove jaws n 15 1 Unscrew the 3 screws n 16 4 Nm 35 in lb If it is necessary to replace winch jaws proceed as follows Torque to apply wh...

Страница 13: ...rings to ensure there are no breaks in bearing cages 6 Replace worn or damaged components See Pages 15 17 for exploded diagrams and parts list LUBRICATE 1 Carry out maintenance on components using pro...

Страница 14: ...EMBLE PAWLS Correctly position spring in housing as shown at left Hold spring closed and slide pawl into housing Once in position check that pawls can be easily opened and closed with a finger If you...

Страница 15: ...k rope guide in place with the end of the rope guide pointing away from centre of plate 4 Remove winch handle socket 5 Slide off the hub n 20 and the cover n 19 6 Unscrew the three screws n 18 4 Nm 35...

Страница 16: ...possibly resulting in severe injury or death WARNING Ensureropeguideisalignedcorrectlyaccordingtothediagram Misalignmentoftheropeguidecancause ropeoverrides andloadingstress leadingtolossofcontrol pos...

Страница 17: ...nd code 3 Manufacturer s address 4 Pictogram instruction to read the manual 5 CE marked and tested to EN13157 2009 standard 6 Safety instruction to put a minimum of 4 rope wraps clockwise around drum...

Страница 18: ...18 Riggers Winch 200 01 03 19 Parts EXPLODED VIEW 1 2 14 13 15 16 12 17 18 19 20...

Страница 19: ...19 Riggers Winch 200 01 03 19 Parts EXPLODED VIEW 2 2 2 1 4 5 11 4 5 7 3 6 10 9 8 4 5...

Страница 20: ...70 00 04 Pin 7 1 S 41363 00 02 Shaft Winch 20 8 1 S 41876 00 63 Winch Serial Number Sticker 9 1 S 268890080 Washer 10 1 M 06040 03 Screw M6x12 UNI 5933 11 1 S 41362 00 41 Gear Z21 12 1 S 41294 00 A0 S...

Страница 21: ...scription 1 1 S 688550052 Plate Riggers winch 200 2 1 S 688590063 Sticker Riggers winch 200 3 1 S 688570002 DRIVE LINE 4 1 M 0602803 Nut M10 UNI5588 5 5 M 0635103 Socked head screw M6x16 UNI 5031 6 1...

Страница 22: ...22 Riggers Winch 200 01 03 19...

Страница 23: ...23 Riggers Winch 200 01 03 19...

Отзывы: