


14
Riggers Winch 200
01/03/19
Cleaning
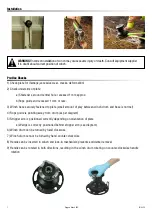
Make sure that the holes and drainage channels in the base of the winch are not obstructed. Assemble winch in
reverse order of sequence in the Disassembly section.
To tighten bolts, use torque indicated in disassembly procedure.
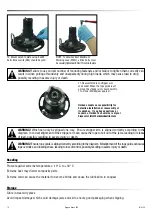
If jaws have been disassembled, insert peeler
between two jaws, taking care that letters
"TOP" on peeler are facing upwards.
When positioning stripper arm, align peeler
with it.
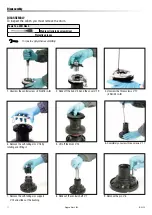
ASSEMBLE PAWLS
Correctly position spring in housing as shown at left. Hold spring
closed and slide pawl into housing. Once in position, check that
pawls can be easily opened and closed with a finger.
If you have questions concerning the assembly procedure contact
Harken
®
Tech Service: [email protected].
OIL
SPARE PARTS
Spare parts can be ordered from Harken as described in
the Harken Worldwide Limited Warranty using the part
number in the Parts List and the serial number of the
winch, which is printed on a label on the drum support
and on the plate.
W XXXXX
XXXXXXXXX
Assembly
Last two numbers of the year of
production, i.e. 10 for 2010.
L
L
Содержание Riggers Winch 200
Страница 2: ...2 Riggers Winch 200 01 03 19...
Страница 18: ...18 Riggers Winch 200 01 03 19 Parts EXPLODED VIEW 1 2 14 13 15 16 12 17 18 19 20...
Страница 19: ...19 Riggers Winch 200 01 03 19 Parts EXPLODED VIEW 2 2 2 1 4 5 11 4 5 7 3 6 10 9 8 4 5...
Страница 22: ...22 Riggers Winch 200 01 03 19...
Страница 23: ...23 Riggers Winch 200 01 03 19...


