background image

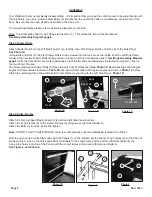
Step 3-Shelf

Turn the Shelf (6) so that the lips on its sides face up and the front lip faces downward. 

See Figure 3.

Line up the hole in the Shelf with the hole in the Center Frame (4). Insert Nut (3) through the Shelf and into the Center
Frame. Tighten it into place with Bolt (3). Repeat for the additional three corners of the Shelf. 

See Photos 3A & 3B.

Workbench should look like 

Photo 3C 

when done with this step.

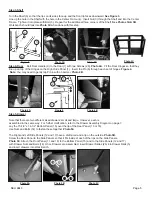
Step 4-Door

Bolt Door Handle (9) to the Door (7) with two Screws (20). 

Photo 4A

.  Fit the Door Hinges so that they 

line up on top of the Hinges on the Right Side Panel (1). Insert the Pin (8) through each set of hinges. 

Figure 4.

 Note:

 You may need to gently tap Pin in with a hammer. 

Photo 4B

.

Step 5-Drawer

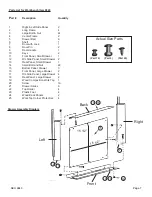
Note that there are two different sized drawers; small and large.  However, each is  


DVVHPEOHGLQWKHVDPHZD\)RUIXUWKHUFODUL¿FDWLRQUHIHUWRWKH'UDZHU$VVHPEO\'LDJUDPRQSDJH

Lay the 15-1/2” x 16-1/2” Bottom Panel (15) over the lip of the Rear Panel (13 or 18).
Use Nuts and Bolts (14) to fasten these together. 

Photo 5A

The Right and Left Side Panels (12 and 17) have a sliding rail and a lip on the outside. 

Photo 5B. 

6FUHZWKH5HDU3DQHOWRWKH6LGH3DQHOVVRWKDWLW¿WVLQVLGHRIHDFKRIWKHOLSVRQWKH6LGH3DQHOV

Photo 5C.

 Attach the Front Panel (11 and 16) to the Bottom Panel (15) and to the Side Panels (12 and 17) 

with Drawer Nuts and Bolts (14). Once Drawers are assembled, insert Drawer Slides (26) into Drawer Rails (5) 
and insert drawers into Work Bench.

Figure 4

Photo 3A

Photo 4A

Photo 4B

Photo 3B

Photo 3C

Photo 5A

Photo 5B

Photo 5C

Figure 3

3

4

6

1

8

2

7

12

17

13

18

SKU 6843

Page 5

Содержание 6843

Страница 1: ...GUGTXGF 0Q RQTVKQP QH VJKU OCPWCN QT CP CTVYQTM EQPVCKPGF JGTGKP OC DG TGRTQFWEGF KP CP UJCRG QT HQTO YKVJQWV VJG GZRTGUU YTKVVGP EQPUGPV QH CTDQT TGKIJV 6QQNU KCITCOU YKVJKP VJKU OCPWCN OC PQV DG FTCYP RTQRQTVKQPCNN WG VQ EQPVKPWKPI KORTQXGOGPVU CEVWCN RTQFWEV OC FKHHGT UNKIJVN HTQO VJG RTQFWEV FGUETKDGF JGTGKP 6QQNU TGSWKTGF HQT CUUGODN CPF UGTXKEG OC PQV DG KPENWFGF QT VGEJPKECN SWGUVKQPU QT TG...

Страница 2: ...RRP GUDZHUV DQG D ODUJH ORFNDEOH VWRUDJH FRPSDUWPHQW 3URYLGHV RYHU FX IW RI VWRUDJH DUHD DUQLQJ 7KH ZDUQLQJV FDXWLRQV DQG LQVWUXFWLRQV GLVFXVVHG LQ WKLV LQVWUXFWLRQ PDQXDO FDQ QRW FRYHU DOO SRVVLEOH FRQGLWLRQV DQG VLWXDWLRQV WKDW PD RFFXU W PXVW EH XQGHUVWRRG E WKH RSHUDWRU WKDW 20021 6 16 1 87 21 5 7256 1127 8 7 172 7 6 352 8 7 87 0867 6833 7 23 5 725 7KH 2SHUDWRU 3 6 5 0 0 5 R QRW DVVHPEOH WKH S...

Страница 3: ...bench 48 x 19 check to make sure the parts listed below are included If any parts are missing or broken please call HARBOR FREIGHT TOOLS at 1 800 444 3353 PLEASE READ THE FOLLOWING CAREFULLY THE MANUFACTURER AND OR DISTRIBUTOR HAS PROVIDED THE PARTS DIAGRAM IN THIS MANUALASAREFERENCE TOOL ONLY NEITHER THE MANUFACTURER NOR DISTRIBUTOR MAKES ANY REPRESENTATION OR WARRANTY OF ANY KIND TO THE BUYER TH...

Страница 4: ... for the Door part 7 line up the two Center Frames The arrow stamped on Drawer Rails 5 faces towards front of Workbench See Photo 1A Bend back tabs at 90 degree angles on Drawer Rails as shown in Photo 1B and bend Center tabs at 20 degree angles as shown in Photo 1C below Attach the remaining three Drawer Rails to Center Frame as you did with the Left Side Panel Photo 1D Step 2 Sides Frames Attach...

Страница 5: ...Step 5 Drawer Note that there are two different sized drawers small and large However each is DVVHPEOHG LQ WKH VDPH ZD RU IXUWKHU FODUL FDWLRQ UHIHU WR WKH UDZHU VVHPEO LDJUDP RQ SDJH Lay the 15 1 2 x 16 1 2 Bottom Panel 15 over the lip of the Rear Panel 13 or 18 Use Nuts and Bolts 14 to fasten these together Photo 5A The Right and Left Side Panels 12 and 17 have a sliding rail and a lip on the ou...

Страница 6: ... Top as shown in Photo 6C Use screws 20 to screw Corner Protectors into place From underneath the Top Holders 22 screw the Top Panel Screws 20 into the Work Top 19 Photo 6D Step 7 Back Line up the four holes in each Wood Back Panel 24 with the four holes in the rear Long 2 and Center 4 Frames Insert Bolt 3 through each hole and secure with the Nut from the inside of the Workbench Photo 7A Tighten ...

Страница 7: ...wer 1 14 Small Bolt and Nut 48 15 Bottom Panel Drawer 3 16 Front Panel Large Drawer 2 17 R L Side Panel Large Drawer 4 18 Rear Panel Large Drawer 2 19 Wood Composition Work Top 1 20 Screw 16 21 Drawer Slides 6 22 Top Holder 4 23 Plastic Feet 4 24 Wood Back Panels 2 25 Work Top Corner Protectors 4 Parts List for Workbench Item 6843 Left 12 17 Back Front Right 15 17 11 16 14 18 13 16 1 2 15 1 2 Draw...

Страница 8: ... RG VVHPEO LDJUDP 3KRWR LJXUH LJXUH LJXUH 6KHOI 3KRWR PSW ROHV Page 8 SKU 6843 ...

Отзывы: