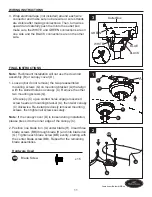
6. Remove one of the switch housing screws (W) from the
switch housing (I) and loosen the other two.
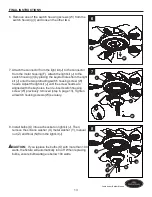
7. Attach the connector from the light kit (J) to the connector
from the motor housing (F). Attach the light kit (J) to the
switch housing (I) by placing the keyslot holes from the light
kit (J) onto the two protruding switch housing screw (W)
heads. Adjust the light kit (J) until the screw heads are
aligned with the keyholes, then re-insert switch housing
screw (W) previously removed (step 6, page 13). Tighten
all switch housing screws (W) securely.
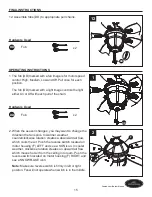
8. Install bulbs (O) into each socket on light kit (J). Then,
remove the silicone washer (X), metal washer (Y), manual
nut (Z) and finial (N) from the light kit (J).
13
Lowes.com/harborbreeze
FINAL INSTRUCTIONS
6
I
W
7
F
I
J
W
8
F
J
X
Y
Z
N
O
CAUTION:
If you replace the bulbs (O) with more than 190
watts, the fixture will automatically turn off. When replacing
bulbs, ensure bulb wattage is below 190 watts.


