background image

5

Lowes.com/harborbreeze

SAFETY INFORMATION

Please read and understand this entire manual before attempting to assemble, operate or install the 

product .

• 

Before you begin installing the fan, disconnect the power by removing fuses or turning off the circuit 

breakers .

• 

Make sure that all electrical connections comply with local codes, ordinances, the National 

Electrical Code, and ANSI/NFPA 70-199. Hire a qualified electrician or consult a do-it-yourself 

wiring handbook if you are unfamiliar with installing electrical wiring .

• 

Make sure the installation site you choose allows a minimum clearance of 7 ft . from the blades to 

the floor and at least 30 in. from the end of the blades to any obstruction.

• 

The net weight of this fan is: 23 .65 lbs .


DANGER:

 When using an existing outlet box, make sure the outlet box is securely attached to 

the building structure and can support the full weight of the fan . Failure to do this can result in serious 

injury or death . The stability of the outlet box is essential in minimizing wobble and noise in the fan 

after installation is complete .


WARNING:

 To avoid personal injury, the use of gloves may be necessary while handling fan 

parts with sharp edges .


WARNING:

 Using a full-range dimmer switch to control fan speed will cause a loud humming 

noise from the fan. To reduce the risk of fire or electric shock, do NOT use a full-range dimmer switch 

to control the fan speed .

 WARNING: 

To reduce the risk of fire, electric shock or personal injury, mount the fan to an 

outlet box marked “ACCEPTABLE FOR FAN SUPPORT” and use the mounting screws provided with 

the outlet box. Most outlet boxes commonly used for the support of lighting fixtures are not acceptable 

for fan support and may need to be replaced. Consult a qualified electrician if in doubt. Secure the 

outlet box directly to the building structure . The outlet box and its support must be able to support the 

moving weight of the fan (at least 35 lbs .) . Do NOT use a plastic outlet box .

 WARNING: 

To reduce the risk of fire, electrical shock or personal injury, wire connectors 

provided with this fan are designed to accept only one 12-gauge house wire and two lead wires from 

the fan . If your house wire is larger than 12 gauges or there is more than one house wire to connect 

to the two fan lead wires, consult an electrician for the proper size wire connectors to use .

 WARNING: 

To reduce the risk of fire or electric shock, do not use the fan with any solid-state 

speed-control device or control the fan speed with a full-range dimmer switch .

 WARNING: 

To reduce the risk of fire, electric shock, or personal injury, do not bend the blade 

arms when installing them, balancing the blades or cleaning the fan . Do not insert objects between 

the rotating fan blades .

 WARNING: 

To reduce the risk of personal injury, use only parts provided with this fan . The use 

of parts OTHER than those provided with this fan will void the warranty .

Содержание KINGSBURY 40190

Страница 1: ...8 a m 6 p m EST Monday Thursday 8 a m 5 p m EST Friday 1 Lowes com harborbreeze Harbor Breeze is a registered trademark of LF LLC All Rights Reserved ATTACH YOUR RECEIPT HERE Serial Number ___________...

Страница 2: ...ge Contents 3 Hardware Contents 4 Safety Information 5 Preparation 6 Initial Installation 7 Wiring 13 Final Installation 14 Operating Instructions 17 Care and Maintenance 18 Troubleshooting 18 Limited...

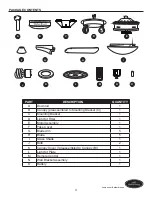
Страница 3: ...A Downrod 1 B Canopy preassembled to Mounting Bracket C 1 C Mounting Bracket 1 D Light Kit Fitter 1 E Motor Assembly 1 F Yoke Cover 1 G Blade Arm 5 H Blade 5 I Glass Shade 1 J Bulb 2 K Canopy Cover pr...

Страница 4: ...to Downrod A Downrod Clip Qty 1 preassembled to Downrod A Motor Housing Set Screw Qty 2 preassembled to Motor Assembly E Mounting Bracket Screw Qty 4 preassembled to Mounting Bracket C Fitter Plate S...

Страница 5: ...a full range dimmer switch to control the fan speed WARNING To reduce the risk of fire electric shock or personal injury mount the fan to an outlet box marked ACCEPTABLE FOR FAN SUPPORT and use the m...

Страница 6: ...this product ensure that all parts are present Compare all parts with the package contents list and hardware contents list If any part is missing or damaged do not attempt to assemble the product Aft...

Страница 7: ...Determine the mounting method to use Note Flushmount installation is not available for this item Important If using the angle mount check to ensure the ceiling angle is not steeper than 23 2 Downrod M...

Страница 8: ...screws and washers provided with the outlet box Note It is very important you use the proper hardware when installing the mounting bracket C as this will support the fan Important If using the angle m...

Страница 9: ...ted for ceilings 8 ft or higher For taller ceilings you may want to use a longer downrod not included Angle mounting is best suited for angled or vaulted ceilings A longer downrod is sometimes necessa...

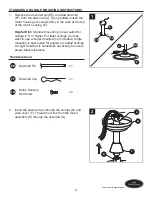
Страница 10: ...r assembly E Hardware Used EE Downrod Pin x 1 FF Downrod Clip x 1 GG Motor Housing Set Screw x 2 F E FF GG A EE 3 4 Depending on the length of downrod you use you may need to cut the lead wires back t...

Страница 11: ...p for black and green wires Note If you did not cut back the lead wires in Step 4 Step 5 is not necessary and you may proceed to Step 6 instead 5 6 Install the ball end of the downrod A into the openi...

Страница 12: ...ft high The downrod hanging ball and canopy cover are not used in this type of installation 1 K B 2 Align the canopy B with the holes in the top of the motor assembly E Reinstall the closemount screws...

Страница 13: ...these steps Connect the Green wires from the fan and the mounting bracket C to the Bare Green ground supply wire Connect the White wire from the fan to the White supply wire Connect the Black wire fro...

Страница 14: ...INAL INSTALLATION 1 Align the canopy B over the loose mounting bracket screws HH preassembled on mounting bracket C Place the keyholes of the canopy B onto the mounting bracket screws HH and rotate th...

Страница 15: ...G through slots in the side of the motor assembly E Align the holes of one blade arm G with two motor screw holes in underside of the motor assembly E Secure with two motor screws AA Repeat this step...

Страница 16: ...holes of the light kit fitter D with the loosened light plate screws JJ and replace previously removed lit kit plate screw JJ Tighten all screws Hardware Used JJ Light Kit Plate Screw x 3 D JJ E L 6 7...

Страница 17: ...rom room Season Slide Switch Changes direction of blade rotation For warm weather slide switch to the left and for cool weather slide switch to the right 2 Remove battery door from back of the remote...

Страница 18: ...ring operation 5 The power of the motor is over 80W 1 Turn the power on or check the fuse 2 Turn the power off Loosen the canopy and check all connections 3 Check that the connectors from the light ki...

Страница 19: ...o the electrical outlet box The bracket must be flush without movement against the outlet box 4 Use a longer downrod or move the fan to another location 5 Lift up the yoke cover and tighten the set sc...

Страница 20: ...te control see p 17 4 The remote control has been synced to this fan at the factory and the dip switch as been switched to 0 inside the battery compartment If you have more than one remote control in...

Страница 21: ...alid Due to varying climate conditions this warranty does not cover any changes in brass finish including rusting pitting corroding tarnishing or peeling Brass finishes of this type give their longest...

Страница 22: ...0067 8 a m 6 p m EST Monday Thursday 8 a m 5 p m EST Friday PART DESCRIPTION PART A Downrod 184428 A B Canopy 184428 B C Mounting Bracket 184428 C D Light Kit Fitter 184428 D F Yoke Cover 184428 F G...

Страница 23: ...a nuestro Departamento de Servicio al Cliente al 1 800 643 0067 de lunes a jueves de 8 a m a 6 p m hora est ndar del Este y los viernes de 8 a m a 5 p m hora est ndar del Este ADJUNTE SU RECIBO AQU N...

Страница 24: ...amentos 26 Informaci n de seguridad 27 Preparaci n 28 Instalaci n inicial 29 Cableado 35 Instalaci n final 36 Instrucciones de funcionamiento 39 Cuidado y mantenimiento 40 Soluci n de problemas 40 Gar...

Страница 25: ...adera de montaje C 1 C Abrazadera de montaje 1 D Soporte del kit de iluminaci n 1 E Ensamblaje del motor 1 F Cubierta de la horquilla 1 G Brazo del aspa 5 H Aspa 5 I Pantalla de vidrio 1 J Bombilla 2...

Страница 26: ...ant 1 preensamblado en la varilla A Tornillo de ajuste de la carcasa del motor Cant 2 preensamblado en el ensamblaje del motor E Tornillo de la abrazadera de montaje Cant 4 preensamblado en la abrazad...

Страница 27: ...rolar la velocidad del ventilador ADVERTENCIA Para reducir el riesgo de incendios descargas el ctricas o lesiones personales instale el ventilador en una caja de salida marcada como ACCEPTABLE FOR FAN...

Страница 28: ...rme a la Secci n 15 de las reglas de la FCC Estas normas se dise aron para proporcionar una protecci n razonable contra la interferencia perjudicial en una instalaci n residencial Este equipo genera u...

Страница 29: ...Determine el m todo de instalaci n que utilizar Note La instalaci n de montaje al ras no est disponible para este art culo Important Si realiza el montaje en ngulo verifique que el ngulo del techo no...

Страница 30: ...s arandelas planas que se proporcionan con la caja de salida Note Es muy importante que use los aditamentos adecuados para instalar la abrazadera de montaje C ya que esta soportar el ventilador Import...

Страница 31: ...to o de mayor altura Para techos m s altos se recomienda utilizar una varilla m s larga no incluida El montaje en ngulo es mejor para los techos en ngulo o de b veda En ocasiones es necesaria una vari...

Страница 32: ...del motor E Aditamentos utilizados EE Pasador de la varilla x 1 FF Sujetador de la varilla x 1 GG Tornillo de ajuste de la carcasa del motor x 2 F E FF GG A EE 3 4 Seg n el largo de la varilla A que...

Страница 33: ...e y negro Nota Si no cort los cables conductores en el paso 4 el paso 5 no es necesario y puede continuar con el paso 6 en su lugar 5 6 Instale el extremo con la bola de la varilla A en la abertura de...

Страница 34: ...la para colgar y la cubierta de la base no se utilizan en este tipo de instalaci n 1 K B 2 Alinee la base B con los orificios de la parte superior del ensamblaje del motor E Fije la base B a la parte...

Страница 35: ...endo estos pasos Conecte los conductores verdes del ventilador y de la abrazadera de montaje C al conductor de suministro desnudo verde de puesta a tierra Conecte el conductor blanco del ventilador al...

Страница 36: ...cios de la base B con la cabeza de los tornillos de la abrazadera de montaje HH preinstalados en la abrazadera de montaje C Levante la base B y g rela en direcci n de las manecillas del reloj hasta qu...

Страница 37: ...spa G con los dos orificios del ensamblaje del motor E y f jelos con dos tornillos del motor AA mediante un destornillador Phillips Repita este procedimiento con los brazos de aspa restantes G Aditame...

Страница 38: ...ltos de la placa de iluminaci n JJ y reemplace y apriete todos los tornillos de la placa del kit de iluminaci n JJ Aditamentos utilizados JJ Tornillo de la placa del kit de iluminaci n x 3 D JJ E L 6...

Страница 39: ...da Cambia la direcci n de giro de las aspas En climas c lidos deslice el interruptor a la izquierda y en climas fr os deslice el interruptor a la derecha 2 Retire la puerta de la bater a de la parte p...

Страница 40: ...perior a los 80 vatios 1 Encienda el suministro de electricidad o verifique el fusible 2 Interrumpa el suministro de electricidad Afloje la base y revise todas las conexiones 3 Verifique que los conec...

Страница 41: ...salida y no debe moverse 4 Utilice una varilla m s larga o mueva el ventilador a otra ubicaci n 5 Levante la cubierta de horquilla y apriete el tornillo de ajuste en la horquilla hasta que quede firm...

Страница 42: ...o de la bater a del control remoto consulte la p gina 39 4 El control remoto ha sido sincronizado con este ventilador en la f brica y el interruptor DIP se ha puesto en 0 dentro del compartimiento de...

Страница 43: ...garant a Debido a las cambiantes condiciones clim ticas esta garant a no cubre cambios en el acabado de lat n incluidos la oxidaci n las picaduras la corrosi n el deslustre o el descascarado Los acab...

Страница 44: ...EZA A Varilla 184428 A B Base 184428 B C Abrazadera de montaje 184428 C D Soporte del kit de iluminaci n 184428 D F Cubierta de la horquilla 184428 F G Brazo del aspa 184428 G H Aspa 184428 H I Pantal...

Отзывы: