background image

Q

R

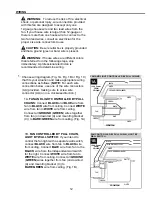
DOWNROD STYLE FAN MOUNTING

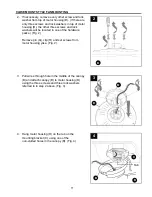
Depending on the length of downrod (A) you 
use, you may need to cut the lead wires back to 
simplify the wiring. If you decide to cut back the 
lead wires, it is suggested that you do so in the 
following manner:

Take the lead wires and make sure that you 
have pulled them all the way through the top of 
the downrod (A). Start at the TOP of the ball on 
the downrod (A) and measure 8 in. of lead wire, 
and then cut the excess wire off with wire cutters 
(not included). (Fig. 4)

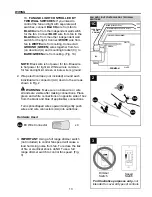
NOTE

: If you do 

not

 cut back the lead wires, 

Steps 4 and 5 are not necessary and you may 
proceed to Step 6 instead

.

 4. 

 2.  Insert downrod (A) through canopy (B). Thread 

wires from motor housing (D) through downrod 
(A). (Fig. 2)

 3.  Slip downrod (A) into motor housing yoke, align 

holes and re-install pin (Q) and clip (R). 
Re-tighten set screws in motor housing yoke 
and then tighten nuts. (Fig. 3)

B

A

2

Set 

Screw

A

3

4

Ball

A

9

Содержание E-BDB52ABZC5BC4N

Страница 1: ...issing parts Before returning to your retailer call or contact our customer service department at 1 800 527 1292 8 30 a m 5 00 p m CST Monday Friday ATTACH YOUR RECEIPT HERE Serial Number Purchase Dat...

Страница 2: ...1999 Hire a qualified electrician or consult a do it yourself wiring handbook available at Lowe s if you are unfamiliar with installing electrical wiring Make sure the installation site you choose all...

Страница 3: ...this fan are designed to accept only one 12 gauge house wire and two lead wires from the fan If your house wire is larger than 12 gauge or there is more than one house wire to connect to the two fan...

Страница 4: ...eps outlined in this manual Your fan can be installed with or without a downrod Downrod style mounting is best suited for ceilings 8 ft 2 44 m high or higher For taller ceillings you may want to use a...

Страница 5: ...Canopy Mounting Screw 4 preassembled Q Pin preassembled 1 R Clip preassembled 1 S Light Kit Fitter Screw 3 preassembled T Switch Housing Screw 3 preassembled U Blade Screw 15 preassembled PART DESCRIP...

Страница 6: ...Lowe s and Wire Cutters Bulbs Required included 4 candelabra base 40 watt max bulbs DANGER When using an existing outlet box make sure the outlet box is securely attached to the building structure an...

Страница 7: ...2 Check to make sure blades G are at least 30 in from any obstruction Check downrod A length to ensure blades G are at least 7 ft above the floor Fig 3 3 ON OFF ON OFF 1 2 Determine mounting method t...

Страница 8: ...ed with the outlet box Fig 4 NOTE It is very important that you use the proper hardware when installing the mounting bracket C as this will support the fan IMPORTANT If using the angle mount make sure...

Страница 9: ...tart at the TOP of the ball on the downrod A and measure 8 in of lead wire and then cut the excess wire off with wire cutters not included Fig 4 NOTE If you do not cut back the lead wires Steps 4 and...

Страница 10: ...ig 6 DANGER Failure to align slot in ball with tab may result in serious injury or death 6 Continue to Wiring instructions on page 12 6 Slot Tab C A Remove canopy cover from bottom of canopy B Fig 1 N...

Страница 11: ...ardware packs Fig 2 Remove pin Q clip R and set screws from motor housing yoke Fig 2 2 D 2 Pull wires through hole in the middle of the canopy B and attach canopy B to motor housing D using the three...

Страница 12: ...ing connections as follows NOTE For each wire connection below use one of the wire connectors AA provided making sure to screw wire connector AA on in a clockwise direction 1A FAN AND LIGHT CONTROLLED...

Страница 13: ...ing a full range dimmer switch not included to control fan speed will cause a loud humming noise from fan To reduce the risk of fire or electrical shock do NOT use a full range dimmer switch to contro...

Страница 14: ...ews U pre installed on the blade arm H with the three holes in the blade G Press up on the blade arm H firmly so that the blade screws U come through the holes in the blade G Be careful not to use so...

Страница 15: ...page 17 and installation is complete Connect WHITE wire from switch housing to WHITE wire from light kit fitter F Connect RED wire from switch housing to BLACK wire from light kit fitter F Make sure t...

Страница 16: ...kit fitter screws S Fig 7 Switch Housing 7 F 7 Remove socket rings L from sockets on light kit fitter F Attach glass shades I with these same socket rings L Fig 8 Note Do not overtighten socket rings...

Страница 17: ...NOTE This fan is remote control adaptable remote control not included 10 K OPERATION INSTRUCTIONS The pull chain located on the switch housing has four positions to control fan speed One pull is HIGH...

Страница 18: ...moving the reverse switch 3 Switch Housing 3A In warmer weather setting the reverse switch in the DOWN position will result in downward airflow creating a wind chill effect Fig 3A 3B In cooler weathe...

Страница 19: ...e loose 2 Cracked blade G 3 Full range dimmer switch 4 Fan is new 1 Check to be sure plastic locking mechanisms E are secure 2 Replace blade G 3 Replace with an approved speed control device 4 Allow f...

Страница 20: ...balance of the warranty call our customer service department at 1 800 527 1292 for return authorization and shipping instructions so that we may repair or replace the ceiling fan Any fan or parts retu...

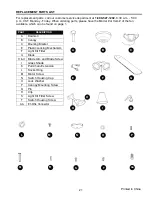
Страница 21: ...le which can be found on page 1 A E B F C G I H R Q M N O AA P 21 K L U S T PART DESCRIPTION A Downrod B Canopy C Mounting Bracket E Plastic Locking Mechanism F Light Kit Fitter G Blade H U Blade Arm...

Страница 22: ...ontacto con nuestro Departamento de Servicio al Cliente al 1 800 527 1292 de lunes a viernes de 8 30 a m a 5 00 p m hora central est ndar ADJUNTE SU RECIBO AQU N mero de serie Fecha de compra E192641...

Страница 23: ...n la instalaci n del cableado el ctrico contrate a un electricista calificado o consulte un manual de cableado disponible en Lowe s para hacerlo usted mismo Aseg rese de que el sitio de instalaci n qu...

Страница 24: ...n dise ados para soportar solo un cable interno de calibre 12 y dos cables conductores del ventilador Si el cable interno es de un calibre superior a 12 o hay m s de un cable interno para conectar a...

Страница 25: ...puede instalar el ventilador con o sin una varilla El montaje de varilla es mejor para los techos de 2 44 m o m s de alto Para techos m s altos le recomendamos utilizar una varilla m s larga se vende...

Страница 26: ...samblado Q Pasador preensamblado 1 R Sujetador preensamblado 1 S Tornillo del soporte del kit 3 de iluminaci n preensamblado T Tornillo de la carcasa 3 del interruptor preensamblado U Tornillo de las...

Страница 27: ...requeridas se incluyen 4 bombillas de base candelabro de 40 vatios como m ximo PELIGRO Si utiliza una caja de salida existente aseg rese de que est bien sujeta a la estructura del edificio y que pueda...

Страница 28: ...spas G est n al menos a 76 20 cm de cualquier obstrucci n Verifique el largo de la varilla A para asegurarse de que las aspas G est n al menos a 2 13 m por encima del piso Fig 3 3 ON OFF ON OFF 1 2 De...

Страница 29: ...s planas que incluye la caja de salida Fig 4 NOTA Es muy importante que use los aditamentos adecuados para instalar la abrazadera de montaje C ya que esta soportar el ventilador IMPORTANTE Si realiza...

Страница 30: ...la A y mida 20 32 cm de cable conductor y corte el exceso de cable con las pinzas cortacables Fig 4 NOTA Si no cort los cables conductores los pasos 4 y 5 no son necesarios y puede proceder con el pas...

Страница 31: ...RO Si no alinea la ranura de la bola con la leng eta pueden producirse lesiones graves o la muerte 6 Contin e con las instrucciones de Cableado de la p gina 33 6 Ranura Leng eta C A Retire la cubierta...

Страница 32: ...Fig 2 Retire el pasador Q y el sujetador R y los tornillos de fijaci n de la horquilla de la carcasa del motor Fig 2 2 D 2 Jale los cables a trav s del orificio en el centro de la base B y fije la bas...

Страница 33: ...ada conexi n de cables a continuaci n utilice uno de los conectores de cables AA provistos asegur ndose de enroscar el conector de cable AA en direcci n de las manecillas del reloj 1A VENTILADOR Y LUZ...

Страница 34: ...l uso de un regulador de intensidad de rango completo no incluido para controlar la velocidad del ventilador provocar un zumbido intenso del ventilador Para reducir el riesgo de incendios o descargas...

Страница 35: ...aspas U preinstalados en el brazo del aspa H con los tres orificios en el aspa G Presione firmemente hacia arriba el brazo del aspa H para que los tornillos de las aspas U pasen por los orificios en...

Страница 36: ...r completa Conecte el conductor BLANCO de la carcasa del interruptor al conductor BLANCO del soporte del kit de iluminaci n F Conecte el conductor ROJO de la carcasa del interruptor al conductor NEGRO...

Страница 37: ...n S Fig 7 Carcasa del interruptor 7 F 7 Retire los anillos del portal mpara L de los portal mparas del soporte del kit de iluminaci n F Fije las pantallas de vidrio I con los mismos anillos del portal...

Страница 38: ...remoto no se incluye 10 K INSTRUCCIONES DE FUNCIONAMIENTO La cadena de tiro ubicada en la carcasa del interruptor tiene cuatro posiciones para controlar la velocidad del ventilador Jale una vez para l...

Страница 39: ...tor 3A En climas m s c lidos la configuraci n del interruptor de reversa en la posici n DOWN ABAJO crear un flujo de aire descendente que generar un efecto de viento refrescante Fig 3A 3B En climas m...

Страница 40: ...Las aspas G est n flojas 2 Hay un aspa G partida 3 Se est utilizando un regulador de intensidad de rango completo 4 El ventilador es nuevo 1 Verifique para asegurarse de que los mecanismos de bloqueo...

Страница 41: ...do que podamos reparar o reemplazar el ventilador de techo Un ventilador o las piezas devueltas con un embalaje incorrecto son responsabilidad nica del comprador No existe otro tipo de garant a expl c...

Страница 42: ...C G I H R Q M N O AA P 42 K L U S T PIEZA DESCRIPCI N A Varilla B Base C Abrazadera de montaje E Mecanismo de bloqueo de pl stico F Soporte del kit de iluminaci n G Aspa H y U Brazo del aspa y tornil...

Отзывы: