background image

15

At least twice each year, lower canopy (B) to check downrod (A) assembly, and then tighten all 
screws on the fan. Clean motor housing (D) with only a soft brush or lint-free cloth to avoid scratching 
the finish. Clean blades (G) with a lint-free cloth. You may occasionally apply a light coat of furniture 
polish to wood blades for added protection.

Important:

 Shut off main power supply before beginning any maintenance. Do not use water or a 

damp cloth to clean the ceiling fan.

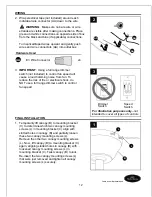
      2A. In 

warmer

 weather, setting the reverse switch  

      in the DOWN position will result in downward    


      airflow creating a wind chill effect. (Fig. 2A)

      2B. In 

cooler

 weather, setting the reverse switch in  

      the UP position will result in upward airflow that 


      can help move stagnant, hot air off the ceiling  


      area. (Fig. 2B)

      2C. 

IMPORTANT

: Reverse switch must be set  


      either 

completely


UP

 or 

completely


DOWN

 for    

      fan to function. If the reverse switch is set in the    
      

middle

 position (Fig. 2C), fan will not operate. 

OPERATION INSTRUCTIONS

2A

2B

2C

CARE AND MAINTENANCE

Lowes.com/harborbreeze

Содержание CLASSIC STYLE BDB52LW5N

Страница 1: ...837 0080297 MODEL BDB52LW5N BDB52ABZC5N BDB52MBK5N BDB52BNK5N Questions problems missing parts Before returning to your retailer call our customer service department at 1 800 643 0067 8 a m 6 p m EST...

Страница 2: ...e at Lowe s if you are unfamiliar with installing electrical wiring Make sure the installation site you choose allows a minimum clearance of 7 feet from the blades to the floor and at least 30 in from...

Страница 3: ...d to accept only one 12 gauge house wire and two lead wires from the fan If your house wire is larger than 12 gauge or there is more than one house wire to connect to the two corresponding fan lead wi...

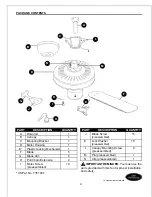
Страница 4: ...arborbreeze A Downrod 1 B Canopy 1 C Mounting Bracket 1 D Motor Housing 1 E Plastic Locking Mechanism 1 F Blade 5 G Blade Arm 5 H Pull Chain Extension 2 I Motor Screw 10 preassembled DESCRIPTION PART...

Страница 5: ...GER When using an existing outlet box make sure the outlet box is securely attached to the building structure and can support the full weight of the fan Failure to do this can result in serious injury...

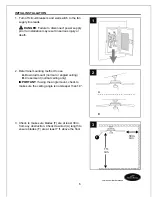
Страница 6: ...re at least 30 in from any obstruction Check downrod A length to ensure blades F are at least 7 ft above the floor 3 Determine mounting method to use A Downrod mount normal or angled ceiling B Closemo...

Страница 7: ...e the proper hardware when installing the mounting bracket C as this will support the fan IMPORTANT If using the angle mount make sure open end of mounting bracket C is installed facing the higher poi...

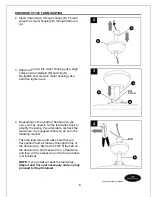
Страница 8: ...downrod A and measure 8 in of lead wire and then cut the excess wire off with wire cutters not included NOTE If you do not cut back the lead wires Steps 4 and 5 are not necessary and you may proceed...

Страница 9: ...with tab may result in serious injury or death 6 Continue to Wiring instructions on page 12 Remove canopy cover from bottom of canopy B NOTE It may be necessary to use the handle end of a screwdriver...

Страница 10: ...re packs Fig 2 Remove pin M clip N and set screws from motor housing yoke 2 Pull wires through hole in the middle of the canopy B and attach canopy B to motor housing D using the three screws and thre...

Страница 11: ...teps stop immediately A professional electrician is recommended to determine wiring For each wire connection below use one of the wire connectors AA provided making sure to screw wire connector AA on...

Страница 12: ...to control fan speed 3 1 Temporarily lift canopy B to mounting bracket C to determine which two canopy mounting screws L in mounting bracket C align with slotted holes in canopy B and partially loosen...

Страница 13: ...nd against the blade screw J as shown in Fig 3 Please note the side of the plastic locking mechanism E indicating THIS SIDE UP Rotate plastic locking mechanism E to the left counterclockwise to lock p...

Страница 14: ...to control fan speed One pull is HIGH two is MEDIUM three is LOW and four turns the fan OFF 1 Use the fan reverse switch located on the switch housing to optimize your fan for seasonal performance A...

Страница 15: ...o not use water or a damp cloth to clean the ceiling fan 2A In warmer weather setting the reverse switch in the DOWN position will result in downward airflow creating a wind chill effect Fig 2A 2B In...

Страница 16: ...t Medium and High speeds Excessive wobbling 1 Blades F are loose 2 Blade arms G incorrectly attached 3 Unbalanced blades F 4 Fan not securely mounted 5 Fan too close to vaulted ceiling 6 Set screw s o...

Страница 17: ...y does not cover changes in brass finish rusting pitting tarnishing corroding or peeling Brass finish fans maintain their beauty when protected from varying weather conditions Any glass provided with...

Страница 18: ...iday E F G N J PART DESCRIPTION A Downrod B Canopy C Mounting Bracket E Plastic Locking Mechanism F Blade G J Blade Arm and Blade Screw H Pull Chain Extension I Motor Screw K Lock Washer L Canopy Moun...

Отзывы: