12
Lowes.com/harborbreeze
FINAL INSTALLATION
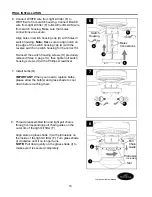
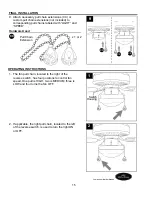
Align the preassembled blade screw posts (T) on
blade arm (H) with the holes on a blade (G).
NOTE:
Make sure to attach blade (G) with the
ridged side of the blade (G) facing UP.
Note label
indicating THIS SIDE UP
.
Press up on the blade arm (H) firmly so the blade
screw posts (T) come through the holes in the
blade (G), then slide a three-C clip (BB) onto each
blade screw post (T).
Repeat for each blade (G).
WARNING
:
To reduce the risk of personal
injury, make sure the friction detents on three-C
clip (BB) face down and recessed groove faces up.
Slide three-C clips (BB) completely under blade
screw posts (T) so edges of blade screw posts (T)
are captured by the recessed groove on the
three-C clips (BB).
2.
Three-C clip x 3
Hardware Used
BB
H
BB
G
Friction
Detents
Recessed
Groove
2
X
T
T
BB
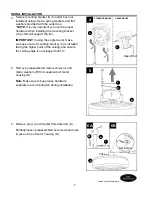
1. Locate two canopy mounting screws (K) on
underside of mounting bracket (C) and remove
canopy mounting screw (K) closest to the open end
of the mounting bracket (C). Partially loosen the
other canopy mounting screw (K).
Then, lift canopy (B) to mounting bracket (C). Place
rounded part of slotted hole in canopy (B) over
loosened canopy mounting screw (K) in mounting
bracket (C) and push up. Twist canopy (B) to lock.
Re-insert canopy mounting screw (K) that was
removed, then tighten both canopy mounting
screws (K) securely. Slide canopy cover (W) up to
canopy (B). Press up gently but firmly on canopy
cover (W) until you hear it snap onto the bottom of
the canopy (B).
1
B
K
A
C
K
B
K
K
W


