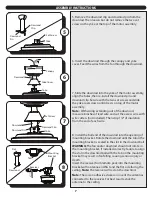
ASSEMBLY INSTRUCTIONS
10
Mounting
Screw
Battery Door
Battery Compartment
Front
Keyhole
Slot
Light
Cage
Cage Screw
Back
Wall Bracket
16
17
18
17.
Remove the battery door from the back of the remote
using a flat-head screwdriver (not included). Insert the two
CR2032 batteries into the remote; ensure the positive pole
of the batteries face up (as pictured) and then replace the
battery door.
Note:
Your fan and wall control/remote were synced at the
factory. If the wall control does not operate the fan, see
TROUBLESHOOTING, page 13.
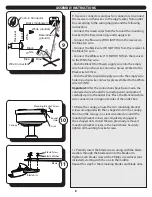
16. Loosen all four and completely remove one of the cage
screws preassembled to the light pan. Then lift the keyhole
slots in the light cage over the loose cage screws and turn
in a clockwise direction. Reinstall the previously removed
cage screw and tighten all screws.
18. If desired, the wall bracket can be installed to the wall
using the two mounting screws. Store the remote in the
wall bracket when not in use.
Turn ON the electrical power at the main fuse or circuit
breaker and the wall switch.
Installation is complete.


