Hanwha Techwin BB-VW-1UHD Скачать руководство пользователя страница 18

Video Wall Controller Series

 Manual 


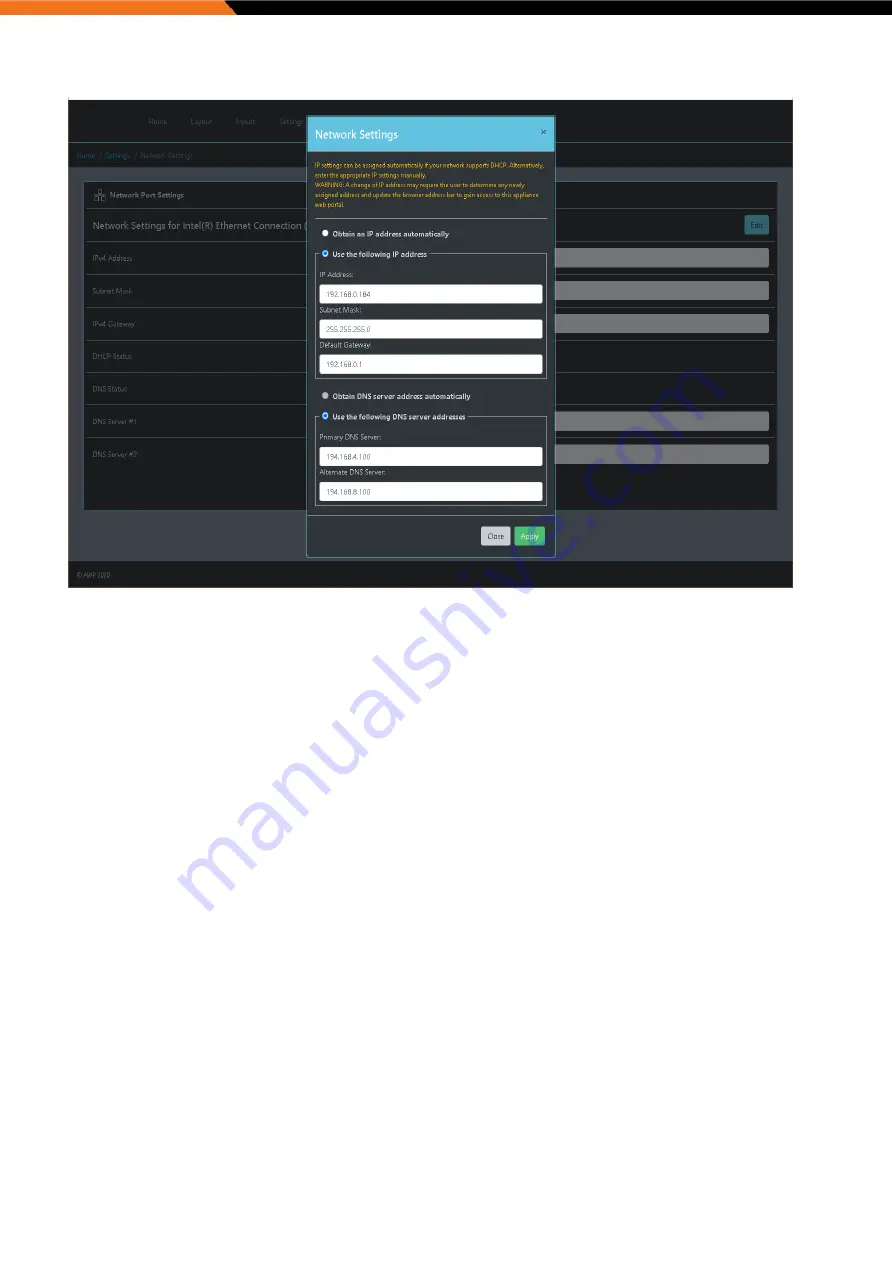
Click “Apply Changes” to set the configuration.


NOTE: when changing network settings on the appliance, you may be required to reload or refresh the AWP browser page.


Adding Inputs:


Inputs are sourced from supported video servers, ONVIF compatible devices or through manually adding inputs. 
 
Inputs are added on the ‘Inputs’ page. 
 
The page will display any input server credentials which have been previously added. In most cases, only a single set of 
credentials are required, this depends on the input integration type.


Input Servers: 
 
The ‘Add New Input Server’ page permits the appliance software access to input sources from NVRs, ONVIF supported 
devices or VMS Servers on the network. If  full integration is supported by the Input Server, the appliance will appear as a 
display device within the associated  VMS Client for direct control of the appliance using the VMS UI in addition to AWP 
control via the ‘Layout’ page. 
 
Press the “Add New Input Server” to open a “Add New Input Server” dialog window: 

Содержание BB-VW-1UHD

Страница 1: ...Contents 1 Warranty and RMA 5 2 Safety Precautions 6 3 Product Introduction 8 4 Know Your Appliance 10 5 Getting Started 12 6 Setup 14 7 Support 21 7 1 Frequently Asked Questions 22 Revision History Version Date Notes 2 0 31 03 2020 3 0 25 11 2020 ...

Страница 2: ...arranties with respect to the contents thereof and do not accept liability for any errors or omissions BlueBox Video Limited reserves the right to change specification without prior notice it does not represent commitment from BlueBox Video Limited and cannot assume responsibility for the use made of the information supplied The information in this publication is provided as is without warranty of...

Страница 3: ...is equipment generates uses and can radiate radio frequency energy and if not installed and used in accordance with the instructions may cause harmful interference to radio communications Operation of this equipment in a residential area domestic environment is likely to cause harmful interference in which case the user will be required to correct the interference take adequate measures at their o...

Страница 4: ... during transportation the repair is treated as Out of Warranty We always recommend shipping the product using the original packaging As it arrived to you If the returned item s fault is diagnosed to be from user error or mistreatment repairs will be treated as Out of Warranty Any products returned after the RMA process to other locations besides the customers site will bear an extra charge and wi...

Страница 5: ...e during installation Dropping it or letting it fall may cause damage 7 The openings on the enclosure are for air convection to protect the equipment from overheating DO NOT COVER OPENINGS 8 Ensure voltage of the power source is correct before connecting the equipment to the power outlet 9 Place the power cord in a way so that people will not step on it Do not place anything on top of the power co...

Страница 6: ...IVALENT TYPE RECOMMENDED BY THE MANUFACTURER DISCARD USED BATTERIES ACCORDING TO THE MANUFACTURER S INSTRUCTIONS Hardware What s included in the box Appliance Extras Included with Nano4K 19V DC Power Supply with country specific plug attachment VESA Mounting Bracket and Screws Optional Extras Depending on Specific Model Mouse Keyboard Optical Cables Active DP to HDMI Adapters VGA to HDMI Adapter H...

Страница 7: ...eived over the network or locally from disk Users can action the latest graphics technologies to provide an unrestricted video layout design under a familiar Windows platform An appliance is optionally supplied with the latest Windows 10 operating system installed and configured Interfaces including DirectX and OpenGL allow user applications to leverage hardware acceleration technology found withi...

Страница 8: ... x HDMI 2 0 1 x Gigabit RJ45 1 x DC power inlet Storage Up to 2 x SATA 2 5 HDD SDD for RAID Configuration Up to 2 x SATA 2 5 HDD SDD for RAID Configuration 1 x 64GB mSATA SDD Dimensions 444mm W x 221mm D x 88mm H 444mm W x 221mm D x 88mm H 129mm W x 129mm D x 40mm H Form Factor 2U Rack Mount 2U Rack Mount VESA Mount Wall Mount Weight 2 5Kg 2 5Kg 1 3Kg Power Supply 1 x Internal Power supply Input 9...

Страница 9: ...mport appliance metrics for easy inspection USB 3 0 Ports Used to connect USB 3 0 2 0 devices Rear Panel AC Power Socket 90V 240V AC Input Plug an AC power cord here before turning on the system USB 2 0 Ports Used to connect USB 2 0 devices GbE LAN Ports Used to connect the system to a local area network DisplayPort 1 2 Ports Used to connect DisplayPort interface to monitors ...

Страница 10: ...3 0 Ports Used to connect USB 3 0 2 0 devices USB 2 0 Ports Used to connect USB 2 0 devices Rear Panel DC Power Input Plug the 19V external power supply cord here before turning on the system GbE LAN Port Used to connect the system to a local area network HDMI Port Used to connect HDMI interface to the display device VGA Port Used to connect VGA interface to the display device ...

Страница 11: ...ar of the unit Make sure that there is ample clearance around the appliance to provide sufficient air flow Power IMPORTANT A common IEC C13 cable is required to power the appliance this is not provided and the customer will be required to purchase one of the appropriate length and region for installation This cable must be a 3 wire Earthed cable and must be connected to an Earthed outlet socket Wh...

Страница 12: ... the system from the mains supply The system should then be passed to a qualified technician for inspection Continued operation could result in personal injury and damage to property Cable Lengths Workable cable lengths depend on the quality of the cables used as part of your installation Cable Type Resolution Maximum Length DisplayPort output Up to 1080p60 15m 20m DisplayPort output Up to 4k60 10...

Страница 13: ...to the video source network switch LAN1 is the primary network port LAN1 should be used for video streaming interfaces LAN2 is the secondary network port Nano4K Connect Ethernet cable to LAN Port on appliance and connect to video source network switch Step 2 Connect Monitors Display Devices Eight1080 and Six4K Connect required graphics outputs starting from left to right looking at the rear of the...

Страница 14: ...ayout is set to English US by default To change this use the Windows Run command and type Region Follow the instructions presented The device uses DHCP by default if your network supports DHCP the appliance will now be discoverable on the network The appliance Hostname will be Videowall XXXXX You can now login to the Appliance Web Portal AWP to configure the appliance remotely Step 5 AWP Configura...

Страница 15: ...ing static and DHCP settings Global Settings General hardware and software settings Upload Firmware Allows a new software release to be uploaded and installed User Manual Download View this manual in the browser RTSP Encoder Download Client application for screen and chosen programs to be captured encoded and transported as accessible authenticated RTSP video sources Restart Restarts Appliance Shu...

Страница 16: ...rangements based on the connected and discovered outputs in addition to what resolutions the displays attached support Once the desired layout mode has been selected the display grid arrangement will update to show the current monitor arrangement Pressing Identify will display the output ID s on the monitor s Use the grid to drag displays to the desired desktop position without physically unpluggi...

Страница 17: ...ging the Desktop Network Settings The network settings page presents the user with remote access to configure active network ports on the appliance By default the appliance ships with all ports set to DHCP The page will auto display all active network ports on the appliance and display the current settings for each Pressing the Edit button for each of the ports will open a dialogue window which al...

Страница 18: ...which have been previously added In most cases only a single set of credentials are required this depends on the input integration type Input Servers The Add New Input Server page permits the appliance software access to input sources from NVRs ONVIF supported devices or VMS Servers on the network If full integration is supported by the Input Server the appliance will appear as a display device wi...

Страница 19: ...om of the pop up windows to view the setup instructions and connection diagram for the selected integration Click Add Server to apply and accept these settings Manually Add Inputs The Input page allows the user to manually add the following input types Network video streams Local video sources Applications with command line arguments VNC viewers Web pages ...

Страница 20: ...e user in the Layout page under the heading Capture For further details information and guides see Getting Started found in the AWP Help page 7 Support For technical support please contact via one of the below options BlueBox Video Ltd Pontefract Road Unit 5 Courtyard 31 Normanton WF6 1JU United Kingdom Tel 44 7307 052693 Email support bluebox video www bluebox video ...

Страница 21: ...ons 1 Ensure display monitor s are NOT television screens TV screens require hot plug re detection after losing signal the appliance must be rebooted 2 Ensure any dongles or signal conversions between the display appliance and the display monitor s support this feature 3 Try disabling Lock Displays pressing Apply and then re applying the Lock Displays toggle switch with a second Apply Q At the bot...

Страница 22: ...Video Wall Controller Series Manual ...

Отзывы: