background image

Start-up

Page EN-36

Setting up the appliance

1. Place the appliance upright on as flat and 

as firm a base as possible. 

2. To ensure adequate air circulation, 

– maintain a minimum distance of 3 cm to 

the rear wall.

– maintain a distance of 10cm on the 

sides.

– free an area of at least 30cm above the 

appliance.

– do not place any objects on the appli-

ance.

– do not place the appliance on carpeted 

flooring.

Aligning the appliance

1. Check the position with a spirit level. 

(42)

2. Level out any unevenness on the ground 

using the two front screw feet (42).
– Close the doors to do this.
– Tilt the appliance backwards slightly and 

screw/unscrew the screw feet.

– Stand the appliance back up again and 

check the alignment with a spirit level.

– Repeat the process until the appliance 

is standing up vertically. The appliance 
should not move when opening the 
doors.

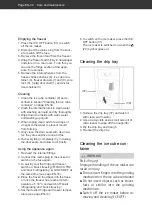
Adjusting the doors

It may be that the doors are not on the same 
level, even if the appliance itself is completely 
level.

In this case, you can adjust the position of 
the doors by lowering or lifting the door to the 
fridge.

 NOTICE

The doors can be adjusted by a maxi-
mum of 5mm.

1. Open the door to the fridge wide.

(43)

(44)

lower

lift

2. Turn the locknut (43) two full rotations 

clockwise to loosen it. Use the spanner 
supplied to do this.

3. Turn the adjusting nut (44) in the desired 

direction until the doors are on the same 
level.

4. Tighten the locknut (43) again by turning it 

anticlockwise.

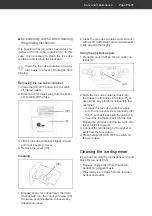
Cleaning before use

To remove the odour that comes with all new 
appliances, clean the appliance before using 
it (see "Cleaning the fridge“ and "Cleaning the 
freezer“ on page EN-29).

Содержание HSBS17990WETDI

Страница 1: ...y Side K hl Gefrier Kombination mit Wasserspender und Eisbereiter Gebrauchsanleitung Anleitung Version 2001 01000 DE 20200828 Bestell Nr 9714 3127 Nachdruck auch auszugswei se nicht gestattet HSBS1799...

Страница 2: ...igen DE 30 Abtauen DE 31 K hlbereich reinigen DE 31 Gefrierbereich reinigen DE 31 Abtropfgitter reinigen DE 33 Eisw rfelbeh lter reinigen DE 33 Eisspender reinigen DE 34 Wassertank reinigen DE 34 Bele...

Страница 3: ...Gefrierschublade 1 Gefrierschublade gro 1 Gefrierschublade klein 3 T rablage 1 Ablagegitter 1 Eierablage 1 Schraubschl ssel Lieferung kontrollieren 1 Transportieren Sie das Ger t an einen ge eigneten...

Страница 4: ...Innenbeleuchtung 6 Glasablagen im Gefrierbereich 7 gro e Gefrierschublade 8 Ablagegitter 9 kleine Gefrierschublade 10 Glasablagen im K hlbereich 11 Flaschenablage 12 gro e Obst Gem seschublade 13 klei...

Страница 5: ...LOCK UNLOCK Wenn das Bedienfeld gesperrt ist erscheint das Symbol Wenn das Bedienfeld entsperrt ist erscheint das Symbol 25 Anzeige Kaltwasserentnahme 26 Wahltaste DISPENSER zum W hlen zwischen Eisw r...

Страница 6: ...g gilt als nicht bestimmungsgem und kann zu Sachsch den oder sogar zu Personensch den f hren Der Hersteller bernimmt keine Haftung f r Sch den die durch nicht bestimmungsgem en Gebrauch entstanden sin...

Страница 7: ...fweist z B die Anschlussleitung defekt ist Rauch entwickelt oder verbrannt riecht ungewohnte Ger usche von sich gibt In einem solchen Fall Netzstecker aus der Steckdose ziehen bzw Sicherung herausschr...

Страница 8: ...und si cherstellen dass auch Kinder keine Gegenst nde einstecken k nnen Ger t regelm ig auf Sch den pr fen Brandgefahr Unsachgem er Umgang mit dem Ge r t kann zu einem Brand zu Verletzun gen und zu S...

Страница 9: ...im Ger t lagern da sie z ndf hige Gas Luft Gemische bilden k nnen Zum Abtauen auf keinen Fall Abtau sprays verwenden Sie k nnen explo sive Gase bilden Risiken f r Kinder WARNUNG Erstickungsgefahr Kind...

Страница 10: ...ereitung von Spei seeis oder Eisw rfeln geeignet Ein Zwei und Drei Sterne F cher sind nicht f r das Einfrieren von fri schen Lebensmitteln geeignet Wenn das K hl Gefrierger t l ngere Zeit leer steht d...

Страница 11: ...e ner Haut sind Hautsch den m glich Eisw rfel oder Eis am Stiel vor dem Verzehr etwas antauen lassen nicht direkt aus dem Gefrierbereich in den Mund nehmen HINWEIS Brandgefahr Unsachgem er Umgang mit...

Страница 12: ...ressive k rni ge soda s ure l semittelhaltige oder schmirgelnde Reinigungsmit tel verwenden Diese greifen die Kunststofffl chen an Empfehlens wert sind Allzweckreiniger mit ei nem neutralen pH Wert T...

Страница 13: ...llst ndig austauschen Sp lwasser wegsch tten Unsachgem er Umgang mit dem Eis bereiter kann Verletzungen zur Folge haben Nicht in das Mahlwerk im Eisw rfel beh lter greifen Keine Gegenst nde wie z B Me...

Страница 14: ...en lassen Besch digungsgefahr Unsachgem er Umgang mit dem Ge r t kann zu Sachsch den f hren Innenbeleuchtung ausschlie lich zur Beleuchtung des Ger teinneren ver wenden Sie ist nicht zur Beleuchtung e...

Страница 15: ...ekunden lang keine Taste gedr ckt wird sperrt sich das Bedien feld automatisch Temperatur einstellen VORSICHT Das Ger t arbeitet eventuell nicht ein wandfrei wenn die Umgebungstempe ratur ber l ngere...

Страница 16: ...Einstellungen Schnelles Einfrieren und Schnelles K hlen einzustellen Nach 26 Stunden Schnelles Einfrieren und nach 2 5 Stunden Schnelles K hlen schal tet das Ger t automatisch in den normalen Modus zu...

Страница 17: ...und QUICK REF auf dem Display erschei nen Um Schnelles Einfrieren und Schnelles K hlen auszuschalten dr cken Sie die Wahltaste MODE so oft bis auf dem Dis play die Symbole QUICK FRZ und QUICK REF erl...

Страница 18: ...rn ert nt ein Signalton wenn eine oder beide T ren der K hl Gefrier Kombination l nger als 2 Minuten ge ffnet sind Schlie en Sie die ge ffnete T r bzw die ge ffneten T ren Wenn Sie die Ger tet r des K...

Страница 19: ...l ngere Zeit ge ffnet wird kann es zu einem erheb lichen Temperaturanstieg in den F chern des Ger tes kommen Die Fl chen die mit Lebensmitteln und zug nglichen Ablaufsystemen in Ber hrung kommen k nne...

Страница 20: ...ng der T rscharniere zu mindern stellen Sie volle Beh lter dich ter ans T rscharnier Bewahren Sie kleine Flaschen und Tu ben in den gro en T rablage 14 auf Legen Sie gut verschlossene Flaschen in die...

Страница 21: ...empe raturanstiegs im Ger teinneren ver k rzen kann wie z B durch Reinigen oder Stromausfall Stern Einstufungen und im Gefrierbereich sowie die da raus resultierenden Lagerzeiten f r Tiefk hlprodukte...

Страница 22: ...tzung f r Ihr Ger t zu erzielen Lebensmittel vorbereiten Frieren Sie nur qualitativ einwandfreie Le bensmittel ein Frieren Sie frische und zubereitete Spei sen ungesalzen und ungew rzt ein Un gesalzen...

Страница 23: ...n werden Die Temperatur des Gefrierguts muss stets mindestens 18 C betragen Kaufen Sie deshalb keine Ware die in bereiften stark vereisten Truhen liegt oberhalb der vorgeschriebenen Markie rungsmarke...

Страница 24: ...n Sie dass sich so vermehrt Bakterien und Keime bilden k nnen Bereiten Sie aufgetaute Lebensmittel so schnell wie m glich zu Entsorgen Sie die Auftaufl ssigkeit Wenn Sie nur einen Teil einer Packung a...

Страница 25: ...undheitsgefahr Der Verzehr von Eisw rfeln die mit verunreinigtem oder abgestandenem Wasser bereitet wurden kann die Ge sundheit gef hrden Durch falsche Handhabung besteht die Gefahr einer Lebensmittel...

Страница 26: ...zu been den Beachten Sie dass das Symbol nach 150 Tagen dauerhaft aufleuchtet und nach 180 Tagen blinkt um Sie daran zu erinnern den Wassertank 15 zu reinigen Nachdem Sie den Wassertank gereinigt habe...

Страница 27: ...ig im Eisw rfelbeh lter Weitere M glichkeiten werden im Abschnitt Eisw rfelbeh lter reinigen auf Seite DE 33 beschrieben Um zu verhindern dass der Motor des Eis bereiters berhitzt stoppt die Entnahme...

Страница 28: ...Zersto enes Eis Crushed Ice entnehmen 26 27 1 Dr cken Sie die Wahltaste DISPEN SER 26 so oft bis das Symbol 27 aufleuchtet 35 36 2 Halten Sie das Gef so dicht wie m glich an die ffnung des Eisauslass...

Страница 29: ...hme zu been den Eisbereiter sperren entsperren Sperren Wenn Sie die Funktionen zur Eisentnahme l ngere Zeit nicht nutzen k nnen Sie den Eisbereiter sperren 29 31 1 Entsperren Sie ggf das Bedienfeld du...

Страница 30: ...enfl chen verwenden T rdichtungen und Ger teteile aus Kunststoff sind empfindlich gegen l und Fett Verunreinigungen m g lichst schnell entfernen Nur weiche T cher verwenden Einzelne Ger teteile nicht...

Страница 31: ...Sp lmittel aus 3 Geben Sie beim Nachwischen einige Tropfen Essig ins Wasser um Schimmel bildung vorzubeugen 4 Reinigen Sie die T rdichtung nur mit kla rem Wasser sie ist empfindlich gegen ber l und F...

Страница 32: ...schubladen 7 und 9 Ablagegitter 8 1 Stern T rablage 1 und 2 Sterne T rab lagen 3 Reinigen 1 Reinigen Sie den Eisw rfelbeh lter 4 wie im Abschnitt Eisw rfelbeh lter reinigen auf Seite DE 33 beschrieben...

Страница 33: ...die Eisw rfel im Eisw r felbeh lter 4 verklumpt sind In diesem Fall wird es n tig den Eisw rfelbeh lter zu reini gen bzw die Blockade zu beseitigen Reinigen Sie den Eisw rfelbeh lter regelm ig um eine...

Страница 34: ...teck dose bzw schalten Sie die Sicherung wieder ein 4 Dr cken Sie die Taste 31 ICE OFF um den Eisbereiter einzuschalten Eisspender reinigen Eisw rfel k nnen den Eisspender 2 verstop fen und den Eisaus...

Страница 35: ...Unsachgem er Umgang mit dem Ge r t kann zu Sachsch den f hren Innenbeleuchtung ausschlie lich zur Beleuchtung des Ger teinneren ver wenden Sie ist nicht zur Beleuchtung eines Raumes geeignet Die Innen...

Страница 36: ...zontale kippen Nach dem Transport und vor dem An schlie en das Ger t ca 2 Stunden aufrecht stehen lassen Zum Auspacken keine scharfen oder spitzen Gegenst nde verwenden Barfacht r nicht zur Ablage von...

Страница 37: ...ufstellungsort eine Fu bodenhei zung installiert ist stellen Sie das K hlger t auf eine Isolierplatte aus festem Material Vom gew hlten Standort h ngt der Ener gieverbrauch des Ger ts ab Der Energie v...

Страница 38: ...te DE 38 Grafik Raumbedarf bei geschlossener und bei ge ffneter T r 1788 mm 895 mm 396 mm 487 mm 774 mm 745 mm 691 mm 1728 mm 30 mm 315 mm 350 mm 1126 mm 36 mm 135 90 1580 mm 36 mm 1139 mm Mindestabst...

Страница 39: ...den Vorgang bis das Ger t senkrecht ausgerichtet ist Beim ffnen der T ren darf sich das Ger t nicht bewegen T ren justieren Es kann vorkommen dass die T ren nicht auf gleicher H he stehen auch wenn da...

Страница 40: ...ktabstand vorge schaltet sein hierzu z hlen Sicherun gen LS Schalter und Sch tze Netzanschlussleitung nicht knicken oder klemmen und nicht ber scharfe Kanten legen Die Folge kann ein Ka belbruch sein...

Страница 41: ...der Kompressor selbstt tig ein Ger t k hlt zu stark Temperatur ist zu niedrig ein gestellt H here Einstellung w hlen siehe Tempera tur einstellen auf Seite DE 15 Ger t k hlt nicht ausreichend Temperat...

Страница 42: ...rungscode z B EE angezeigt bis die St rung behoben ist Zur Beseitigung der St rung nehmen Sie bitte Kontakt mit unserem Service auf siehe Seite DE 43 St rungscode betroffener Ger tebereich L sungen T...

Страница 43: ...des Ger ts und die fachgerechte Be nutzung im Haushalt verantwortlich Wenn Sie wegen eines Bedienfehlers den Kundendienst rufen so ist der Besuch auch w h rend der Gew hrleistungs Garantiezeit f r Si...

Страница 44: ...Austritt von K lte mittel besteht Brandgefahr Achten Sie darauf dass an einem K hlger t bis zur fachgerechten Ent sorgung keine K hlrippen oder Rohre besch digt werden Unser Beitrag zum Schutz der Oz...

Страница 45: ...Ger ts finden Sie unter Technische Daten Technische Daten Bestellnummer 97143127 Ger tebezeichnung Side by side K hl Gefrierkombination Modellkennung HSBS17990WETDI Ger tema e H he Breite Tiefe 1765 m...

Страница 46: ...Side by side fridge freezer with water dispenser and ice maker User manual Manual version 2001 01000 EN 20200828 Article no 97143127 Reproduction even of excerpts is not permitted HSBS17990WETDI...

Страница 47: ...eaning the fridge EN 29 Cleaning the freezer EN 29 Cleaning the drip tray EN 30 Cleaning the ice cube container EN 30 Cleaning the ice dispenser EN 31 Cleaning the water tank EN 32 Lighting EN 32 Star...

Страница 48: ...elf adjustable 1 Glass shelf as cover of large freez er drawer 1 Freezer drawer large 1 Freezer drawer small 3 Door shelf 1 Wire rack 1 Egg tray 1 Spanner Check the delivery 1 Move the appliance to a...

Страница 49: ...e maker 5 Interior light 6 6 Glass shelves in freezer Glass shelves in freezer 7 Large freezer drawer 8 Wire rack 9 Small freezer drawer 10 Glass shelves in fridge 11 Bottle rack 12 Large fruit vegeta...

Страница 50: ...ng unlocking the control panel 24 LOCK UNLOCK signal When the control panel is locked the symbol appears When the control panel is unlocked the symbol appears 25 Cold water dispenser signal 26 DISPENS...

Страница 51: ...ed improper and may result in damage to property or even personal injury The manufacturer accepts no li ability for damage caused by improper use Explanation of terms The following symbols can be foun...

Страница 52: ...see page EN 40 The appliance corresponds to protec tion class I and may only be connect ed to a plug with a protective conduc tor that has been properly installed When connecting the appliance make s...

Страница 53: ...not use any electric For example do not use any electric heating equipment knives or devices heating equipment knives or devices with an open flame such as a candle with an open flame such as a candl...

Страница 54: ...idge and freezer drawers unscrew the door cover Risks for certain groups of people CAUTION Dangers for children and people with limited physical sensory or mental ca pacity This appliance can be used...

Страница 55: ...correct handling insufficient cool ing or overlapping items can spoil the stored food This could lead to a risk of food poisoning when consumed Pay attention to the star classifica Pay attention to th...

Страница 56: ...of damage Improper handling of the appliance can lead to damage to property Do not pull or lift the appliance by its doors or door handles Place the appliance only on a lev el and firm surface that ca...

Страница 57: ...ice cubes produced during the first 6 hours produced during the first 6 hours If the water dispenser ice or cold wa If the water dispenser ice or cold wa ter has not been in use for at least a ter ha...

Страница 58: ...g of the appliance can lead to damage to property The interior light must only be used to illuminate the interior of the appli ance It is not suitable for lighting a room Operation Switching on 1 Inse...

Страница 59: ...on the display If no button is pressed for 30 seconds the control panel will lock automatical ly Setting the temperature CAUTION The appliance may not operate proper ly if the ambient temperature exce...

Страница 60: ...the Quick freezing and Quick refrigerating settings After 26 hours of Quick freezing and after 2 5 hours of Quick refrigerating the appli ance automatically switches back to normal mode You can also...

Страница 61: ...r on the display To turn off Quick refrigerating and Quick freezing press MODE selection button enough times until the QUICK FRZ and QUICK REF symbols disappear from the display Holiday mode WARNING H...

Страница 62: ...time To avoid an excessive loss of cooling a tone will sound when one or both doors of the fridge freezer have been open for more than 2 minutes Close the open door s When you open the door of the ref...

Страница 63: ...appliance Clean regularly surfaces that can come in contact with food and acces sible drainage systems Clean water tanks if they have not been used for 48 h flush the water system connected to a wate...

Страница 64: ...he door hinge Store small bottles and tubes in the large door shelf 14 Place securely closed bottles in the bot tle rack 11 Place cooked and baked foods on the glass shelves 10 Place fresh meat game p...

Страница 65: ...periods for freezer products In case of prolonged power failure or malfunction of the appliance remove the stored frozen food from the appli ance and store it in a sufficiently cool place or in anoth...

Страница 66: ...will protect against oxidation penetration by microbes transfer of odours and flavourings and drying out freezer burn Only use packaging material that is strong impermeable to air and liquid not too...

Страница 67: ...2 star door shelves 2 star door shelves Inthefreezercompartmentofyourfridge freez Inthefreezercompartmentofyourfridge freez er there are 2 star door shelves 3 They are er there are 2 star door shelve...

Страница 68: ...ilar into the ice or cold wa ter outlet Do not use delicate glasses or cups to catch the ice These could break as a result of the difference in tempera ture Health hazard Eating ice cubes which have b...

Страница 69: ...remind you to clean the water tank 15 After cleaning the water tank you can turn off the symbol by pressing and holding the DISPENSER button for 3 seconds Function of the ice maker When the freezer h...

Страница 70: ...re If you need a larger quantity of ice cubes take them directly from the ice cube container instead Section Cleaning the ice cube container on page EN 30 describes how to remove the ice cube containe...

Страница 71: ...hed ice 4 To stop the flow of ice pull the vessel back slightly from the dispenser guide Keep holding the vessel under the ice outlet for another 2 seconds to catch any falling ice Dispensing ice cube...

Страница 72: ...ired press the LOCK UNLOCK but ton 23 to unlock the control panel 2 Press the ICE OFF button 31 The 29 symbol will light up on the display 34 2 3 Lock the ice dispenser 2 using the lock ing box 34 to...

Страница 73: ...oil and grease Remove con taminants as quickly as possible Only use soft cloths Do not wash individual appliance parts in a dishwasher They are not dishwasher safe Never spray the appliance with a wa...

Страница 74: ...ct the mains plug to the socket or switch on the fuse again 3 Place the food back in the fridge 4 Switch on Quick freezing QUICK FRZ and Quick refrigerating QUICK REF at the same time see page EN 16 5...

Страница 75: ...uding the door seals and allow to air briefly Using the appliance again 1 Re insert the internal fittings 2 Connect the mains plug to the socket or switch on the fuse again 3 To quickly cool the fridg...

Страница 76: ...lockwise or anticlockwise to loosen any trapped ice cubes 2 Clean the ice cube container and its cover with a soft cloth water and a mild cleaner 3 Dry all parts thoroughly Using the appliance again 1...

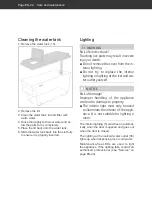
Страница 77: ...e cover from the in terior lighting Do not try to replace the interior lighting or lighting at the ice cold wa ter outlet yourself NOTICE Risk of damage Improper handling of the appliance can lead to...

Страница 78: ...approx 2 hours after transport and before connecting Do not use sharp or pointed objects to unpack it Do not place objects on the bar com partment door Move the appliance using a wheeled platform for...

Страница 79: ...g appliances 10 cm from washing machines dishwashers 10cm If underfloor heating is installed at the set up location place the cooling appliance on an insulation plate made from solid material The use...

Страница 80: ...e requirement diagram when the door is open and when the door is closed 1788 mm 895 mm 396 mm 487 mm 774 mm 745 mm 691 mm 1728 mm 30 mm 315 mm 350 mm 1126 mm 36 mm 135 90 1580 mm 36 mm 1139 mm Minimum...

Страница 81: ...with a spirit level Repeat the process until the appliance is standing up vertically The appliance should not move when opening the doors Adjusting the doors It may be that the doors are not on the sa...

Страница 82: ...his in cludes fuses circuit breakers and con tactors Do not kink or pinch the mains cable or lay it over sharp edges This can re sult in a break in the cable CAUTION Fire hazard Improper handling of t...

Страница 83: ...s the compressor au tomatically switches on Appliance cools too quickly Temperature has been set too low Select a higher setting see Setting the tem perature on page EN 14 The appliance doesn t cool s...

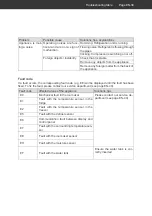
Страница 84: ...the corresponding fault code e g EE will be displayed until the fault has been fixed To fix the fault please contact our service department see page EN 40 Fault code Affected areas of the appliance S...

Страница 85: ...e responsible for the condition of the appliance and its proper use in the household If you call out for customer service due to an operating error you will incur charges even during the guarantee war...

Страница 86: ...d insulation must be proper ly disposed of Refrigerant leakage may cause a fire hazard Until the point of proper disposal en sure that none of the cooling fins or tubes on a refrigerating appliance ar...

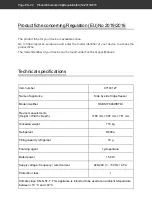
Страница 87: ...er Technical specifications Technical specifications Item number 97143127 Name of appliance Side by side fridge freezer Model identifier HSBS17990WETDI Device measurements Height Width Depth 1765 mm 8...

Отзывы: