background image

Safety

Page EN-6

thorised specialists. Please contact 
our service department if necessary 
(see “Service” on page EN-27).

Only parts corresponding to the orig-
inal appliance specifi cations may be 
used for repairs. 

In the event of a fault, as well as be-
fore extensive cleaning, pull out the 
mains plug or isolate/unscrew the 
fuse. 

Do not put any objects in or through 
the housing openings, and also en-
sure that children cannot insert any 
objects into them.

Check the appliance regularly for 
damage.

Fire hazard!
Improper handling of the appliance can 
lead to fi re and damage to property.

Do not connect to a timer or a sepa-
rate remote-controlled system for dis-
tance monitoring and control.

Do not locate multiple portable sock-
et-outlets or portable power supplies 
at the rear of the appliance.

Risks associated with using 
refrigerants

 WARNING

Risk of fi re and explosion!
Your appliance’s refrigeration circuit 
contains the environmentally friendly, 
but fl ammable and – as a mixture of air 
and gas – explosive refrigerant R600a 
(isobutane). 

Do not use mechanical devices or oth-
er means to accelerate the defrost-
ing process, other than those recom-
mended by the manufacturer. 

Mechanical intervention in the refrig-
eration system must only be carried 
out by authorised specialists.

Do not damage the refrigerant cir-
cuit, e.g. by puncturing the refrigerant 
channels of the condensate evapora-
tor with sharp objects, bending the 
piping, or cutting open the insulation. 

Ensure that none of the cooling fi ns 
or tubes on a cooling appliance are 
damaged prior to the point of proper 
disposal.

To prevent the formation of a fl am-
mable gas-air mixture in the event 
of a leakage in the refrigeration cir-
cuit, the installation space must have 
a minimum size of 1  m

3

 per 8  g of 

refrigerant in compliance with the 
EN 378 standard. The amount of re-
frigerant contained in your appliance 
can be found on the type plate.

To avoid the formation of sparks, do 
not pull out the mains plug in the 
event of a gas leak.

Dispose of old electrical appliances 
at an authorised collection or return 
point.

Only use original accessories.

Health hazard!
Spurting refrigerant can damage the 
eyes. 

If refrigerant comes into contact with 
the eyes or mucous membranes, im-
mediately fl ush eyes with clean water 
and seek medical attention.

Содержание HGS14355DI

Страница 1: ...Gefrierschrank Gebrauchsanleitung Anleitung Version 2201 01012 DE 20221012 Artikel Nr 92591142 96669548 Nachdruck auch auszugs weise nicht gestattet HGS14355DI HGS14355DW...

Страница 2: ...Auspacken und Aufstellen DE 21 Grundreinigung DE 23 T rgriff montieren DE 24 Elektrischer Anschluss DE 24 T ranschlag wechseln DE 25 Fehlersuchtabelle DE 28 Service DE 29 Beratung Reklamation und Bes...

Страница 3: ...arnt vor m glichen Sachsch den Symbolerkl rung Folgende Symbole finden Sie in dieser Ge brauchsanleitung bzw auf dem Ger t Dieses Symbol verweist auf n tzli che Zusatzinformationen Vorsicht Brandgefah...

Страница 4: ...tung beschrieben Jede andere Verwendung gilt als nicht be stimmungsgem und kann zu Sachsch den oder sogar zu Personensch den f hren Der Hersteller bernimmt keine Haftung f r Sch den die durch nicht be...

Страница 5: ...e Spannung anliegt N here Informationen hierzu nden Sie auf dem Typschild Die vollst ndige Trennung vom Stromnetz erfolgt bei diesem Ger t nur durch Ziehen des Netzsteckers aus der Steckdose Ger t dah...

Страница 6: ...g ist unzul ssig Ortsver nderliche Mehrfachsteckdo sen oder Netzteile nicht an der R ck seite der Ger te platzieren Risiken im Umgang mit K ltemitteln WARNUNG Brand und Explosionsgefahr Im K ltemittel...

Страница 7: ...lter sind kratz und hitzeemp ndlich oder k nnen schmelzen oder in Brand geraten Kunststoffe wie sie in der W rmed m mung verbaut sind k nnen wenn sie schmelzen oder in Brand geraten gifti ge D mpfe f...

Страница 8: ...uf dem Typschild des Ger ts Bei l ngerem Stromausfall oder einer St rung am Ger t das eingelagerte Gefriergut aus dem Ger t nehmen und in einem ausreichend k hlen Raum oder einem anderen K hlger t ein...

Страница 9: ...scharfen oder spitzen Gegenst nde verwenden Beim Reinigen beachten Auf keinen Fall aggressive k rni ge soda s ure l semittelhaltige oder schmirgelnde Reinigungsmit tel verwenden Diese greifen die Kun...

Страница 10: ...schublade 6 gro e Gefrierschubladen 7 Einschubfach SMART TEMPERATURE CONTROL SUPER 3s SET SUPER COLD COLDER COLDEST 1 2 3 4 5 1 7 2 4 5 6 Ger t 3 8 Anzeige Schnelles Einfrieren aktiv 9 Taster Set zum...

Страница 11: ...e den festen Stand und entfernen Sie Gegenst nde die auf dem Ger t liegen Ausschalten Um das Ger t auszuschalten ziehen Sie den Netzstecker aus der Steckdose Wenn das Ger t ausgeschaltet ist las sen S...

Страница 12: ...istung auf Stu fe 4 eingestellt wird Verwenden Sie aber in jedem Fall die K hl Gefrierthermometer um die tats chliche Temperatur zu ermitteln Die ideale Temperatur im Gefrierbereich liegt bei 18 C Sch...

Страница 13: ...btauen Reinigen oder Stromausfall Bei einem Stromausfall bleibt das Ge friergut noch einige Zeit ausreichend gek hlt Bei l ngerem Stromausfall oder einer St rung am Ger t das ein gelagerte Gefriergut...

Страница 14: ...r nke eignen sich nicht zum Einfrieren da die Kohlens ure beim Einfrieren entweicht Die geeignete Verpackung Wichtig beim Tiefgefrieren ist die Verpackung Sie soll vor Oxidation vor dem Eindringen von...

Страница 15: ...s 18 C betragen Kaufen Sie deshalb keine Ware die in bereiften stark vereisten Truhen liegt oberhalb der vorgeschriebenen Mar kierungsmarke gestapelt ist teilweise verklumpt ist vor allem bei Beeren u...

Страница 16: ...n Sie die Eisw rfelformen 11 des mitgelieferten Eisw rfelbereiters 12 zu ca mit frischem Trinkwasser und stel len Sie ihn waagerecht in den Gefrierraum Benutzen Sie dazu am besten einen F ll beh lter...

Страница 17: ...f chen an Empfehlenswert sind Allzweckreiniger mit einem neutralen pH Wert T rdichtungen und Ger teteile aus Kunststoff sind emp ndlich gegen l und Fett Verunreinigungen m g lichst schnell entfernen N...

Страница 18: ...eratur im Innenraum wieder auf den vorigen Wert wie im Abschnitt K hlleistung einstellen auf Seite DE 11 beschrieben Gefrierbereich abtauen Tauen Sie das Ger t m glichst im Win ter ab wenn die Au ente...

Страница 19: ...lich trocken und l ften Sie kurze Zeit durch 11 Setzen Sie die Schubladen wieder ein und legen Sie die Lebensmittel zur ck in den Gefrierbereich 12 Stecken Sie den Netzstecker wieder in die Steckdose...

Страница 20: ...e Inbetriebnahme auf Seite DE 21 2 Entfernen Sie alle Verpackungstei le Kunststoffprofile Klebestreifen und Schaumpolster 3 Pr fen Sie ob die Lieferung vollst ndig ist 4 Kontrollieren Sie ob das Ger t...

Страница 21: ...des Verdampfers mit scharfen Gegenst nden Abknicken von Rohrleitungen usw Herausspritzendes K ltemittel ist brennbar und kann zu Augensch den f hren Sp len Sie in diesem Fall die Augen unter klarem Wa...

Страница 22: ...t bel ftet und m glichst k hl sind Ung nstig sind Standorte mit direkter Sonneneinstrahlung oder unmittelbar neben einem Ofen Herd oder Heiz k rper 3 Wenn am Aufstellungsort eine Fu bo denheizung inst...

Страница 23: ...2 C bestimmt subtropische Zone ST Dieses K hlger t ist f r die Verwendung bei Umge bungstemperaturen von 16 C bis 38 C bestimmt tropische Zone T Dieses K hlger t ist f r die Verwendung bei Umge bungst...

Страница 24: ...uch entwickelt oder verbrannt riecht ungewohnte Ger usche von sich gibt In einem solchen Fall Netzstecker aus der Steckdose ziehen bzw Sicherung herausschrauben ausschalten und unseren Service kontakt...

Страница 25: ...Seite DE 11 T ranschlag wechseln Sollten Ihre r umlichen Verh ltnisse es erfor dern k nnen Sie den T ranschlag der Ger tet r 2 wechseln Diese Arbeit erfordert aller dings etwas handwerkliches Geschick...

Страница 26: ...Scharnier vorbereiten 3 1 Setzen Sie ggf den T rgriff 3 um Lesen sie dazu noch einmal den Abschnitt T r griff montieren auf Seite DE 24 25 26 2 L sen Sie die Schraube am Kunststoffein satz 25 der Ger...

Страница 27: ...charnier 23 links an und drehen Sie den Schraubfu 4 wieder ein Drehen Sie die Schrauben mit dem Schraubendreher 2 oder 3 Umdrehun gen weit hinein und ziehen Sie sie dann mit dem 8er Schraubenschl ssel...

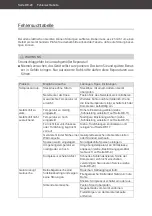
Страница 28: ...ehe K hlleistung einstellen auf Seite DE 11 Ger t k hlt nicht ausreichend Temperatur zu hoch eingestellt Niedrigere Einstellung w hlen siehe K hlleistung einstellen auf Seite DE 11 T r nicht fest vers...

Страница 29: ...iden Wenden Sie sich an un seren Service Ersatzteile stehen f r eine Mindestdauer von sieben Jahren nach dem Inverkehrbringen des letzten Exemplars des Modells zur Ver f gung T rdichtungen stehen f r...

Страница 30: ...Verbraucher bis zu drei Altger te einer Ger teart bei einer Sam melstelle eines Vertreibers unentgeltlich ab geben ohne dass dies an den Erwerb eines Neuger ts gekn pft ist Allerdings darf keine der u...

Страница 31: ...d Um welt haben Kleben Sie daher bei lithiumhalti gen Batterien und Akkus vor der Entsorgung die Pole ab um einen u eren Kurzschluss zu vermeiden Batterien und Akkus die nicht fest im Ger t verbaut si...

Страница 32: ...inden Sie unter Technische Daten Technische Daten Bestellnummer 96669548 92591142 Ger tebezeichnung Gefrierschrank Modellkennung HGS14355DW HGS14355DI Ger tema e H he Breite Tiefe 1426 mm 544 mm 571 m...

Страница 33: ...Freezer User manual Manual version 2201 01012 EN 20221012 Item no 92591142 96669548 Reproduction even of ex cerpts is not permitted HGS14355DI HGS14355DW...

Страница 34: ...king and setup EN 19 Cleaning before use EN 21 Attaching the door handle EN 22 Electrical connections EN 22 Changing the door hinges EN 23 Troubleshooting table EN 26 Service EN 27 Advice complaints a...

Страница 35: ...st possible dam age to property Explanation of symbols The following symbols can be found in this user manual and or on the appliance This symbol refers to useful addi tional information Caution Fire...

Страница 36: ...to prop erty or even personal injury The manufactur er accepts no liability for damage caused by improper use Safety notices In this chapter you will find general safety notices which you must always...

Страница 37: ...e be connected to an easi ly accessible socket so that it can be quickly disconnected from the power supply in the event of malfunction Since all poles of the appliance can not be disconnected from th...

Страница 38: ...nical devices or oth er means to accelerate the defrost ing process other than those recom mended by the manufacturer Mechanical intervention in the refrig eration system must only be carried out by a...

Страница 39: ...pliance away from open ames and hot surfaces Risks in handling freezers CAUTION Health hazard Contaminated food can cause health problems Opening the door for long periods can cause a signi cant incre...

Страница 40: ...ry low temperature Never touch them with wet hands This can cause injury to the skin Skin damage can occur even with dry skin Let ice cubes or ice lollies thaw a lit tle before eating do not put into...

Страница 41: ...freezer drawer 6 Large freezer drawers 7 Sliding drawer SMART TEMPERATURE CONTROL SUPER 3s SET SUPER COLD COLDER COLDEST 1 2 3 4 5 1 7 2 4 5 6 Appliance 3 8 Quick freezing active indicator 9 Set butt...

Страница 42: ...unusual noises check that it is stable and re move any objects that may be on top of it Switching off To switch the appliance off pull the mains plug out of the socket If the appliance is switched off...

Страница 43: ...tures can be reached by setting the cooling power to level 4 It is highly recommended to use fridge freezer thermometers to find out the actual temper atures The ideal temperature for the freezer is 1...

Страница 44: ...or power failure If there is a power failure the frozen food may remain suf ciently cold for some time In case of prolonged pow er failure or malfunction of the appli ance remove the stored frozen fo...

Страница 45: ...ut freezer burn Only use packaging material that is strong impermeable to air and liquid not too stiff and labelled It should be desig nated as suitable for freezer use Use plastic clips rubber bands...

Страница 46: ...bags Observe the storage conditions and times on the packaging Defrosting food Observe the following basic rules when defrosting food To defrost food remove it from the freezer and let it defrost at r...

Страница 47: ...the freezer It is best to use a filling container for this not included in the package contents 13 14 2 To remove ice cubes turn the levers 13 clockwise The ice cubes fall into the storage con tainer...

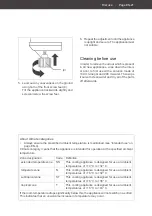
Страница 48: ...rfaces All purpose cleaners with a neutral pH are recommended Door seals and plastic parts are sen sitive to oil and grease Remove con taminants as quickly as possible Only use soft cloths Checking an...

Страница 49: ...ment If possible defrost the appliance in winter when the outside temperature is low You can then store the food on the bal cony or similar while defrosting Alternatively you can wrap up the frozen fo...

Страница 50: ...table place and unpack it see First use on page EN 19 2 Remove all parts of the packaging plastic profiles tape and foam padding 3 Check that the delivery is complete 4 Check whether the appliance was...

Страница 51: ...is ammable when spurt ing out and can damage the eyes In this case rinse your eyes in clean wa ter and seek medical assistance im mediately NOTICE Risk of damage Improper handling of the appliance may...

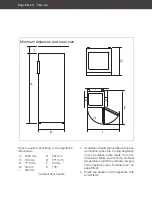
Страница 52: ...out door handle Minimum distances and room size 3 If underfloor heating is installed at the set up location place the cooling appliance on an insulation plate made from sol id material Make sure that...

Страница 53: ...designed for use at ambient temperatures of 16 C to 32 C subtropical zone ST This cooling appliance is designed for use at ambient temperatures of 16 C to 38 C tropical zone T This cooling appliance...

Страница 54: ...a smell of burning makes unfamiliar noises In such cases remove the mains plug from the socket or unscrew isolate the fuse and contact our service de partment see page EN 27 Do not connect to a timer...

Страница 55: ...m page EN 10 Changing the door hinges If your spatial conditions require it you can change the door hinge of the appliance door 2 This work however requires you to have a certain degree of craftsmansh...

Страница 56: ...r handle again at page EN 22 25 26 2 Loosen the screw on the plastic insert 25 of the appliance door and remove the plastic insert 3 Screw the plastic insert 26 on the oppo site side of the appliance...

Страница 57: ...rew foot 4 back in Use the screwdriver to tighten the screws by just 2 to 3 turns and then use the 8 mm spanner to tighten them fully 2 Place the appliance upright 3 Re insert the appliance door 2 Ass...

Страница 58: ...r setting see Set the cooling power on page EN 10 The appliance doesn t cool sufficiently Temperature has been set too high Select a lower setting see Set the cooling power on page EN 10 Door not tigh...

Страница 59: ...defec tive appliances repaired Please contact our service department regarding this Spare parts are available for a minimum peri od of seven years after the final version of the model has been placed...

Страница 60: ...s may return up to three old electrical appliances of the same type to a distributor s collection point for free with out having to purchase a new electrical ap pliance In this case however the old ap...

Страница 61: ...ironment It is therefore important to tape off the terminals of lithium batteries and rechargeable batter ies before disposing of them to prevent an external short circuit Single use and rechargeable...

Страница 62: ...pecifications Technical specifications Item number 96669548 92591142 Name of appliance Upright Freezer Model identifier HGS14355DW HGS14355DI Device measurements Height Width Depth 1426 mm 544 mm 571...

Страница 63: ......

Страница 64: ......

Отзывы: