background image

Service

Page EN-34

Service

In order for us to help you quickly, please tell us:

Name of appliance

Colour

Model

Order number

Hanseatic Refrigerator with freezer 

compartment

white

HEKS8260GE

74909835

Advice, complaints and 

orders

Please contact your mail order company’s 

customer service centre if


– the delivery is incomplete,


– the appliance is damaged during trans-

port,


– you have questions about your appliance,


– a malfunction cannot be rectified using 

the troubleshooting table,


– you would like to order additional acces-

sories.

Repairs and spare parts

You can prevent waste by having your defec-

tive appliances repaired. Please contact our 

service department regarding this.
Spare parts are available for a minimum peri-

od of seven years after the final version of the 

model has been placed on the market. Door 

seals are available for a period of ten years. 


Customers in Germany

Please contact our Technical Service:

Phone +49 (0) 40 36 03 31 50 

Customers in Austria

Please contact your mail order company’s 

customer service centre or product advice 

centre.

Please note!


You are responsible for the condition of the appliance and its proper use in the household. 
If you call out for customer service due to an operating error, you will incur charges, even during 

the guarantee/warranty period. 
Damage resulting from non-compliance with this manual unfortunately cannot be recognised.

Содержание HEKS8260GE

Страница 1: ...K hlschrank mit Gefrierfach Gebrauchsanleitung Anleitung Version 2201 00617 DE 20230105 Artikel Nr 74909835 Nachdruck auch auszugs weise nicht gestattet HEKS8260GE POWER 3 SUPER TEMP C ALARM sec 88...

Страница 2: ...n Betrieb nehmen DE 23 Auspacken und Aufstellen DE 23 Grundreinigung DE 23 T ranschlag wechseln DE 25 Elektrischer Anschluss DE 27 Installation DE 28 Ger t einbauen DE 29 Fehlersuchtabelle DE 33 Servi...

Страница 3: ...warnt vor m glichen Sachsch den Symbolerkl rung Folgende Symbole finden Sie in dieser Ge brauchsanleitung bzw auf dem Ger t Dieses Symbol verweist auf n tzliche Zusatzinformationen Vorsicht Brandgefah...

Страница 4: ...bei der Benutzung beaufsichtigt werden Wenn die Netzanschlussleitung dieses Ger tes besch digt wird muss sie durch den Her steller oder seinen Kundendienst oder eine hnlich qualifizierte Person erset...

Страница 5: ...nnt riecht ungewohnte Ger usche von sich gibt In einem solchen Fall Netzstecker aus der Steckdose ziehen bzw die Siche rung ausschalten herausschrauben und unseren Service kontaktieren siehe Seite DE...

Страница 6: ...st nde einstecken k nnen Abdeckungen von der Innenbeleuch tung nicht entfernen Nicht versu chen die Innenbeleuchtung aus zutauschen Wenden Sie sich im Bedarfsfall an unseren Service siehe Seite DE 34...

Страница 7: ...delgef hl Kopfschmerzen belkeit oder Ersticken verursachen K ltemitteld mpfe nicht einatmen Sollte K ltemittel austreten Raum unverz glich l ften Risiken durch chemische Stoffe VORSICHT Explosionsgefa...

Страница 8: ...atur ber l ngere Zeit den vorgeschrie benen Temperaturbereich ber oder unterschreitet Es kann dann zu einem Temperaturanstieg im Ger teinneren kommen Immer die vorgeschriebene Umge bungstemperatur ein...

Страница 9: ...n f hren Ger t nur an eine ordnungsgem installierte Schutzkontakt Steckdose anschlie en Der Anschluss an eine Steckdosenleis te oder eine Mehrfachsteckdose ist unzul ssig Ger t nicht direkt an die Wan...

Страница 10: ...tragen kann Beim Auspacken keine scharfen oder spitzen Gegenst nde verwenden Beim Auspacken auf keinen Fall das Isoliermaterial an der Ger ter cksei te besch digen Zum Beschleunigen des Abtauvor gangs...

Страница 11: ...dienfeld 2 Ger tet r 3 Obere T rablage 4 Beweglicher T rabsteller 5 Untere T rablage 6 Frontblende 7 Gem sefach 8 Gem sefachabdeckung 9 Glasablage 10 Gefrierfach Ger t 11 Taster POWER 12 Taster SUPER...

Страница 12: ...rpr fen Sie den festen Stand und entfernen Sie Gegenst nde die auf dem Ger t liegen Ausschalten Um das Ger t auszuschalten ziehen Sie den Netzstecker aus der Steckdose Alternativ halten Sie den Taster...

Страница 13: ...nach 6 Stunden au tomatisch deaktiviert Um das Schnelle K hlen manuell zu de aktivieren dr cken Sie den Taster 12 Die Anzeige erlischt Die Temperaturan zeige springt auf die urspr ngliche Einstel lun...

Страница 14: ...uf bewahren dass es andere Lebensmit tel nicht ber hrt oder auf diese tropft Tipps f r das K hlen POWER 3 SUPER TEMP C ALARM sec 88 9 8 7 5 3 4 Kombinieren Sie die Glas und T rabla gen wie in der Abbi...

Страница 15: ...r stehend und fest verschlossen Lassen Sie warme Lebensmittel abk hlen ehe Sie sie in den K hlschrank stellen Die Temperaturen im Ger t und damit der Energieverbrauch k nnen ansteigen wenn die Tu ren...

Страница 16: ...Raum oder einem anderen K hlger t einlagern Die maximale Lagerzeit bei einer St rung entneh men Sie dem Typschild des Ger ts Nach einer St rung berpr fen ob die eingelagerten Lebensmittel noch genie b...

Страница 17: ...weg F llen Sie Fl ssigkeitsbeh lter max zu denn beim Frieren dehnt sich Fl ssigkeit aus Lagern Sie keine Glas oder Metallgef e mit Fl ssigkeit wie Wasser Limonade Bier etc Wasser dehnt sich im gefror...

Страница 18: ...z B die Auftaufunktion Ih rer Mikrowelle Beachten Sie dabei die Herstellerangaben und beachten Sie dass sich so vermehrt Bakterien und Keime bilden k nnen Bereiten Sie aufgetaute Lebensmittel so schne...

Страница 19: ...kon trolliert werden damit keine warme Luft in das Ger t eindringt 1 Klemmen Sie zur Pr fung ein d nnes St ck Papier an verschiedenen Stellen ein Das Papier muss sich an allen Stellen gleich schwer du...

Страница 20: ...weiche T cher verwenden Tauen Sie das Ger t m glichst im Win ter ab wenn die Au entemperaturen niedrig sind Dann k nnen Sie die Lebens mittel w hrend des Abtauens auf dem Bal kon o lagern Alternativ...

Страница 21: ...che K hlleistung ein Innenbeleuchtung WARNUNG Stromschlaggefahr Das Ber hren von unter Spannung ste henden Teilen kann zu schweren Verlet zungen oder zum Tod f hren Abdeckungen von der Innenbeleuch tu...

Страница 22: ...Erstinbetriebnahme auf Sei te DE 23 2 Entfernen Sie alle Verpackungstei le Kunststoffprofile Klebestreifen und Schaumpolster 3 Pr fen Sie ob die Lieferung vollst ndig ist 4 Kontrollieren Sie ob das Ge...

Страница 23: ...r K l temittelkan le des Verdampfers mit scharfen Gegenst nden Abknicken von Rohrleitungen usw Herausspritzendes K ltemittel ist brennbar und kann zu Augensch den f hren Sp len Sie in diesem Fall die...

Страница 24: ...endung bei Umge bungstemperaturen von 10 C bis 32 C bestimmt gem igte Zone N Dieses K hlger t ist f r die Verwendung bei Umge bungstemperaturen von 16 C bis 32 C bestimmt subtropische Zone ST Dieses K...

Страница 25: ...uf Seite DE 28 ben tigen Sie zum T ranschlagwechsel noch folgendes Material mittelgro er Kreuzschlitz Schraubendre her Lesen Sie die nachfolgenden Arbeits schritte vollst ndig durch bevor Sie mit der...

Страница 26: ...en ber ange bracht werden 5 Legen Sie die Scharniere auf der gegen berliegenden Seite an POWER 3 SUPER TEMP C ALARM sec 88 18 19 19 18 6 Befestigen Sie die Scharniere 18 mit den Schrauben 19 16 16 17...

Страница 27: ...e schaltet sein ziehen Sie gegebe nenfalls eine Fachkraft zurate siehe Service auf Seite DE 34 Netzanschlussleitung nicht knicken oder klemmen und nicht ber scharfe Kanten legen Die Folge kann ein Ka...

Страница 28: ...ppelschraube 22 2 Mutter 23 2 Winkel f r M belfrontplatte 24 1 Trennschwamm 25 12 Schraube 26 2 Winkelabdeckung 27 1 Scharnierblende 28 1 Schraubenabdeckung Einbaunische Die Einbaunische muss die folg...

Страница 29: ...Schraubenschl ssel 20 25 16 16 20 25 16 16 1 Nehmen Sie die Scharnierabdeckungen 16 ab 2 Befestigen Sie beide Winkel 20 mit den Schrauben 25 am Ger t Die Winkel k nnen entweder zu Befes tigung an eine...

Страница 30: ...10 Befestigen Sie die Winkel 23 mit den Schrauben 25 an der M belfrontplatte A B Die Winkel m ssen in einem Abstand von 130 mm zur Mitte der M belfrontplatte ange bracht werden Der Abstand der Winkel...

Страница 31: ...tierten Win kel 30 am unteren Ende der M bel frontplatte mit den Schrauben 25 23 14 Richten Sie den Winkel 23 so aus dass die M belfrontplatte waagerecht sitzt 15 Drehen Sie die Muttern fest 26 25 20...

Страница 32: ...uf die Doppelschrauben 20 Stecken Sie die Scharnierblende 27 in das untere Scharnier ein 21 Falls Sie eine Sockelblende installie ren m chten stellen Sie sicher dass sie eine H he von 97 177 mm und ei...

Страница 33: ...usreichend Temperatur zu hoch eingestellt Niedrigere Einstellung w hlen siehe Temperatur einstellen auf Seite DE 12 Ger tet r nicht fest verschlossen oder T rdichtung liegt nicht voll auf Siehe T rdic...

Страница 34: ...den Sie sich an un seren Service Ersatzteile stehen f r eine Mindestdauer von sieben Jahren nach dem Inverkehrbringen des letzten Exemplars des Modells zur Ver f gung T rdichtungen stehen f r einen Ze...

Страница 35: ...Verbraucher bis zu drei Altger te einer Ger teart bei einer Sam melstelle eines Vertreibers unentgeltlich ab geben ohne dass dies an den Erwerb eines Neuger ts gekn pft ist Allerdings darf keine der u...

Страница 36: ...d Um welt haben Kleben Sie daher bei lithiumhalti gen Batterien und Akkus vor der Entsorgung die Pole ab um einen u eren Kurzschluss zu vermeiden Batterien und Akkus die nicht fest im Ger t verbaut si...

Страница 37: ...c europa eu und geben Sie die Modellkennung Ihres Ger ts ein um das Produktdatenblatt abzurufen Die Modellkennung Ihres Ger ts finden Sie unter Technische Daten Technische Daten Bestellnummer 74909835...

Страница 38: ...Refrigerator with freezer compartment User manual Manual version 2201 00617 EN 20230105 Item no 74909835 Reproduction even of ex cerpts is not permitted HEKS8260GE POWER 3 SUPER TEMP C ALARM sec 88...

Страница 39: ...to use the appliance EN 23 Unpacking and setup EN 23 Basic cleaning EN 23 Changing the door hinges EN 25 Electrical connections EN 27 Installation EN 28 Installing the appliance EN 29 Troubleshooting...

Страница 40: ...nst possible dam age to property Explanation of symbols The following symbols can be found in this user manual and or on the appliance This symbol refers to useful additional information Caution Fire...

Страница 41: ...make any technical changes to the appliance Use the appliance exclusively as described in this user manual Any other use is deemed improper and may result in damage to prop erty or even personal injur...

Страница 42: ...ocket The appliance must therefore be connected to an easi ly accessible socket so that it can be quickly disconnected from the power supply in the event of a breakdown Since all poles of the applianc...

Страница 43: ...explosion Your appliance s refrigeration circuit contains the environmentally friendly but flammable and as a mixture of air and gas explosive refrigerant R600a isobutane Do not use mechanical device...

Страница 44: ...melt or catch fire Do not use any electric heating equip ment knives or devices with an open flame as well as candles Do not use electrical appliances in side the food storage compartments of the appl...

Страница 45: ...y cool place or in another cooling appliance After a malfunction check wheth er the stored food is still edible Con sume thawed and defrosted foods immediately do not refreeze Use only potable water t...

Страница 46: ...page EN 29 Risk of damage NOTICE Risk of damage to property If the cooling unit has been transport ed horizontally lubricant from the com pressor may get into the cooling circuit If possible only tra...

Страница 47: ...h a neutral pH are recommended Door seals and plastic parts are sensitive to oil and grease Remove stains as quickly as possible Use only soft cloths for cleaning Wait 5 minutes after switching off th...

Страница 48: ...ol panel 2 Appliance door 3 Upper door shelf 4 Moveable door tray 5 Lower door shelf 6 Front panel 7 Vegetable drawer 8 Vegetable drawer cover 9 Glass shelf 10 Freezer Appliance 11 POWER button 12 SUP...

Страница 49: ...noises check that it is stable and re move any objects that may be on top of it Switching off To switch the appliance off pull the mains plug out of the socket Alternatively press and hold the button...

Страница 50: ...is automatically deactivat ed after 6 hours To deactivate Quick refrigerating manual ly press the button 12 The indicator will go out The temper ature indicator will return to the original setting Do...

Страница 51: ...ith or drip onto other food Refrigeration tips POWER 3 SUPER TEMP C ALARM sec 88 9 8 7 5 3 4 To achieve the most efficient use of ener gy for your appliance combine the glass shelves and door shelves...

Страница 52: ...placing it in the refrigerator The temperatures in the appliance and thus the energy consumption can increase if the doors are opened frequently or for a prolonged period if the temperature falls belo...

Страница 53: ...e The maximum storage time is shown on the appli ance s type plate After a malfunction check wheth er the stored food is still edible Con sume thawed and defrosted foods immediately do not refreeze Ri...

Страница 54: ...Use waterproof marker pens or adhesive labels wherever possible Freezing capacity You will find the freezing capacity for your ap pliance on the appliance type plate Adhere to the maximum freezing ca...

Страница 55: ...remove the portion you need and immediately close the rest of the pack In this way you will avoid freez er burn and will reduce ice formation on the remaining foods Always defrost meat poultry and fi...

Страница 56: ...should be difficult to pull through at all points 2 If the seal is not uniform everywhere Warm the seal in the appropriate places carefully with a hair dryer and pull it out with your fingers 3 Clean...

Страница 57: ...sting Alternatively you can wrap up the frozen food in a thick layer of newspaper and store it in a cool room or insulated bag 1 Disconnect the mains plug from the sock et or switch off the fuse 2 Rem...

Страница 58: ...ng live parts may result in severe injury or death Do not remove the cover from the in terior lighting Do not attempt to replace the interi or light Maintenance free LEDs are used to light the applian...

Страница 59: ...e place and unpack it see First use on page EN 23 2 Remove all parts of the packaging plastic profiles tape and foam padding 3 Check that the delivery is complete 4 Check whether the appliance was dam...

Страница 60: ...nt channels of the condensate evapora tor with sharp objects bending the piping or cutting open the insulation Refrigerant is flammable when spurt ing out and can damage the eyes In case of an acciden...

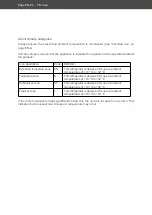
Страница 61: ...gerator is designed for use at ambient temperatures of 10 C to 32 C Temperate zone N This refrigerator is designed for use at ambient temperatures of 16 C to 32 C Subtropical zone ST This refrigerator...

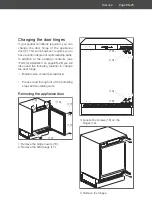
Страница 62: ...e package contents see Parts for installation on page EN 28 you will also need the following material to change the door hinge Medium size cross tip screwdriver Please read through all of the followin...

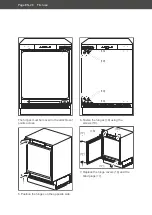
Страница 63: ...he hinges must be moved to the attachment points across 5 Position the hinges on the opposite side POWER 3 SUPER TEMP C ALARM sec 88 18 19 19 18 6 Fasten the hinges 18 using the screws 19 16 16 17 17...

Страница 64: ...at least 3 mm contact clearance consult a qualified professional if necessary see Ser vice on page EN 34 Do not kink or pinch the mains cable or lay it over sharp edges This can re sult in a break in...

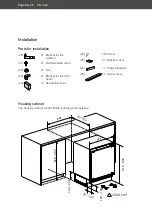
Страница 65: ...Double ended screw 22 2 Nut 23 2 Bracket for the front panel 24 1 Separation foam 25 12 Screw 26 2 Bracket cover 27 1 Hinge faceplate 28 1 Screw cover Housing cabinet The housing cabinet must fulfil...

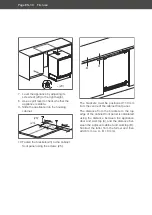
Страница 66: ...ip screwdriver a size 8 spanner a size 13 spanner 20 25 16 16 20 25 16 16 1 Remove the hinge covers 16 2 Attach both brackets 20 to the appli ance using the screws 25 The brackets can be used either t...

Страница 67: ...asten the brackets 23 to the cabinet front panel using the screws 25 A B The brackets must be positioned 130 mm from the centre of the cabinet front panel The distance from the brackets to the top edg...

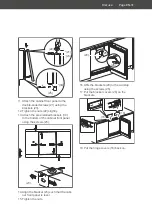
Страница 68: ...tly 13 Attach the pre installed brackets 30 to the bottom of the cabinet front panel using the screws 25 23 14 Align the bracket 23 such that the cabi net front panel is level 15 Tighten the nuts 26 2...

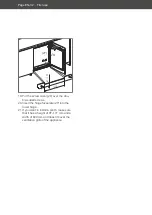
Страница 69: ...w cover 28 over the dou ble ended screws 20 Insert the hinge faceplate 27 into the lower hinge 21 If you want to install a plinth make sure that it has a height of 97 177 mm and a width of 600 mm and...

Страница 70: ...doesn t cool sufficiently Temperature has been set too high Select a lower setting see Setting the temperature on page EN 12 Appliance door not tightly closed or door seal is not completely tight See...

Страница 71: ...efec tive appliances repaired Please contact our service department regarding this Spare parts are available for a minimum peri od of seven years after the final version of the model has been placed o...

Страница 72: ...n up to three old electrical appliances of the same type to a distributor s collection point for free with out having to purchase a new electrical ap pliance In this case however the old appli ances e...

Страница 73: ...important to tape off the terminals of lithium batteries and rechargeable batter ies before disposing of them to prevent an external short circuit Single use and rechargeable batteries that are not b...

Страница 74: ...odel identifier of your device to access the product fiche The model Identifier of your device can be found under Technical specifications Technical specifications Item number 74909835 Name of applian...

Отзывы: