background image

Safety

Page EN-4

 Safety

Intended use

This appliance is intended to be used 
to remove cooking fumes and airborne 
grease from a cooktop in a private 
household. It is not designed for use in 
a commercial setting.
Use the appliance exclusively as de-
scribed in this user manual. Any other 
use is deemed improper and may result 
in damage to property or even personal 
injury. The manufacturer accepts no li-
ability for damage caused by improper 
use.

Explanation of terms

The following symbols can be found in 
this user manual.

 WARNING

This symbol indicates a hazard with a 
medium level of risk which, if not avoid-
ed, could result in death or serious inju-
ry.

 CAUTION

This symbol indicates a hazard with a 
low level of risk which, if not avoided, 
could result in minor or moderate injury. 

 NOTICE

This symbol warns against possible 
damage to property. 

This symbol refers to useful addi-
tional information.

Explanation of symbols

 Protection class I

 Safety notices

In this chapter you will fi nd  general 
safety instructions which you must al-
ways observe for your own protection 
and that of third parties. Please also 
observe the warning notices in the indi-
vidual chapters. 

 WARNING

Risks in handling household 
electrical appliances

Risk of electric shock!
Touching live parts may result in severe 
injury or death.

Only use the appliance indoors. Do 
not use in wet rooms or in the rain.

If the mains plug is no longer acces-
sible after installation, an all-pole dis-
connecting device complying with 
over-voltage category III must be 
connected to the house wiring with a 
contact gap of at least 3 mm; this in-
cludes fuses, circuit breakers and con-
tactors.

Lay the mains cord so that it does not 
pose a tripping hazard.

Do not kink or pinch the mains cord 
or lay it over sharp edges.

Keep the appliance, the mains plug 
and the mains cord away from open 
fl ames and hot surfaces. 

Always touch the mains plug, not the 
mains cord. 

Содержание 822120

Страница 1: ...Gebrauchsanleitung Anleitung Version 92790 DE 20190912 Bestell Nr 822120 Nachdruck auch auszugs weise nicht gestattet SY 3288C1IR E8 C40 L831 600 Insel Dunstabzugshaube...

Страница 2: ...4 Anbaustelle festlegen DE 14 Dunstabzugshaube montieren DE 16 Fehlersuchtabelle DE 21 Unser Service DE 22 Allgemeiner Service DE 22 Ersatzteile DE 22 Aktivkohlefilter bestellen DE 22 Umweltschutz DE...

Страница 3: ...von der Wandbeschaffenheit abh ngig sind Bitte lassen Sie sich hierzu im Fachhandel beraten siehe Werkzeuge und Hilfsmittel auf Seite DE 14 ein Aktivkohlefilter Dieser wird nur f r den Umluftbetrieb...

Страница 4: ...edrigen Risiko grad die wenn sie nicht vermieden wird eine geringf gige oder m ige Verletzung zur Folge haben kann HINWEIS Dieser Signalbegriff warnt vor m g lichen Sachsch den Dieses Symbol verweist...

Страница 5: ...ausschlie lich autorisierte Fachkr fte vornehmen Bei Reparaturen d rfen ausschlie lich Teile verwendet werden die den urspr nglichen Ger tedaten entspre chen In diesem Ger t be nden sich elektrische u...

Страница 6: ...s sei denn sie werden beaufsichtigt Kinder d rfen nicht mit dem Ger t spielen VORSICHT Verletzungsgefahr Bei der Montage beachten dass eini ge Teile scharfe Kanten aufweisen Zur Montage eine stabile S...

Страница 7: ...nung beachtet werden Den zust ndigen Schornsteinfegermeister zu Rate ziehen Dunstabzugshaube niemals an einen Bel ftungsschacht bzw Raum oder Abgaskamin anschlie en Die abge f hrte Luft darf nicht in...

Страница 8: ...Mit den Tasten 26 langsam 27 mittel oder 28 schnell die Dunstab zugshaube in der gew nschten Gebl se st rke starten 2 W hrend das Gebl se l uft kann mit den Tasten 26 27 oder 28 die Ge bl sest rke ge...

Страница 9: ...zstecker ziehen Sollte der Netzstecker schwer zug ngig sein entsprechende Sicherung ausschalten bzw herausdrehen VORSICHT Brandgefahr Unsachgem erUmgangmitdemGer t oder mangelhafte Wartung kann dazu f...

Страница 10: ...ssen 13 14 5 Den Fettfilter hinten in die Nut einschie ben dann nach oben hin zuklappen und mit der R ndelschraube 14 festschrauben 6 Stromversorgung wieder herstellen Aktivkohlefilter einsetzen erset...

Страница 11: ...oben hin zuklappen und mit der R ndelschraube 14 festschrauben 6 Stromversorgung wieder herstellen Wechseln der LED Sollte eine der LEDs nicht mehr funktionieren darf sie nur von einem autorisierten...

Страница 12: ...muss je nach Benutzung erneuert werden mindestens etwa alle sechs Mo nate berpr fen Abluftbetrieb Beim Abluftbetrieb werden die K chend nste angesaugt ber den Fettfilter gereinigt und ber den Ablufts...

Страница 13: ...n le m glichst gradlinig zu verlegen und scharf abknickende Winkel zu vermeiden B gen und Kr mmer sind g nstiger Jede Biegung erh ht den Ener gieverbrauch den Querschnitt des Gebl sestutzens nicht zu...

Страница 14: ...utzen Sie Sicherheitshandschuhe Die lackierten Fl chen Ihrer neuen Dunst abzugshaube sind zum Schutz vor Kratzern w hrend des Transports mit Folien berzo gen Ziehen Sie die Schutzfolien vor der Mon ta...

Страница 15: ...seite so dass Sie gen gend Platz f r die Montage der Dunstabzugshaube haben 2 3 4 2 Grundplatte 2 aus der Kaminblende 4 ab montieren die 3 Schrauben 3 l sen und Grundplatte 2 zusammen mit dem Stabi li...

Страница 16: ...r t kann zu Sachsch den f hren Fassen Sie beim Anheben und Tragen der Dunstabzugshaube immer direkt am Geh use an nicht an der Glasab deckung Diese k nnte sonst brechen 13 14 1 1 Dunstabzugshaube 1 mi...

Страница 17: ...liegen lassen 5 17 8 Glasscheibe 5 auf die Dunstabzugshaube 1 legen 9 Gegebenenfalls den Kabelbinder um den LED Lichtschlauch 15 l sen und den Ste cker mit einem Stecker in der Steckerbox 17 verbinde...

Страница 18: ...ampen im unteren Ring 20 mit dem 2 Stecker in der Ste ckerbox 17 verbinden er muss mit einem Klick einrasten und Stecker in die Ste ckerbox 17 einlegen 17 16 14 Deckel der Steckerbox 17 zuklappen und...

Страница 19: ...r ver schraubten Montageschienen 7 mit je vier Schrauben 10 vier Unterlegscheiben 11 und vier Muttern 12 an je eine Monta geschienen Halterung 9 schrauben 25 6 20 Nur bei Abluftbetrieb Abluftschlauch...

Страница 20: ...1 hineinstecken 1 2 25 Dunstabzugshaube 1 mit zwei Personen am Geh use anheben und die Grund platte 2 mit 9 Schrauben an die Decke schrauben Bei Betondecken 6 Schwerlastanker ver wenden 6 26 Bei Ablu...

Страница 21: ...r che werden nicht mehr ausrei chend beseitigt schwacher Luftstrom Die Filter sind ver schmutzt Fettfilter reinigen und oder Aktivkohlefilter er neuern siehe ab Seite DE 10 Motor stoppt nach einigen M...

Страница 22: ...t nur f r den Umluftbe trieb erforderlich und geh rt nicht zum Liefer umfang Sie k nnen ihn unter folgender Artikelnum mernummer beziehen 625444 Damit wir Ihnen schnell helfen k nnen nennen Sie uns bi...

Страница 23: ...er Aktivkohlefilter entsorgen Die verbrauchten Aktivkohlefilter k nnen Sie mit dem Hausm ll entsorgen Verpackung Unsere Verpackungen werden aus umweltfreundlichen wiederverwert baren Materialien herge...

Страница 24: ...76 5 Klasse f r den Fettabscheidegrad auf einer Skala A h chste Effizienz bis G geringste Effizienz C Luftstrom bei minimaler Geschwindigkeit im Normalbetrieb 437 m h Luftstrom bei maximaler Geschwin...

Страница 25: ...kt 343 1 m h Gemessener Luftdruck im Bestpunkt 362 Pa Maximaler Luftstrom 787 4 m h Gemessene elektrische Eingangsleistung im Bestpunkt 145 9 W Nennleistung des Beleuchtungssystems 3 0 W Durchschnittl...

Страница 26: ...SY 3288C1IR E8 C40 L831 600 Versorgungsspannung Frequenz 220 240 V 50 Hz Schutzklasse I Ger tema e Breite Tiefe 60 0 cm 60 0 cm H he gesamt 125 0 cm H he der Kaminblende 105 cm 125 cm Anschluss Abluf...

Страница 27: ...User manual Manual version 92790 EN 20190912 Article no 822120 Reproduction even of ex cerpts is not permitted SY 3288C1IR E8 C40 L831 600 Island exhaust hood...

Страница 28: ...ine the installation space EN 14 Assembling the exhaust hood EN 16 Troubleshooting table EN 21 Our Service Centre EN 22 General customer service EN 22 Spare parts EN 22 Ordering activated charcoal fil...

Страница 29: ...e and dimen sions will vary depending on the character istics of the wall Please have a specialist advise you as to which ones you need see Tools and aids on page EN 14 an activated charcoal filter Th...

Страница 30: ...ol refers to useful addi tional information Explanation of symbols Protection class I Safety notices In this chapter you will nd general safety instructions which you must al ways observe for your own...

Страница 31: ...Independent or improper repairs made to the appliance may cause damage to property and personal in jury any liability and warranty claims will be forfeited Never try to repair a defective or suspected...

Страница 32: ...edge of the Exhaust hood must be at least 65 cm for gas cookers For gas stovetops you must read the user manual for the stovetop If the manual stipulates a larger distance this must be observed Do no...

Страница 33: ...tended exclusively for the exhaust hood NOTICE Risk of damage to property To operate the air extraction a ceiling break of at least 15 5 cm in diameter is required We recommend having a specialist ele...

Страница 34: ...ur exhaust hood has three settings 1 You can start the exhaust hood on the desired blower setting with the buttons 26 lowest 27 medium or 28 highest 2 When the blower is already in operation you can u...

Страница 35: ...pull out the mains plug If the mains plug is dif cult to access switch off or pull out the cor responding fuse CAUTION Fire hazard Improper handling of the appliance or incorrect maintenance can resul...

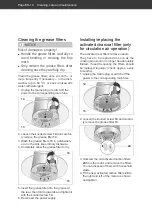
Страница 36: ...filter to dry 13 14 5 Insert the grease filter into the groove at the rear then fold it upwards and tighten it with the knurled screw 14 6 Reconnect the power supply Installing replacing the activated...

Страница 37: ...nto the groove at the rear then fold it upwards and tight en it with the knurled screw 14 6 Reconnect the power supply Changing the LEDs If one of the LEDs ceases to work it must be changed by an auth...

Страница 38: ...ec tivity of the filter and exhaust functions The activated charcoal filter must be replaced depending on use check it at least every six months Exhaust air operation When air is extracted the cooking...

Страница 39: ...hannels as straight as possible and avoiding any sharp angles curves or bends are preferable Each bend increases energy usage not reducing the cross section of the fan connector The wider the diameter...

Страница 40: ...Risk of injury Wear protective gloves The painted surfaces of your new exhaust hood are covered with protective film to pre vent scratching during transport Remove the protective film before attach i...

Страница 41: ...e the cooker aside so that you have enough space to install the exhaust hood 2 3 4 2 Removing the base plate 2 from the chim ney panel 4 loosen the 3 screws 3 and remove the base plate 2 together with...

Страница 42: ...roper handling of the appliance can lead to property damage When lifting and carrying the ex haust hood always carry it by the housing and never by the glass cover This could otherwise break 13 14 1 1...

Страница 43: ...ssible 5 17 8 Place the glass pane 5 on the exhaust hood 1 9 If necessary loosen the cable strap around the LED light tube 15 and connect the plug to a plug in the plug box 17 it must click into place...

Страница 44: ...he lower ring 20 to the second plug in the plug box 17 it must click into place and in sert the plug into the plug box 17 17 16 14 Close the cover of the plug box 17 and tighten it with the two screws...

Страница 45: ...12 11 9 7 19 As shown screw the assembled mount ing rails 10 to the mounting rail bracket 9 with four screws 7 four washers 11 and four nuts 12 25 6 20 Only for exhaust air operation Attach the exhau...

Страница 46: ...1 2 25 With two people lift the exhaust hood 1 onto the housing and screw the base plate 2 to the ceiling with 9 screws For concrete ceilings use 6 heavy duty anchors 6 26 For exhaust air operation A...

Страница 47: ...d week airflow The filters are dirty Clean the grease filter and or replace the ac tive carbon filter see from page EN 10 Motor stops after a few minutes The appliance has overheated and tripped the i...

Страница 48: ...rcoal filters An activated charcoal filter is only required for air circulation and is not included in the package contents You can order it under the following article number 625444 In order for us t...

Страница 49: ...ler directly for more information about this topic Disposing of activated charcoal filters You can dispose of activated charcoal filters with your household waste Packaging Our packaging is made from...

Страница 50: ...ent to G least efficient A Grease Filtering Efficiency 76 5 Grease Filtering Efficiency class on a scale from A most efficient to G least efficient C Air flow at minimum speed in normal use 437 m h Ai...

Страница 51: ...te at best efficiency point 343 1 m h Measured air pressure at best efficiency point 362 Pa Maximum air flow 787 4 m h Measured electric power input at best efficiency point 145 9 W Nominal power of t...

Страница 52: ...Y 3288C1IR E8 C40 L831 600 Supply voltage frequency 220 240 V 50 Hz Protection class I Device measurements Width Depth 60 0 cm 60 0 cm Total height 125 0 cm Height of the flue screen 105 cm 125 cm Exh...

Отзывы: