background image


Hansa C5 O&M Manual - OM-025 Revision A 13/02/2020 


© Hansa Chippers 2020 

13 


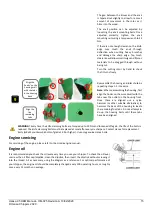
Measure the width of the knife and check that it will be 
at least 35 mm after sharpening. 
 
If the knife will be shorter than 35 mm, then the knife 
should be replaced. Please contact your nearest Hansa 
dealer. 

 Sharpen the knives 


Sharpen  the  knives  on  a  surface  grinder.  A  cutting 
angle  of  40  °  is  critical  for  the  performance  of  the 
chipper.  Make  sure  plenty  of  coolant  is  used  when 
grinding to avoid softening of the steel knives. 

Reinstall the knives 


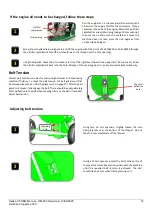
Clean all mounting surfaces and remount the knife in the reverse procedure. Tighten all three nuts as tight as 
possible by hand using a  13 mm spanner and  6  mm hexagonal  Allen key.

  Do NOT


tighten the bolts with the 

hexagonal Allen key. 

Note:

 When blades are sharpened, material is removed from the blades, affecting the distribution of weight in 

the rotor. The rotor must be balanced appropriately after blade sharpening, as per the method outlined below: 


5


MIN 35 mm 


6


7


40 ° 

Содержание C5

Страница 1: ...hippers com au HANSA NEW ZEALAND 64 7 849 4749 info hansaproducts co nz www hansaproducts co nz HANSA AUSTRALIA 1800 426 722 info hansaproducts com au www hansaproducts com au Operation maintenance and safety manual All operators must fully read and understand this operator s manual before using the chipper Keep this manual for future reference ...

Страница 2: ...SAFE OPERATING PROCEDURE 7 STARTING PROCEDURE 8 SHUTDOWN PROCEDURE 9 PETROL 9 PROCESSING FIBROUS MATERIAL 9 STORAGE 10 TRANSPORTATION 10 TROUBLESHOOTING 10 WHAT TO DO IF 10 MAINTENANCE 11 KNIFE RE SHARPENING AND KNIFE REPLACEMENT 11 REMOVE THE KNIFE FOR SHARPENING 12 SHARPEN THE KNIVES 13 REINSTALL THE KNIVES 13 ENGINE SERVICING 15 ENGINE OIL 15 BELT TENSION 16 BELT REPLACEMENT 17 BOLT TORQUE 18 S...

Страница 3: ...stes include Prunings stalks roots vegetable matter hay grass bark Dry manure Branches Palm fronds Dead and hard timbers Note these will dull the knives faster Paper or cardboard Do NOT process Bones Soil root balls sand grit stones metal If you have any questions contact your authorised dealer Do NOT exceed 60 mm branch diameter Receiving your Hansa chipper You may receive your chipper assembled ...

Страница 4: ...astener pack Box 2 contains The inlet chute A fastener pack containing parts required for assembly Documentation Hansa operations manual warranty card and Honda motor manual CAUTION The chipper body weighs 53 kg it is recommended to cut the box open rather than lifting the body out Box 1 Box 2 All the C5 parts in two separate boxes Contents in box 2 Inlet chute Documentation Fastener pack Contents...

Страница 5: ...he chipper body Loosely attach a nyloc nut item no 4 to the end of the bolt threads Once both clamping plates are in position place the axle on top of the bolts between the housing and clamping plate The axle will rest on the shanks on the bolts as per the image Item no Fastener pack contents in box 1 1 Four bolts to attach the axle 2 Two washers to attach the axle 3 Two clamping plates to attach ...

Страница 6: ...g Adjust the inlet chute until the holes at the back of the rotor housing line up with the holes on the back of the inlet chute Line up the holes and insert the bolts item no 1 heavy washers item no 2 spring washers item no 3 and nuts item no 4 Ensure that the heavy washer is touching the chipper body top and the spring washer is touching the nut bottom Safety Preventing accidents is the responsib...

Страница 7: ...haust fumes Hot Exhaust Heat burns Keep bare hands and other body parts a safe distance away from hot exhaust Fire Heat burns Clear any build up of chipping debris around the engine and exhaust regularly Belt Drive Skin pinching and or abrasions Ensure that the belt guard is in place and keep away from the belt Cutting rotor and knives Pinching crushing cutting severing Keep your face and body out...

Страница 8: ...18 to operate the chipper Check That all screws nuts bolts and other fasteners are properly secured That fuel and engine oil levels are above the minimum levels That the fuel cap is secured and there is no fuel leaking from the tank That all chipper components are in place and in good condition If any parts are worn or damaged contact Hansa for replacements That the inlet chute and housing are cle...

Страница 9: ...es spinning and the occurrence of ejection of small pieces back up the inlet chute Hold larger branches back and feed the chipper with care until you are familiar with its capacity The engine will slow down or stall if the branch is too large Feed longer pieces together with short stubby pieces Feed soft materials intermittently with branches The wood chips tend to clean out any soft residue left ...

Страница 10: ... knives This causes excessive vibration which may result in damage to the chipper Move or tilt the machine while it is running Remove the catcher bag while the machine is running Touch any guards or stick hands between guards while the machine is on or connected to a power supply Put hands or any other part of the body or clothing Inside the feed chute past the rubber flap Inside or near the openi...

Страница 11: ...ibrous material take note of the following points Blades must be sharp to process fibrous material Fibrous material is best introduced to the machine as a bundle Fibrous material should be introduced slowly into the machine Tease the material in and out while feeding it into the cutting mechanism ensuring it is not drawn through the machine without being cut properly Do NOT extend hands past the r...

Страница 12: ...g Troubleshooting What to do if The chipper won t start The engine oil level might be too low The chipper is fitted with oil alert and will not start if the oil level is too low Check the oil level and top up if required The chipper is placed on a slope The chipper is fitted with oil alert and will not start if the oil is not level Move the chipper to level ground Belt drive engagement will not wo...

Страница 13: ...er with care and keep it clean at all times To service or inspect the equipment or to change an accessory you must Switch the engine off Allow the chipper to cool before any inspections or adjustments Wait until the cutting rotor and engine are at a complete standstill before opening the cutting rotor housing Disconnect the spark plug wire from the spark plug Switch the fuel lever to the off posit...

Страница 14: ...g the inlet chute on Open the cutting rotor housing by removing the four housing bolts using two 16 mm spanners Using a nylon hammer or suitable alternative gently dislodge the housing from its grooves and remove it Use a 13 mm spanner to remove the knives from the rotor There are three nuts you must remove to do so If the bolt head turns hold it with a 6 mm hexagonal Allen key Note Do NOT try to ...

Страница 15: ... of the chipper Make sure plenty of coolant is used when grinding to avoid softening of the steel knives Reinstall the knives Clean all mounting surfaces and remount the knife in the reverse procedure Tighten all three nuts as tight as possible by hand using a 13 mm spanner and 6 mm hexagonal Allen key Do NOT tighten the bolts with the hexagonal Allen key Note When blades are sharpened material is...

Страница 16: ...n the edge is dull it can be reversed When both edges are worn the anvil should be replaced contact Hansa for a replacement The clearance between the knife and anvil should be approx 1 mm on the inside closest to the bearing and 3 mm on the outside closest to the edge of the rotor refer to diagram for more detail Ensure you are using the outer blade for calibrating these distances 8 Bearing Edge o...

Страница 17: ...ylon hammer or other suitable alternative to hammer the back of the housing to locate the remaining four tabs Do not attempt to do up the housing bolts until these tabs have been aligned Engine servicing For servicing of the engine please refer to the Honda engine manual Engine oil It is recommended you check the oil level every time you use your chipper To check the oil level unscrew the oil fill...

Страница 18: ... not over Screw the oil filler cap dipstick back into the hole Dispose of the used engine oil in an environmentally sensitive way Belt Tension Correct belt tension is crucial for minimising belt wear and maximising machine efficiency To check the belt tension the belt guard must first be removed see step 1 of belt replacement on page 17 After the belt guard is removed fully engage the belt There s...

Страница 19: ...ing images or are clearly broken then they need to be replaced If a belt change is necessary follow these steps Using a 6 mm Allen key undo the two cap screws from the belt guard and then remove the belt guard Note Engine not shown in this view Using two 13 mm spanners unbolt and remove the engine 4 x M8 nuts Replace the belt A21 vee belt 3 1 2 Soft swollen belt Cracked underside of belt Sidewall ...

Страница 20: ...in line loosen the four bolts holding the engine in place and repeat this step Ensure the belts are properly tensioned follow the adjusting belt tension procedure on page 16 Fasten the pulley guard back into place Note Engine not shown in this view Bolt torque Relative Strength Bolt Marking 4 6 8 8 Recommended Tightening Torque Recommended Tightening Torque Bolt size Spanner size lb ft Nm lb ft Nm...

Страница 21: ...ht 1200 mm Weight 67 kg Motor Make model Honda GP200 Max Power 6 5 HP Cutting System Disc speed 3600 RPM Disc dimensions 286 x 10 mm Shaft diameter 25 mm Knives 1 Feed System Chipping capacity 60 mm Feed type Gravity fed self feeding Inlet chute opening 100 x 130 mm Discharge System Discharge height 600 mm Outlet chute type Fixed ...

Страница 22: ...020 Hansa Chippers 2020 20 Decals Decal Description Location General machine safety and inlet chute considerations Side of inlet chute Belt guard hazard Rotor Housing front next to the belt guard Outlet chute and deflector safety Outlet deflector ...

Страница 23: ...anty is available to domestic non commercial and commercial customers excluding commercial customers in the business of plant equipment hire All HANSA products that have not complied with the Extended Warranty registration and maintenance requirements are entitled to the Non Registered warranty period set out below Any authorised HANSA dealer is further authorised to repair or replace any part whi...

Страница 24: ...time of sale through the Hansa Chippers website www hansachippers com registration Serviced by a HANSA Dealer in accordance with the Hansa service schedule using genuine HANSA parts Meeting all other warranty requirements Warranty periods vary depending on whether the purchaser is i a domestic i e non commercial customer ii commercial customer excluding plant equipment hire businesses or iii a com...

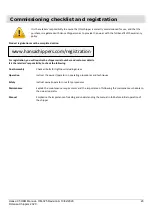
Страница 25: ... on operating procedures and techniques Safety Instruct owner operator on safety procedures Maintenance Explain the maintenance requirements and the importance of following the maintenance schedule to the owner operator Manual Emphasise the importance of reading and understanding the manual in full before initial operation of the chipper It is the retailers responsibility to ensure that this chipp...

Отзывы: