background image

20

ThermoBalance III Jeux de 

garniture

04148XX0

04154XX0

04160XX0

06067XX0

06069XX0

06068XX0

06637XX0

06581XX0

06657XX0

31318XX1

31737XX1

32318XX1

Les instructions ci-après s’appliquent aux modèles 

suivants:


Robinet mitigeur  Ensemble mitigeur


seulement 

pour la douche

C Cross   

06069XX0 

06116XX0 

C Scroll   

06068XX0 

06115XX0 

C Lever   

06067XX0 

06114XX0

Solaris² E 

04148XX0 

Allegro² E 

04154XX0 

Metro² E  

04160XX0

Metris S   

31318XX1 

31325XX1

Focus S   

31737XX1 

31775XX1

Talis S   

32318XX1 

32325XX1

Solaris E  

06637XX0 

06643XX0 

Stratos E  

06581XX0 

06587XX0 

Metro E   

06657XX0 

06663XX0

Ces jeux de garniture sont conçus 

pour les corps d'encastrement 

ThermoBalance III 06624000, 

06628000.

Le mur doit être complètement fini 

et étanche avant l’installation de 

cet ensemble de garniture.

Français

Содержание Allegro2 E 04180XX0

Страница 1: ...e III Rough and Trim Installation Instructions Warranty C Cross 06069XX0 C Scroll 06068XX0 C Lever 06067XX0 Solaris E 04148XX0 Allegro E 04154XX0 Metro E 04160XX0 Metris S 31318XX1 Focus S 31737XX1 Talis S 32318XX1 ...

Страница 2: ...Do not remove the i box Rough valve 06628000 has service stops isolation stops built onto the valve When the slots are horizontal the stops are in the on position When the slots are vertical the stops are in the off position Use a 3 mm Allen wrench to open and close the stops CAUTION When connecting the hot and cold supplies hold the stop steady with a wrench to avoid stop misalignment and breakag...

Страница 3: ...rough valve is for use in a three function shower only All outlets must be plumbed Do not plug any outlet If a two function shower with a shared function is desired follow the special piping instructions on page 5 The ThermoBalance III rough requires a ThermoBalance III trim kit Do not attempt to use any other trim kit Do not attempt to use this valve with a diverter tub spout Technical Informatio...

Страница 4: ...must decide which function he she wants to have come on first As the handle is turned from the off position outlet II will come on first Suggested Layouts three feature systems These are the most common installations using the ThermoBalance III valve but are not the only ones possible The handshower is plumbed to outlet 1 it can only be run by itself The shower head is on 2 and the bodyjets on 3 T...

Страница 5: ...t be connected to the hot inlet and the cold supply must be connected to the cold inlet In an older home confirm that the hot and cold supplies are not reversed If the supplies are not connected to the correct inlets the valve cannot function correctly Model 06628000 only When connecting the hot and cold supplies hold the stop steady with a wrench to avoid stop misalignment and breakage of the fac...

Страница 6: ...e flushing plug permits hot water to flow through outlets I II and the cold water to flow through outlet III Install hose bibbs and hoses to the outlets Flush the lines for at least 5 minutes Use the hoses to direct the water to a location where it will not cause damage The flushing plug prevents cross flow However it will not stop the flow of water through the outlets If the building is to be pre...

Страница 7: ...Metris S 31318XX1 31325XX1 Focus S 31737XX1 31775XX1 Talis S 32318XX1 32325XX1 Solaris E 06637XX0 06643XX0 Stratos E 06581XX0 06587XX0 Metro E 06657XX0 06663XX0 The finished wall must be complete and made watertight before installation of this trim kit These trim kits are for use with rough valves 06624000 and 06628000 only 04148XX0 04154XX0 04160XX0 06067XX0 06069XX0 06068XX0 06637XX0 06581XX0 06...

Страница 8: ... Use the flushing plug screws to connect the cartridge retainer plate to the rough Tighten the screws evenly with a manual screwdriver Do not over tighten the screws Seal the wall around the i box with waterproof sealant Failure to seal the wall can lead to possible water damage Turn the water off at the main or at the stops before beginning Be sure that the blue sealing gasket is removed as well ...

Страница 9: ...rtridge Solaris only oval escutcheon Snap the white Duotec spacers onto the carrier plate Install two Duotec strips on the spacers Install the two remaining strips on the back of the escutcheon trim plate All other models round escutcheon Install two Duotec strips directly on the carrier plate Install the remaining two strips on the back of the escutcheon stop unit Perform the following test to ch...

Страница 10: ...ckwise 2a Then without pressing inward on it turn it counter clockwise until it is positioned vertically and hits the safety stop 2b Install the handle 3 Tighten the screw All models Install the carrier plate and gasket with the carrier plate screws Press the escutcheon firmly over the carrier plate The strips of Duotec will interlock producing a very firm hold Install the handle Tighten the handl...

Страница 11: ...local plumbing codes when setting the high temperature limit stop Tools required Thermometer 3 mm Allen wrench Turn the water on using the handle Loosen the handle screw Remove the handle Remove the clip and stop ring from the thermostatic cartridge stem Turn the thermostatic mixer stem until the output water is the desired maximum high tempera ture usually 110 F Reinstall the stop ring so that it...

Страница 12: ... water cooler Turn the temperature control counter clockwise to make the water warmer The temperature control will stop when the water is 100 this is the safety stop To override the safety stop press inward on the temperature control and continue to turn it counter clockwise Important the temperature control will not automatically reset to below 100 F when the water is turned off When the handle i...

Страница 13: ...ep socket wrench to unscrew and remove the thermostatic cartridge Failure to hold the stop unit steady while removing or replacing the thermostat cartridge will result in damage to the stop unit Rinse the debris from the filters Scrub gently with a soft toothbrush if necessary Do not remove the screens Lubricate the o rings with white plumbers grease Hold the stop unit steady Reinstall and tighten...

Страница 14: ...ater drips continuously after the valve is turned off ceramic plate s damaged replace cartridge Water does not get hot cold enough high temperature limit stop not set properly reset high temperature limit stop handle not justified justify handle thermostat cartridge is faulty replace thermostat cartridge Temperature is erratic thermostat cartridge is faulty replace thermostat cartridge Water press...

Страница 15: ...horizontale les butées d arrêt sont à la position on Lorsque les fentes sont à la verticale les butées d arrêt sont à la position off Utilisez une clé hexagonale de 3 mm pour ouvrir et fermer les butées d arrêt Lors du raccordement des arrivées d eau chaude et froide tenez la butée d arrêt à l aide d une clé pour qu elle ne bouge pas afin de prévenir tout désalignement ou rupture des éléments file...

Страница 16: ...ouches à trois fonc tions seulement Toutes les conduites de sortie doivent être raccordées Ne mettez de bouchon sur aucune des sorties Si vous désirez une douche à deux fonctions avec une fonction partagée veuillez suivre les instructions de raccordement spécial à la page La pièce intérieure ThermoBalance III requiert le jeu de garniture ThermoBalance III N utilisez aucun autre jeu de garniture N ...

Страница 17: ...est tournée depuis la position d arrêt off la sortie II viendra en premier Installation suggérée systèmes à trois fonctions Les installations suivantes sont les plus courantes avec ThermoBalance III mais il existe d autres installations possibles La douchette est raccordée à la sortie 1 elle ne peut fonctionner avec aucune autre fonction La pomme de douche est raccor dée à la sortie 2 et les jets ...

Страница 18: ...ice d arrivée prévu pour l eau chaude et la conduite d eau froide doit être installée dans l orifice d arrivée prévu pour l eau froide S il s agit d une construction non récente assurez vous que les conduites d alimen tation d eau froide et d eau chaude n ont pas été inversées Si les conduites ne sont pas raccordées dans les bons orifices la valve ne pourra fonction ner correctement Modèle 0662800...

Страница 19: ...tion i box comprend un bou chon de rinçage permettant de rincer la conduite et de tester la pression avant que la cartouche et la garniture ne soient installées Il est recommandé d effectuer un test de pression de la tuyauterie avant de fermer les murs Le bouchon de rinçage permet à l eau froide de circuler dans les conduites de sortie I et II et à l eau chaude de circuler dans la conduite de sort...

Страница 20: ...0 06116XX0 C Scroll 06068XX0 06115XX0 C Lever 06067XX0 06114XX0 Solaris E 04148XX0 Allegro E 04154XX0 Metro E 04160XX0 Metris S 31318XX1 31325XX1 Focus S 31737XX1 31775XX1 Talis S 32318XX1 32325XX1 Solaris E 06637XX0 06643XX0 Stratos E 06581XX0 06587XX0 Metro E 06657XX0 06663XX0 Ces jeux de garniture sont conçus pour les corps d encastrement ThermoBalance III 06624000 06628000 Le mur doit être com...

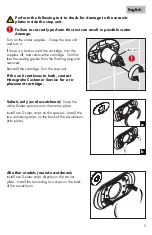
Страница 21: ...on de rinçage à la boîte d installation i box Enlevez le bouchon de rinçage Ne jetez pas les vis Assurez vous d avoir également enlevé le joint bleu du bouchon de rinçage Insérez l élément thermostatique dans la pièce intérieure La languette s insère directement dans la coche de la pièce intérieure Utilisez les vis du bouchon de rinçage pour fixer la plaque d arrêt de l élément thermostatique à la...

Страница 22: ...core Si le problème persiste contactez le Service à la clientèle pour obtenir un élément thermostatique de rechange Solaris uniquement écusson ovale Enclenchez les espaceurs Duotec blancs sur la plaque support Installez deux bandes Duotec sur les espaceurs Installez les deux autres bandes au dos de l écus son plaque de la garniture Tous les autres modèles écusson rond Installez deux bandes Duotec ...

Страница 23: ...oignée Outils requis Thermomètre Clé hexagonale 3 mm Ouvrez la valve Placez le thermomètre dans le jet d eau Tournez le bouton de contrôle de la température jusqu à ce que l eau qui s écoule atteigne 100 F Fermez l eau À l aide d une clé hexagonale de 3mm desserrez la vis de la poignée Retirez la poignée de la valve 1 D une main tenez le levier de la poignée et de l autre main faites tourner le bo...

Страница 24: ... effectuez le réglage pour le réglage de la butée limite d eau chaude Outils requis Thermomètre Clé hexagonale 3 mm Ouvrez l eau à l aide de la poignée Desserrez la vis de la poignée Retirez la poignée Retirez l étrier et la bague de retenue de la tige de la cartouche thermostatique Tournez la tige du mitigeur thermostatique jusqu à ce que la température de l eau chaude atteigne le degré voulu hab...

Страница 25: ...I Lorsque la poignée est entre la position II et III l eau viendra des deux sorties Il est impossible de faire fonctionner les trois conduites de sortie en même temps Pour que l eau soit plus chaude tournez le bouton de contrôle de la température dans le sens antihoraire Le contrôle de température s arrête lorsque l eau atteint 100 F c est l arrêt de sû reté Pour outrepasser l arrêt de sûreté appu...

Страница 26: ...hermostatique et retirez la ATTENTION Le dispositif d arrêt pourrait être endommagé si vous ne le retenez pas fermement en place lorsque vous retirez ou remplacez la cartouche thermostatique le pan de manoeuvre Rincez les débris ou dépôts pouvant se trouver dans les tamis de filtre Au besoin brossez déli catement à l aide d une brosse à dent douce Ne retirez pas les tamis Lubrifiez les joints tori...

Страница 27: ...obinet fermé Une ou des plaques de céramique sont endommagées Remplacez l élément thermosta tique L eau n est pas assez chaude froide La butée limite d eau chaude n est pas réglée Réglez a nouveau la butée d eau chaude La poignée n est pas réglée Réglez la poignée La cartouche thermostatique est défectueuse Remplacez la cartouche thermo statique La température est irrégulière La cartouche thermost...

Страница 28: ...XX0 11 Solaris handle 88530XX0 12 Stratos handle 88547XX0 13 Metro handle 88548XX0 14 Talis handle 88641XX0 15 Metris handle 16 Focus handle 17 oval escutcheon 88532XX0 18 round escutcheon 88522XX0 19 C escutcheon 20 thermostat cartidge 94282000 21 Allegro handle 22 Metro handle XX0 color code 000 chrome 620 oil rub bronze 820 brushed nickel 830 polished nickel 930 polished brass included with Sol...

Страница 29: ...s drop lets can enter openings and gaps and cause damage After cleaning rinse thoroughly with clean water to remove any cleaner residue Important Residues of liquid soaps shampoos and shower foams can also cause damage so rinse with clean water after using Please note if the surface is already damaged the effect of cleaning materials will cause further damage Components with damaged surfaces must ...

Страница 30: ... warranty covers only your Hansgrohe manufactured product Hansgrohe warrants this product against defects in material or workmanship as follows Hansgrohe will repair at no charge for parts only or at its option replace any product or part of the product that proves defective because of improper workmanship and or material under normal installation use service and maintenance If Hansgrohe is unable...

Страница 31: ...NY PERSON TO CREATE FOR IT ANY OBLIGATION OR LIABILITY IN CONNECTION WITH THIS PRODUCT HANSGROHE SHALL NOT BE LIABLE TO PURCHASER OR ANY PERSON FOR ANY INCIDENTAL SPECIAL OR CONSEQUENTIAL DAMAGES ARISING OUT OF BREACH OF THIS WARRANTY OR ANY IMPLIED WARRANTY INCLUDING MERCHANTABILITY Some States do not allow the exclusion or limitation of incidental or consequential damages so the above limitation...

Страница 32: ...Hansgrohe Inc 1490 Bluegrass Lakes Parkway Alpharetta GA 30004 Tel 770 360 9880 Fax 770 360 9887 www hansgrohe usa com US Installation Instructions Part No 90965101 06 Revised 04 2008 ...

Отзывы: