background image


63

Time Setting

This setting allows you to set the TV clock.

1

Press 

MENU

 to enter the OSD 

menus.

2

Press the 

CH UP 

button


or 

CH 

DOWN 

button to select 

Miscellaneous.

3

Press 

MENU

 to enter the Miscella-

neous menu.

4

Press 

MENU

 to select Time Setting.
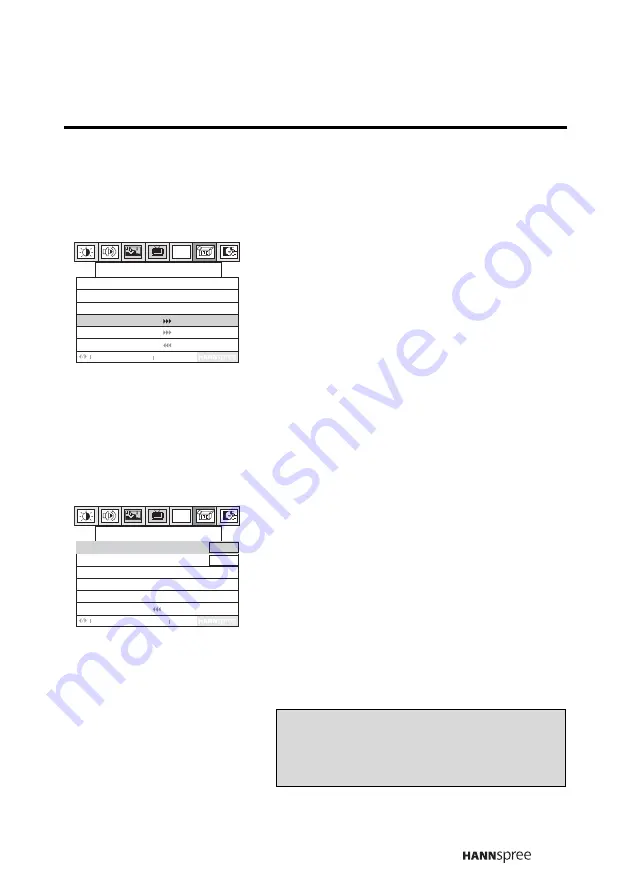
5

Press the 

CH UP 

button to enter 

the Time Setting menu.

6

Press 

MENU

 to select the Hour or 

Minute.

7

Press the 

CH UP

 button or 

CH 

DOWN

 button to decrease or 

increase the time.

8

Press 

MENU

 to select Return.

9

Press the 

CH DOWN

 button to exit 

the Time Setting menu.

PC

Return

Adjust

Menu

Next 

Language
Sleeper

OSD Display
Time Setting
More Option

Off

English

On

Off

Miscellaneous

PC

Time Setting

Return

Adjust

Menu

Next

Hour    :
Minute :

00

00

Note

The new setting is confirmed automatically 
when the OSD times out.

Содержание WT0C-15A1

Страница 1: ...15 Liquid Crystal Display Television WT0C 15A1 NTSCTVTWEN1203 MAC 001153 Batman visit...

Страница 2: ...or Cable TV 21 Connecting to AV Devices 22 Connecting to a VCR VCD DVD Player 22 Connecting to a Video Camera 23 Connecting to a Game Device 24 Connecting External Speakers or Headphones 25 Connectin...

Страница 3: ...rogram 49 Manual Program 50 Channel Add Erase 51 PC Setting 52 Horizontal Position 53 Vertical Position 54 Phase 55 Clock 56 Color Temperature 57 Miscellaneous Setting 59 Language 60 Sleeper 61 OSD Di...

Страница 4: ...r one year limited service from the date the product is received as shown on the Warranty and Service Manual please refer to the Warranty and Service Manual for the detailed warranty information Hanns...

Страница 5: ...on in this document is subject to change without notice Copyright Copyright 2003 Hannspree Inc All rights reserved This product and related documentation are pro tected by copyright and are distribute...

Страница 6: ...ling operating and cleaning the product In addition read the following Safety Notices carefully before using the product to ensure that your TV is safe and long lasting Warning This symbol is used to...

Страница 7: ...r mainte nance 4 To avoid fire or electric shocks do not overload electric power outlets Installation Safety Notes Antenna We suggest that you use an outdoor antenna to get the best signal possible un...

Страница 8: ...nd warning label instructions 4 Any changes or modifications that do not follow the instructions in this manual will void this product s warranty Warning To reduce the risk of fire or electric shock d...

Страница 9: ...8 Optimal Viewing Distance...

Страница 10: ...install near any heat sources such as radiators heat registers stoves or other apparatus including amplifiers that produce heat 9 Do not defeat the safety purpose of the polarized or grounding type p...

Страница 11: ...mbination to avoid injury from tip over 12 Only use attachments accessories specified by the manufacturer 13 Unplug this apparatus during lightning storms or when unused for long periods of time 14 Re...

Страница 12: ...to avoid an elec tric shock or a fire If the TV is dropped falls down or is otherwise damaged unplug the power cord immediately and notify a qualified service technician If any fluid is sprayed or dro...

Страница 13: ...ce the TV on a bed sofa carpet or in a sealed cabinet to avoid blocking the product s vents Install the outdoor antenna far from power trans mission lines to avoid possible danger Remove the power cor...

Страница 14: ...e techni cian if you cannot plug it in correctly If there is any problem that cannot be resolved according to the instructions given in this man ual notify a qualified service technician immedi ately...

Страница 15: ...ipment does cause harmful interference to radio or television reception which can be deter mined by turning the equipment off and on the user is encouraged to try to correct the interference by one or...

Страница 16: ...h Canada ICES 003 Class B CE Conformity Statement2 This device complies with the requirements set out in the Council Direc tive on the approximation of the Laws of the Member States relating to Electr...

Страница 17: ...4 IN 1 cable You can also connect your TV to a PC and use the TV as an external monitor Convenient control buttons located on the side panel and a handy remote control let you change channels adjust t...

Страница 18: ...ng is missing or damaged TV User s Manual Quick Start Guide Warranty and Service Manual Wire Material Package VGA Cable Power Cord Power Adapter 4 IN 1 cable RCA Jack x 3 S Jack x 1 User s Manual Quic...

Страница 19: ...on to return to TV mode 3 Adjust volume Press VOL to increase the audio volume Press VOL to decrease the audio volume 4 Source Selects the input source to be displayed TV CATV AV1 AV2 or PC 5 Menu Tur...

Страница 20: ...ption Function 1 LINE OUT Connects to external amplifier or speakers 2 DC 12V Connects to the included power adapter 3 LINE IN Connects to a PC s line out port LINE OUT LINE IN R AUDIO L VIDEO DC IN A...

Страница 21: ...white and red audio cables Video Input AV connector video yellow or S Video cables 5 HEADPHONE Connects to headphones 6 R AUDIO Connects to a right audio red cable 7 VGA Connects to a PC 8 L AUDIO Co...

Страница 22: ...f the VHF UHF Antenna or CATV cable to the antenna socket or CATV cable Note If you cannot receive channels after connecting to an antenna or cable TV line try scanning for channels See Auto Program o...

Страница 23: ...R VCD or DVD player Actual connections may vary according to the make and model of the device Refer to the user s manual included with the device for more detailed instructions Note The cables are col...

Страница 24: ...ing to the make and model of the device Refer to the user s manual included with the camcorder or camera for more detailed instructions Note The cables are color coded black red white yellow Connect e...

Страница 25: ...make and model of the game device Refer to the user s manual included with the game device for more detailed instructions Notes Connect the 4 IN 1 cable connectors to the corresponding connectors on y...

Страница 26: ...ers or headphones to the speaker or headphone line out port as illustrated Notes External speakers or headphones are not included with the product The internal TV speakers will not output sound when h...

Страница 27: ...in port to the PC s line out port to listen to the PC s audio output on the TV s speakers Refer to the following illustration Note You can connect the line out port of a CD ROM player stereo or other...

Страница 28: ...the power adapter connector into the DC IN input jack on the rear panel of the TV 3 Insert the three pronged plug at the other end of the power cord into a power outlet DC IN input jack LINE OUT LINE...

Страница 29: ...best results use the remote control within a distance of 5 meters from the front of the TV s signal sensor Do not exceed an angle of 30 degrees when pointing at the signal sensor Refer to the followi...

Страница 30: ...n indicating that the power has been turned on 2 Press the POWER button again the power LED changes from green to red indicating that the TV is in off mode Selecting Channels Press CH UP or CH DOWN bu...

Страница 31: ...The TV supports S Video input in addition to normal video and audio sig nals The TV detects the signal type automatically and gives priority to S Video when two signals are detected at the same time A...

Страница 32: ...enus using the control panel Note To exit the OSD menus press the CH UP button or CH DOWN button to select Exit Then press MENU to exit the OSD menus Also after you finish setting OSD parameters follo...

Страница 33: ...ss Contrast menu 4 Press the CH UP button to increase the brightness Press the CH DOWN button to decrease the brightness 5 Press MENU to select Return 6 Press the CH DOWN button to exit the Brightness...

Страница 34: ...u 4 Press MENU to select Contrast 5 Press the CH UP button to increase the contrast Press the CH DOWN button to decrease the contrast 6 Press MENU to select Return 7 Press the CH DOWN button to exit t...

Страница 35: ...U button to enter the OSD menus 1 Press the CH UP button or CH DOWN button to select Audio Setting 2 Press MENU to enter the Audio Setting menu PC Audio Setting Return Select Menu OK L R Treble Bass B...

Страница 36: ...ng menu 4 Press the CH UP button to increase the treble Press the CH DOWN button to decrease the treble 5 Press MENU to select Return 6 Press the CH DOWN button to exit the Audio Setting menu PC Audio...

Страница 37: ...s MENU to select Bass 5 Press the CH UP button to increase the bass Press the CH DOWN but ton to decrease the bass 6 Press MENU to select Return 7 Press the CH DOWN button to exit the Audio Setting me...

Страница 38: ...nce 5 Press the CH UP button to change the balance to the right speaker Press the CH DOWN button to change the balance to the left speaker 6 Press MENU to select Return 7 Press the CH DOWN button to e...

Страница 39: ...e Audio Setting menu 4 Press MENU to select SRS 5 Press the CH DOWN button to turn the SRS on Press the CH UP but ton to turn the SRS off 6 Press MENU to select Return 7 Press the CH DOWN button to ex...

Страница 40: ...ss MENU to select Mute 5 Press the CH DOWN button to turn the mute on Press the CH UP but ton to turn the mute off 6 Press MENU to select Return 7 Press the CH DOWN button to exit the Audio Setting me...

Страница 41: ...button to enter the OSD menus 1 Press the CH UP button or CH DOWN button to select Video Setting 2 Press MENU to enter the Video Setting menu PC Video Setting Return Select Menu OK G R Hue Saturation...

Страница 42: ...crease the red hue The image becomes more red Press the CH UP button to increase the hue towards the green hue The image becomes more green 5 Press MENU to select Return 6 Press the CH DOWN button to...

Страница 43: ...P button to increase the saturation The screen image becomes more vibrant Press the CH DOWN button to decrease the saturation The screen image becomes less vibrant 6 Press MENU to select Return 7 Pres...

Страница 44: ...ENU to select Sharpness 5 Press the CH UP button to increase the sharpness Press the CH DOWN button to decrease the sharpness 6 Press MENU to select Return 7 Press the CH DOWN button to exit the Video...

Страница 45: ...are available Warm Press the CH UP button or CH DOWN button to select Warm Standard Press the CH UP button or CH DOWN button to select Standard Cold Press the CH UP button or CH DOWN button to select...

Страница 46: ...tton to enter the OSD menus 1 Press the CH UP button or CH DOWN button to select TV Setting 2 Press MENU to enter the TV Setting menu PC TV Setting Return Select Menu OK TV CATV MTS Auto Program Manua...

Страница 47: ...CH UP button or CH DOWN button to select CATV STD default when connected to cable 5 Press MENU to select Return 6 Press the CH DOWN button to exit the TV Setting menu PC TV Setting Return Adjust Menu...

Страница 48: ...particular channel SAP Press the CH UP button or CH DOWN button to select SAP Sec ondary Audio Program an audio channel used with the NTSC TV stan dard for auxiliary transmission of such items as fore...

Страница 49: ...speaker and the alternate audio signal on the other speaker 5 Press MENU to select Return 6 Press the CH DOWN button to exit the TV Setting menu PC TV Setting Return Adjust Menu Next TV CATV MTS Auto...

Страница 50: ...he TV Set ting menu 4 Press MENU to select Auto Program 5 Press the CH DOWN button to select Yes Channel indicator values scans from 2 to 69 antenna connection or from 1 to 125 CATV cable connection P...

Страница 51: ...lect Manual Pro gram 5 Press the CH UP button to enter the Manual Program menu 6 Press the CH UP button and the CH DOWN button to find the channel you want to add When you have found the channel see t...

Страница 52: ...list Erase Channel Press the CH UP button to select Erase The channel is erased from the channel list When you return to the normal TV screen and use the CH UP button and the CH DOWN button to browse...

Страница 53: ...the OSD menus 1 Connect product to a PC 2 Press SOURCE to select PC 3 Press the CH UP or CH DOWN button to select PC 4 Press MENU to enter the PC menu PC PC Setting Return Select Menu OK H Position V...

Страница 54: ...Press the CH UP button to move the display to the right Press the CH DOWN button to move the dis play to the left 5 Press MENU to select Return 6 Press the CH DOWN button to exit the PC setting menu...

Страница 55: ...to select V Position 5 Press the CH UP button to move the display up Press the CH DOWN button to move the display down 6 Press MENU to select Return 7 Press the CH DOWN button to exit the PC setting...

Страница 56: ...to select Phase 5 Press the CH UP button to increase the phase Press the CH DOWN button to decrease the phase 6 Press MENU to select Return 7 Press the CH DOWN button to exit the PC setting menu PC P...

Страница 57: ...to select Clock 5 Press the CH UP button to increase the clock Press the CH DOWN but ton to decrease the clock 6 Press MENU to select Return 7 Press the CH DOWN button to exit the PC setting menu PC...

Страница 58: ...the CH UP button to enter the Color Temp menu 6 Press MENU to select Color Temp Warm Press the CH DOWN button to select Warm Standard Press the CH UP button or CH DOWN button to select Standard Cold...

Страница 59: ...G or User B press the CH UP button or CH DOWN button to increase or decrease the selected color tem perature 7 Press MENU to select Return 8 Press the CH DOWN button to exit the More Option menu PC Mo...

Страница 60: ...to enter the OSD menus 1 Press the CH UP button or CH DOWN button to select Miscellaneous 2 Press MENU to enter the Mis cellaneous menu PC Return Select Menu OK Language Sleeper OSD Display Time Setti...

Страница 61: ...ella neous menu 4 Press the CH UP button or CH DOWN button to select Chinese or English 5 Press MENU to select Return 6 Press the CH DOWN button to exit the Miscellaneous menu PC Miscellaneous Return...

Страница 62: ...MENU to enter the Miscella neous menu 4 Press MENU to select Sleeper 5 Press the CH UP button or CH DOWN button to select a power off time Off 30 minutes 60 minutes 90 minutes 120 minutes 6 Press MEN...

Страница 63: ...2 Press the CH UP button or CH DOWN button to select Miscellaneous 3 Press MENU to enter the Miscella neous menu 4 Press MENU to select OSD Display 5 Press the CH DOWN button to select On Press the CH...

Страница 64: ...nter the Time Setting menu 6 Press MENU to select the Hour or Minute 7 Press the CH UP button or CH DOWN button to decrease or increase the time 8 Press MENU to select Return 9 Press the CH DOWN butto...

Страница 65: ...e More Option menu 6 Press MENU to select OSD back ground 7 Press the CH DOWN button to make the background transparent Press the CH UP button to make the background opaque 8 Press MENU to select Retu...

Страница 66: ...once it begins 1 Press MENU to enter the OSD menus 2 Press the CH UP button or CH DOWN button to select Miscellaneous 3 Press MENU to enter the Miscella neous menu 4 Press MENU to select More Option 5...

Страница 67: ...is already selected highlighted in yellow The TV immediately resets when ON is selected and you see the message on the screen 8 Press MENU to select Return 9 Press the CH DOWN button to exit the More...

Страница 68: ...a dry soft cloth and use neutral cleaning fluids If your model has leather components wipe the leather parts with a dry cloth and keep the area dry Place the TV far from sources of steam to avoid mak...

Страница 69: ...t the saturation in the OSD menus See Saturation on page 42 Picture is OK no sound Press the VOL UP button on the control panel or remote control Make sure the MTS option is set to Main or Dual See MT...

Страница 70: ...re the video signal cable is con nected properly Snow appears on the screen Adjust the location of the antenna placing it far from roads or sources of interference Check the antenna and the video sign...

Страница 71: ...240V 50 60 Hz 12V DC Power Consumption 60 W Maximum Power Consumption Standby 3 W Maximum Weight including base 5 3 kg Dimensions including base 415 mm H x 435 mm W x 202 mm D Pixel Format Hor Freq kH...

Страница 72: ...audio other than the primary MAIN audio signal DUAL enables reception of a stereo audio signal while SAP Second Audio Program enables reception of a separate channel that may be a different language...

Страница 73: ...is a trademark of SRS Labs Inc SRS technology is incorpo rated under license from SRS Labs Inc...

Отзывы: