background image

User’s Manual 


SETTING THE MONITOR ON THE WALL


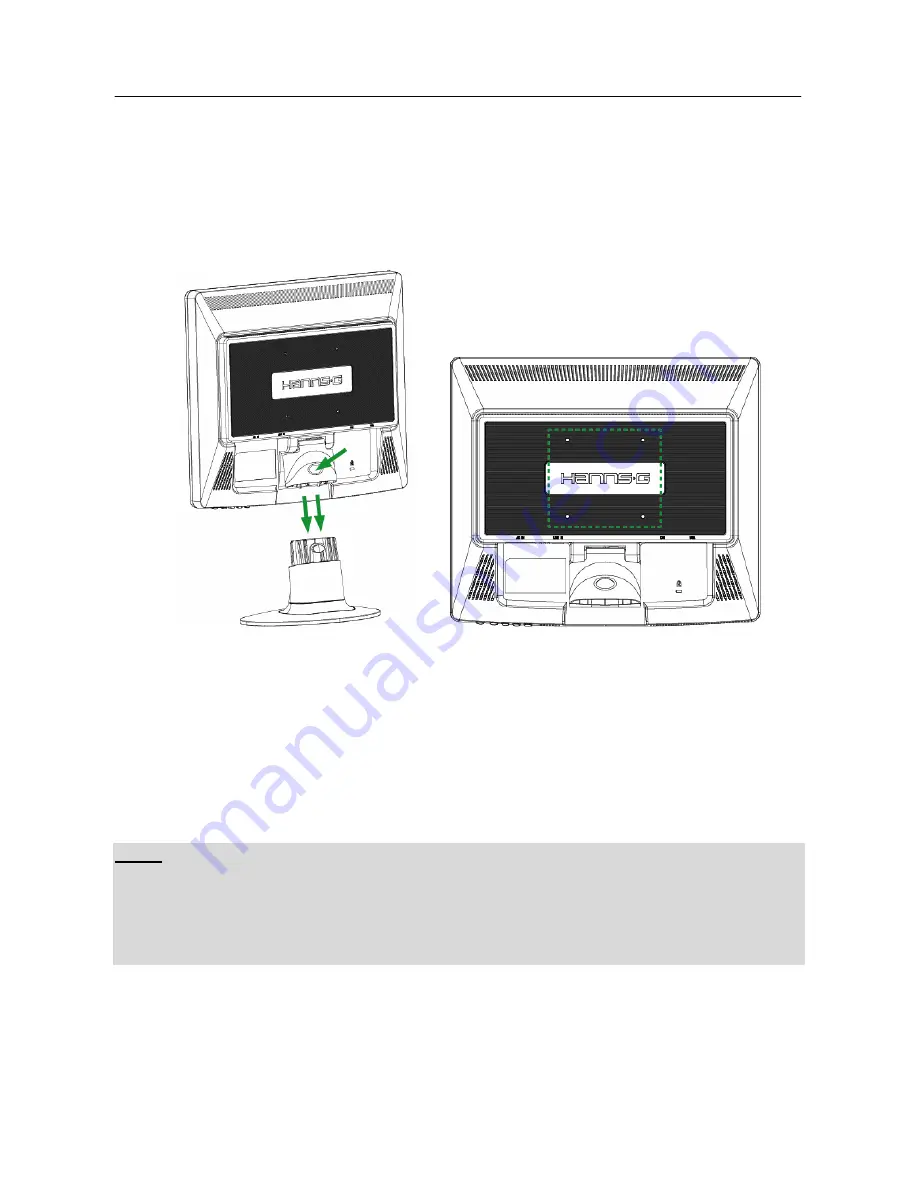
DISSEMBLING THE STAND BASE: 
 

1.


Disconnect all the cables and cords from the Monitor to prevent breakage. 

2.


Carefully place the Monitor face down on a soft and flat surface (blanket, foam, cloth, etc) to 
prevent any damage to the Monitor. 

3.


Gently remove the stand base.   


(For reference only) 


WALL MOUNTING THE MONITOR: 
 

1.


Purchase a VESA compatible wall bracket: 
VESA 100X100, 4 holes, M4, 10mm, 8kg. 

2.


Locate your ideal Monitor position on the wall. 

3.


Fix the wall bracket firmly on the wall. 

4.


Secure the Monitor to the bracket using the 4 mount holes on the back and center of the Monitor. 


Note:   


Please read the instructions of your specific wall bracket to properly wall mount the Monitor. 


The pitch of the mounting holes is 100mm horizontally and 100mm vertically. 


The screws type required is metric: M4, 10mm length. 


The Monitor stand base can be screwed on a table or a hard surface using the hole on the back of 
the stand base. 


*Installing the LCD Monitor requires special skill that should only be performed by qualified service 
personnel. Customers should not attempt to do the work themselves. Hanns.G bears no responsibility 
for improper mounting or mounting that results in accident or injury. You can ask a qualified service 
personnel about using an optional bracket to mount the Monitor to the wall.


10 

Содержание HA191

Страница 1: ...HA191 HSG1097...

Страница 2: ...g the equipment off and on the user is encouraged to try to correct the interference by one or more of the following measures Reorient or relocate the receiving antenna Increase the separation between...

Страница 3: ...rgy saving mode after a certain time beneficial both for the user and the environment Electrical safety Emissions Electromagnetic fields Noise emissions Ecology The product must be prepared for recycl...

Страница 4: ...recycling of industrial technology devices at the end of life These devices contain recyclable materials which can be re decomposed and re integrated into brand new marvels On the contrary other mater...

Страница 5: ...KAGE 8 INSTALLATION INSTRUCTIONS 9 POWER 9 SETTING THE MONITOR ON THE WALL 10 MAKING CONNECTIONS 11 ADJUSTING THE VIEWING ANGLE 12 OPERATING INSTRUCTIONS 13 GENERAL INSTRUCTIONS 13 FRONT PANEL CONTROL...

Страница 6: ...r and follow the kit instructions Slots and openings in the back and bottom of the cabinet are provided for ventilation To ensure reliable operation of the monitor and to protect it from overheating b...

Страница 7: ...ll of the time Due to the nature of the LCD screen an afterimage of the previous screen may remain after switching the image when the same image is displayed for hours In this case the screen is recov...

Страница 8: ...mmended Resolutions 1280 X 1024 75Hz EPA ENERGY STAR GP Green Product Ergonomic Design Space Saving Compact Case Design CHECKING THE CONTENTS OF THE PACKAGE The product package should include the foll...

Страница 9: ...e that the clips are fully engaged in the base REMOVAL 1 Flip over the monitor so that it is upside down 2 Press the 2 clips on the base that holds the monitor in place 3 Gently press and hold the 2 c...

Страница 10: ...mount holes on the back and center of the Monitor Note Please read the instructions of your specific wall bracket to properly wall mount the Monitor The pitch of the mounting holes is 100mm horizonta...

Страница 11: ...Connect one end of the VGA cable to the back of the monitor and connect the other end to the computer s VGA port 2 Plug one end of the AC power cord to the LCD monitor s AC input socket and the other...

Страница 12: ...d the stand so you do not topple the monitor when you change the monitor s angle You are able to adjust the monitor s angle from 5 to 15 Figure 3 Monitor Angle NOTES Do not touch the LCD screen when y...

Страница 13: ...re 4 By changing these settings the picture can be adjusted to your personal preferences The power cord should be connected Connect the Signal cable from the monitor to the VGA card Press the power bu...

Страница 14: ...nding on the models This function is only available in models with digital inputs 2 The OSD menu is used as confirmation function during start up 3 Press and hold this button more than 3 seconds will...

Страница 15: ...ors or air dusts or in a place subject to direct sunlight or excessive dust or mechanical vibration or shock Save the original shipping box and packing materials as they will come in handy if you ever...

Страница 16: ...e INPUT SETTING option to change between analog VGA or Digital DVI source Enter the option and select Analog or Digital Dual input mode optional AUTO SEARCH From the Signal Selection menu select the A...

Страница 17: ...just the sharpness of the display Set the value from 2 to 2 VIDEO MODE Choose VIDEO MODE or PC MODE for video transmission While using HDMI or HDMI to DVI ports for video transmission the video will a...

Страница 18: ...or AUDIO IN port For HDMI Input only VOLUME Select the VOLUME option to change the volume level Enter the option and adjust the level This function applies only to models with incorporated audio By hi...

Страница 19: ...is monitor meets the Green monitor standards as set by the Video Electronics Standards Association VESA and or the United States Environmental Protection Agency EPA and The Swedish Confederation Emplo...

Страница 20: ...ure computer is operational by hitting the CAPS LOCK key on the keyboard while observing the CAPS LOCK LED The LED should either turn ON or OFF after hitting the CAPS LOCK key Missing one of the prima...

Страница 21: ...User s Manual INPUT as a PC option and make sure PC audio output cable is connected to monitor s LINE IN port or AUDIO IN port For HDMI Input only 21...

Страница 22: ...480 60Hz VGA 31 469 59 94 5 640 480 67Hz MAC 35 66 667 6 640 480 70Hz VGA 36 052 70 004 7 640 480 72Hz VGA 37 861 72 809 8 640 480 75Hz VGA 37 5 75 9 720 400 70HzVGATEXT 31 469 70 087 10 720x480 60Hz...

Страница 23: ...8 1280 1024 72Hz SXGA 76 02 71 448 29 1280 1024 60Hz 79 976 75 025 30 1280 1024 75Hz 79 976 75 025 We ensure that the monitor can be lighted under interlace signal mode but we can not guarantee the im...

Страница 24: ...ut Terminal VGA Maximum Screen Size Hor 376 32mm Ver 301 056mm Power Source 100 240VAC 50 3Hz 60 3Hz Environmental Considerations Operating Temp 5 to 35 C Storage Temp 20 to 60 C Operating Humidity 20...

Отзывы: