


x14
2" (5,1 cm)
2
3
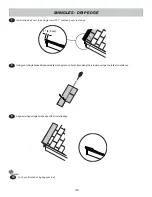
Position front
2-1/2" x 72"
fascia board centered on front soffi t with
primed side out,
fl ush along top edge
of roof panels as shown
(Fig. B)
.
Secure using 2" fi nish nails into front wall frame.
Position
2-1/2" x 41-15/16"
side trim with primed side out.
Side trim is fl ush with back of roof and wall panels and fl ush along top of roof panel as shown
(Fig. C, Fig. D)
.
Secure using 2" fi nish nails into soffi t, side wall frame and wall 2" x 3" trim as shown.
Repeat STEP 2 on opposite side.
You have fi nished installing your fascia and trim.
FINISH
4
1
BEGIN
Fig. B
Fig. C
30
3/8 x 2-1/2 x 40-15/16" (1 x 6,3 x 104 cm)
x1
RIGHT
3/8 x 2-1/2 x 40-15/16" (1 x 6,3 x 104 cm)
x1
LEFT
3/8 x 2-1/2 x 72" (1 x 6,3 x 182,9 cm)
x1
Back wall
panel
Fig. D
TRIM
PARTS REQUIRED:
Primed Side Out
Primed Side Out
2" (5,1 cm)
Finish Nails
2" (5,1 cm)
Finish Nails
2-1/2" x 72"
2-1/2" x 40-15/16"
Flush
Flush along top
of roof panels
Flush along top
of roof panel
Flush
Flush
Содержание OCOEE
Страница 2: ... This page intentionally left blank ...


