


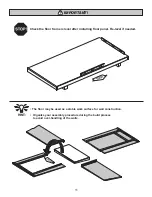


Set RIGHT side wall on fl oor
(Fig A)
. You may have to raise the wall to make sure side trims are fl ush to front
panel
(Fig. B)
and back panel edges
(Fig. C)
.
Secure using one 3" screw through side wall trim into front and back wall 2 x 3" top plates as shown
(Fig D)
.
20
You have fi nished standing your walls.
FINISH
5
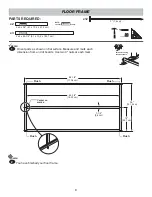
PARTS REQUIRED:
Side Wall Assembly
1 Left
1 Right
SIDE WALL INSTALLATION
3" (7,6 cm)
x4
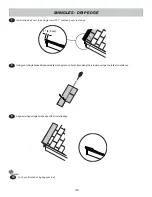
Secure front and back walls to side wall trim using 1-1/2" nails
(Fig D)
spaced 6" apart.
Secure bottom plate to fl oor frame using 3" nails.
Repeat STEPS 1-3 for LEFT side wall.
Remove temporary braces.
Fig. A
1-1/2" (3,2 cm)
Nails
1-1/2" (3,2 cm)
Nails
3" (7,6 cm)
Nails
Flush
1-1/2" (3,2 cm)
Nail
2
1
3
4
x50
1-1/2" (3,8 cm)
x6
3" (7,6 cm)
3" (7,6 cm)
Screw
Fig. D
TOP VIEW
6"
(15,2 cm)
Flush with front
wall panel
Front wall
panel
Fig. B
Flush with back
wall panel
Back wall
panel
Fig. C
RIGHT WALL
Содержание OCOEE
Страница 2: ... This page intentionally left blank ...


