background image

2

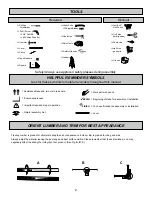
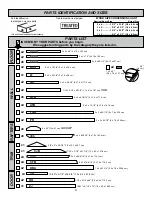
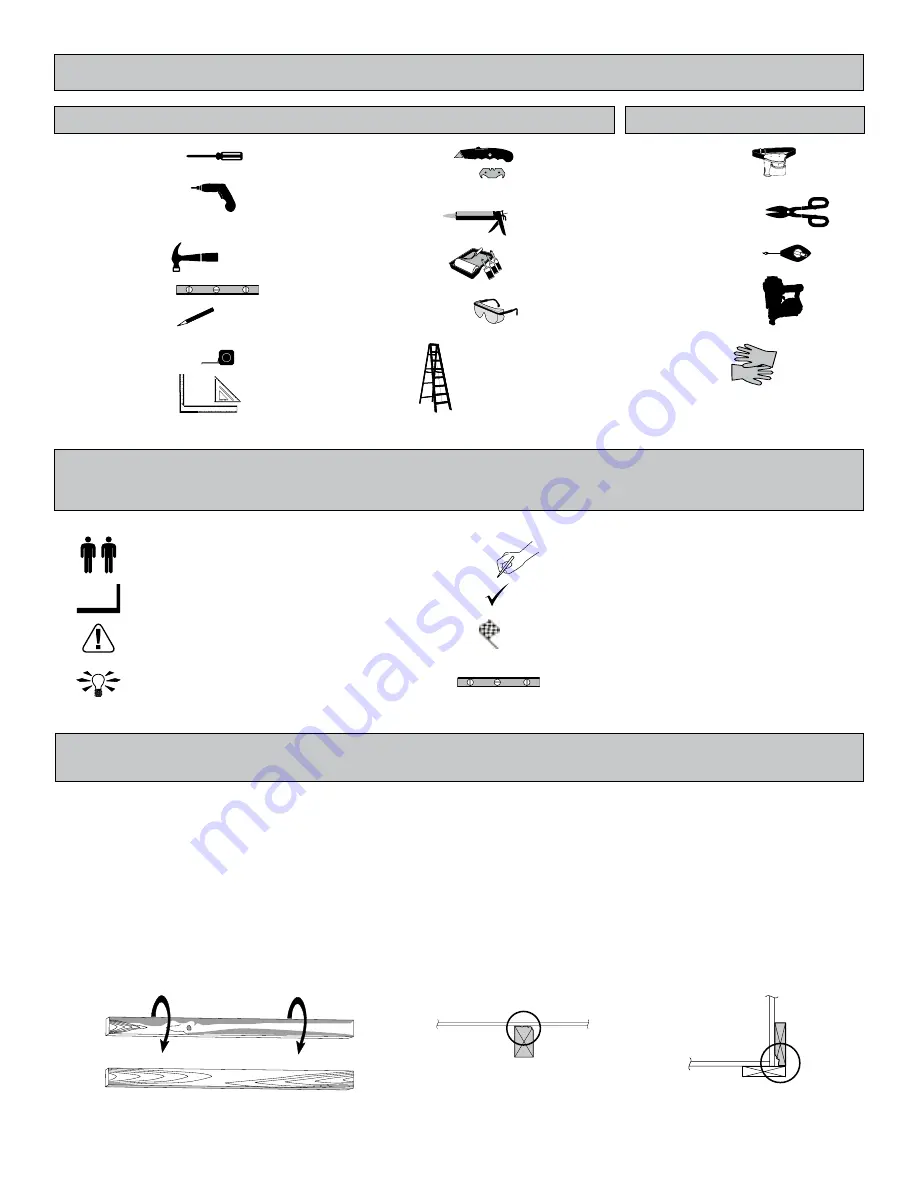
TOOLS

Safety! Always use approved safety glasses during assembly.

Optional

Required

HELPFUL REMINDER SYMBOLS 

Look for these symbols for helpful reminders throughout this manual.

ORIENT LUMBER AND TRIM FOR BEST APPEARANCE

= Assistance Required; two or more people.


= Ensure squareness.


= Important required step or operation.


= Helpful assembly hint.

= Mark part with pencil. 
 
= Beginning of steps for assembly or installation. 
 

= You have finished the assembly or installation.


= Level

 Gloves

Framing lumber is graded for structural strength and not appearance. Exterior trim is graded for one good side.
Always install the material leaving the best edge and best surface visible. Please remember that these blemishes in no way 

negatively affect the strength or integrity of our product. (See Fig. 

A

B

C

.)

A

 Safety Glasses

 Tape Measure

 Paint Tools

 Ladder

 Caulk Gun


Hammer

 Level

FINISH

BEGIN

 Pencil

 Phillips

 Screwdriver

  Drill / Driver

  3/8" Drill Bit

  #2 Philips Drive Bit

 Tool Belt/

    Nail Pouch


 Chalk Line

 Nail Gun

  • gun nails

 Tin Snips

   (for drip edge)

 Square

or

 Utility Knife

 Shingle Blades

B

C

Содержание MONARCH

Страница 1: ...embly or product information call our toll free number 1 800 221 1849 or email customerservice handyhome com Our staff is ready to provide assistance April through October M F 8 00 AM to 7 00 PM EST S...

Страница 2: ...This page intentionally left blank...

Страница 3: ...for specific restrictions and or requirements before building ENGINEERED DRAWINGS Contact our Customer Service Team if engineered drawings are needed to pull local permits SURFACE PREPARATION To ensur...

Страница 4: ...the assembly or installation Level Gloves Framing lumber is graded for structural strength and not appearance Exterior trim is graded for one good side Always install the material leaving the best edg...

Страница 5: ...uggested materials to properly level your floor as this will vary depending on your specific site 3 TAB SHINGLES 4 Bundles PAINT FOR SIDING 2 Gallons Use 100 acrylic latex exterior paint 2 coats recom...

Страница 6: ...8 5 x 7 6 x 38 4 cm BXS x1 2 x 3 x 22 1 8 5 x 7 6 x 56 cm LT x4 2 x 3 x 70 9 16 5 x 7 6 x 179 2 cm CFB x6 2 x 3 x 67 9 16 5 x 7 6 x 171 6 cm BPB x4 2 x 3 x 75 1 2 5 x 7 6 x 191 8 cm ATB x2 2 x 3 x 94...

Страница 7: ...8 x 72 1 x 122 x 183 cm x1 x1 x1 x1 x1 RIGHT DOOR x2 20 9 16 x 96 52 2 x 244 cm x2 48 x 96 122 x 244 cm x1 LEFT DOOR x1 RIGHT x1 LEFT 3 8 x 23 7 8 x 72 1 x 61 x 183 cm x2 LEFT 3 8 x 23 7 8 x 72 1 x 61...

Страница 8: ...35 cm x2 48 x 92 1 2 121 9 x 235 cm 6 FLOOR PANELS Not Included You will need floor panels to complete your floor Floor panel sizes and quantities are shown below NOTE Use a minimum of 5 8 1 6 cm orie...

Страница 9: ...the following page CONCRETE Leveling higher than 16 not recommended LEVELING MATERIALS Gravel 2x4 Treated Lumber Solid Masonry Blocks in 1 2 4 or 8 thickness Asphalt Shingles 8 Block 4 Block Gravel Gr...

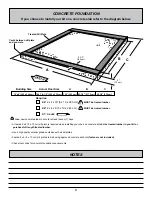
Страница 10: ...high quality exterior grade caulk beneath all sill plates Fasten 2 x 4 5 x 10 cm sill plates to slab using approved concrete anchors fasteners not included Check local code for concrete foundation req...

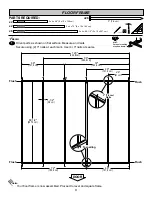
Страница 11: ...stand on frame 1 Orient parts as shown on flat surface Measure and mark Secure using 2 3 nails at each mark Use 4 3 nails at seams BEGIN x2 2 x 4 x 72 5 x 10 x 183 cm x2 2 x 4 x 48 5 x 10 x 122 cm x6...

Страница 12: ...Check for frame squareness by measuring diagonally across corners If the measurements are the same the frame is square The diagonal measurement will be approximately 151 1 2 384 8 cm When the frame i...

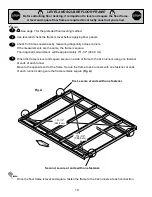
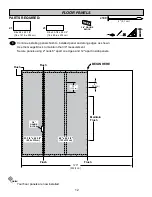
Страница 13: ...nside panel 2 BEGIN 1 PARTS REQUIRED x53 2 5 1 cm FLOOR PANELS Attach the 48 x 92 1 2 panel with the 48 edge and corner flush to the floor frame Fig A Secure panel using 2 2 nails in the corners Fig B...

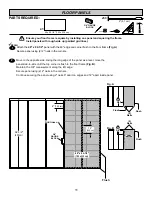
Страница 14: ...3 4 measurement Secure panels using 2 nails 6 apart on edges and 12 apart inside panels 3 x1 5 8 x 48 x 92 1 2 1 6 x 121 9 x 235 cm x1 5 8 x 23 7 8 x 92 1 2 1 6 x 60 6 x 235 cm x100 2 5 1 cm FLOOR PAN...

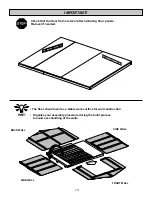
Страница 15: ...or wall construction Organize your assembly procedure during the build process to avoid over handling of the walls HINT SIDE WALL SIDE WALL FRONT WALL BACK WALL Check that the floor frame is level aft...

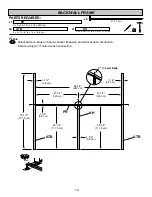
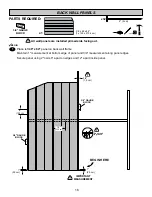
Страница 16: ...2 240 cm 2 x 3 x 46 1 4 5 x 7 6 x 117 5 cm x1 NH x2 2 x 3 x 75 1 2 5 x 7 6 x 191 8 cm ATB 14 3 7 6 cm ATB ATB NH PR PARTS REQUIRED BACK WALL FRAME HINT 2 x 3 x 94 1 2 5 x 7 6 x 240 cm x1 PR x6 Orient...

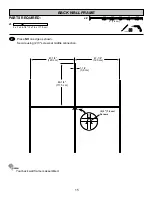
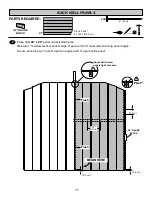
Страница 17: ...4 120 cm 47 1 4 120 cm 2 3 7 6 cm Screws 2 x 3 x 46 1 4 5 x 7 6 x 117 5 cm x1 NH Place NH on edge as shown Secure using 2 3 screws at middle connection 2 PARTS REQUIRED 3 7 6 cm BACK WALL FRAME x2 You...

Страница 18: ...lled primed side facing out Place left 48 x 84 panel on back wall frame Maintain 1 measurement at bottom edge of panel and 3 4 measurement along panel edges Secure panel using 2 nails 6 apart on edges...

Страница 19: ...in 1 measurement at bottom edge of panel and 3 4 measurement along panel edges Secure panel using 2 nails 6 apart on edges and 12 apart inside panel 2 1 2 5 cm 6 15 2 cm BEGIN HERE 3 4 GAUGE BLOCK 12...

Страница 20: ...CFB 2 1 2 6 35 cm CFB Primed Side Down Fig A 2 1 2 6 35 cm Assemble TWO RIGHT and TWO LEFT wing walls Place a wing wall panel primed side down on top of CFB Fig A Flush edge of panel along edge and b...

Страница 21: ...IRED LEFT RIGHT Pre assembled Pre assembled 6 15 2 cm Angle nail to draw panels tight at seams Flush Flush Flush Place wing wall assemblies onto frame flush along the edge and flush to bottom of insta...

Страница 22: ...able panels on gable support flush to top of wall panel Maintain 3 4 measurement FIg A Fig B NOTE Panel grooves will not align Secure panel using 3 2 nails as shown Your back wall is now assembled FIN...

Страница 23: ...on floor as shown Measure and mark center at each connection Secure using 2 3 nails at each connection 1 BEGIN 3 7 6 cm Nails ATB LT ATB BXS BXS PR x2 2 x 3 x 15 1 8 5 x 7 6 x 38 4 cm BXS x1 2 x 3 x...

Страница 24: ...ls are installed primed side facing out Place left 48 x 96 panel on front wall frame Maintain 1 measurement at bottom edge of panel and 3 4 measurement along panel edges Secure panel using 2 nails 6 a...

Страница 25: ...lace right 48 x 96 panel on front wall frame Maintain 1 measurement at bottom edge of panel and 3 4 measurement along panel edges Secure panel using 2 nails 6 apart on edges and 12 apart inside panel...

Страница 26: ...assembled Pre assembled 6 15 2 cm Angle nail to draw panels tight at seams Flush Flush Flush Place wing wall assemblies onto frame flush along the edge and flush to bottom of installed panels Secure...

Страница 27: ...RTS REQUIRED ASSEMBLE TWO IDENTICAL SIDE WALLS HINT Flush Flush Orient parts on edge on floor as shown Measure and mark center at each connection Secure using 2 3 nails at each connection x6 2 x 3 x 6...

Страница 28: ...de wall frame NOTE THE SQUARE AND LIP EDGES Maintain 1 1 2 measurement at top edge of panel and 3 4 measurement along panel edges Secure panel using 2 nails 6 apart on edges and 12 apart inside panel...

Страница 29: ...3 cm RIGHT x2 3 8 x 23 7 8 x 72 1 x 61 x 183 cm x2 LEFT Place 23 7 8 panels on frame as shown NOTE THE SQUARE AND LIP EDGES Secure using 2 nails 6 apart on edges Repeat STEPS 1 3 to build 2nd wall 3 S...

Страница 30: ...g 2 nails 6 apart Angle nail to hit floor frame Fig A 2 Secure studs to floor using 3 screws Fig B You have finished standing your back wall FINISH 3 7 6 cm Screws 3 7 6 cm Screw 3 7 6 cm Screw Fig B...

Страница 31: ...bottom of panel to floor using 2 nails 6 apart Angle nails to hit floor frame Fig C Center left side wall on floor front to back Secure lower and upper corner of side wall panels to back wall trim us...

Страница 32: ...trim to floor using 1 3 screw at each side Angle screw to hit floor frame Fig D Secure the front wall trim to side wall top plate using 1 3 screw at each side Fig E 3 7 6 cm x4 2 5 cm x36 Trim Fig B 2...

Страница 33: ...enter at peak Fig A Secure trim using 10 1 1 4 screws from inside Install two screws at seam Fig B Position second AAA flush to panel edge and flush to peak of installed trim Fig A Secure trim using 1...

Страница 34: ...Ensure CJB is level From the inside attach CJB using 11 3 4 screws as pattern shows 4 BACK GABLE TRIM PARTS REQUIRED CJB x1 11 16 x 2 1 2 x 51 7 8 1 7 x 6 3 x 131 8 cm Flush Flush GABLE TRIM LEVEL CJB...

Страница 35: ...using 2 2 finish nails From the inside secure trim using 2 3 4 screws as pattern shows Your gable trim is now installed 6 FRONT GABLE FILLER PARTS REQUIRED 3 4 1 9 cm x2 x1 3 8 x 5 x 25 7 8 1 0 x 12...

Страница 36: ...peak Place 1 6 x 24 gusset on top of rafters Install with 1 4 gap from top of rafter edge Fig A Secure using 12 2 nails in pattern shown Fig A x2 GAA 1 x 3 x 5 2 5 x 7 6 x 12 7 cm 1 BEGIN 2 x 4 x 64 5...

Страница 37: ...sing 2 3 screws at each end Fig A Fig B BEGIN 1 PARTS REQUIRED PRE ASSEMBLED x3 x12 Maintain the measurements between rafters FINISH Your rafters are now installed NOTE Measurements from inside of pan...

Страница 38: ...48 x 96 panel with a 1 4 measurement back from the gable trim Fig A and flush at the peak Fig B Secure panel using 2 2 nails in the corners 1 BEGIN 2 5 cm PARTS REQUIRED ROOF PANELS x2 48 x 96 122 x...

Страница 39: ...e roof panels using 2 nails 6 apart on edges and 12 apart inside panel Repeat process to attach roof panels on the opposite side 4 PARTS REQUIRED ROOF PANELS D O O R 2 Nails Fig E FINISH Your roof pan...

Страница 40: ...t to face of side wall panel Fig A Secure soffit to roof panel using 3 4 screws Fig A Repeat steps to install eave soffit on opposite side Your eave soffits are installed PARTS REQUIRED 1 x 4 x 93 1 4...

Страница 41: ...porary support OO with 3 screws in middle and at ends Attach temporary support ZJ at bottom with 2 screws in middle and at ends ZJ OO OFFSET 3 7 6 cm Screw 3 7 6 cm Screw 2 5 cm Screw 2 5 cm Screw Bot...

Страница 42: ...oors for correct operation Screw hinge boards into wall supports and floor using 4 3 screws as shown Make sure screws go into framing and floor Fig C D 5 3 7 6 cm Screws into the wall support and floo...

Страница 43: ...6 3 4 Screws from inside 2 Nails x8 Nail into framing Two Screws Fig B ZJ 2 5 cm x8 3 4 1 9 cm x58 14 35 5 cm Approximately AH 9 22 9 cm 9 22 9 cm ZJ x1 19 32 x 2 1 2 x 72 1 5 x 6 3 x 182 9 cm Door T...

Страница 44: ...RSTRIP 1 1 4 x 2 1 2 x 69 3 2 x 7 6 x 175 3 cm x2 OO FINISH On right door center OO vertically in door opening Fig A OO will offset the right door 1 in from the door trim Fig C 3 Secure OO using 7 3 s...

Страница 45: ...contacting base Fig A Mark and pre drill holes for screws Mark and pre drill holes for screws 1 LEFT DOOR PARTS REQUIRED 1 2 5 cm x2 x8 5 16 0 8 cm Drill Bit DOOR HARDWARE You have finished installing...

Страница 46: ...re using 1 1 2 3 8 cm screws 2 1 3 4 3 8 cm 35 3 4 90 cm RIGHT DOOR 1 3 4 3 8 cm TOP VIEW 1 4 Pre drill and 1 2 Drill through DOOR HARDWARE DECORATIVE HINGES x1 3 4 1 9 cm x12 x4 x2 PARTS REQUIRED 1 1...

Страница 47: ...ting Follow directions provided by manufacturer Snip bottom side of drip edge and bend over to other side of roof Follow directions provided by manufacturer PAINT CAULK NOT INCLUDED ROOF FELT NOT INCL...

Страница 48: ...ross with lower edge of roof deck NOTE If you have installed drip edge install shingles flush to drip edge BEGIN 1 TABS UP Shingle overlaps roof decking 1 2 5 cm overhang past roof deck 1 2 5 cm overh...

Страница 49: ...5 cm Flush with starter row Flush with starter row Continue installing rows of shingles by staggering at front 4 SHINGLES continued Install second row of shingles flush at top of first row s rain slot...

Страница 50: ...t ridge cut to peak with a utility knife Repeat steps 1 5 to shingle the opposite side of your roof Trim shingles at ridge Once both sides are shingled you need to trim ends Strike a chalk line 1 from...

Страница 51: ...cut off pieces first Score shingle then snap off angled cut Install first ridge cap flush to shingles at front as shown Install second ridge cap 5 back as shown 2 3 BEGIN 1 2 5 cm 2 5 cm 2 5 cm 2 5 cm...

Страница 52: ...between the shingle color and edge of shingles When you have 4 minimum of shingle color cut one piece to cap your roof Install flush to shingles 4 5 6 7 2 Nails per side You have finished your ridge...

Страница 53: ...B siding to include all exterior walls and all sides and all edges of doors Gazebos Pergolas To validate your warranty it is necessary to properly maintain your Backyard Storage Solutions LLC unit Thi...

Отзывы: