background image

5

HAMPTONBAY.COM

Por favor llame al 1-855-HD-HAMPTON para asistencia adicional.

Montaje (continuación)


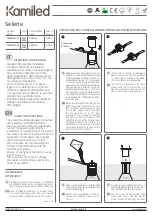
Instalación de la pantalla y de la bombilla

3

Desenrosque el remate (A) del arpa (C). 

Coloque la pantalla (B) en el arpa (C) y asegure la pantalla (B) con el remate (A). 

Instale la bombilla correcta (no incluida) consultando las marcas de la lámpara y/o las etiquetas para saber la potencia máxima 

en vatios.

Enchufe el cable de alimentación (I) a la toma de corriente, gire el interruptor y disfrute. 

Interruptor

Nota

: Utiliza 

una

 bombilla de base media (E26) de 100 W 

como máximo, de 3 vías de tipo “A”, o bien una bombilla LED 

con balasto propio de base media (E26) de 16 W como 

máximo, de 3 vías (se venden por separado). 

Nota

: Retire la cubierta de plástico de la pantalla antes de la 

instalación. 

A

B

C

I

Содержание HD8532A3

Страница 1: ...tinually create quality products designed to enhance your home Visit us online to see our full line of products available for your home improvement needs Thank you for choosing Hampton Bay Questions p...

Страница 2: ...rticular purpose other than the warranty contained herein The manufacturer specifically disclaims any liability and shall not be liable for any consequential or incidental loss or damage including but...

Страница 3: ...r assistance Pre assembly PLANNING ASSEMBLY Read all instructions before assembling To avoid damaging this product place it on a soft non abrasive surface such as carpet or cardboard Part Description...

Страница 4: ...arp C and the socket assembly D together Saddle D C Attaching the column and the socket assembly 1 Thread the socket assembly D the columns E F G and the base H together as shown Hand tighten until sn...

Страница 5: ...cure the shade B with the finial A Install the correct bulb not included referring to fixture markings and or labels for maximum wattage Plug the power cord I into the outlet turn on the switch and en...

Страница 6: ...ight s will not turn on The bulb is burned out Replace the light bulb The power is off Ensure the power supply is turned on The cord is not plugged in Ensure the cord is plugged into an outlet Ensure...

Страница 7: ...problems missing parts Before returning to the store call Hampton Bay Customer Service 8 a m 7 p m EST Monday Friday 9 a m 6 p m EST Saturday 1 855 HD HAMPTON HAMPTONBAY COM Retain this manual for fu...

Страница 8: ...completa de productos disponibles para las necesidades de mejoras de tu hogar Gracias por elegir Hampton Bay GU A DE USO Y MANTENIMIENTO Preguntas problemas o piezas faltantes Antes de regresar a la t...

Страница 9: ...PREGUNTA SOBRE ELECTRICIDAD Si usted tiene alguna otra pregunta acerca de esta l mpara por favor contacte a nuestro Equipo de Servicio al Cliente al 1 855 HD HAMPTON o visita www HAMPTONBAY com Por fa...

Страница 10: ...la montaje Lea todas las instrucciones antes de realizar la instalaci n Coloque este producto sobre una superficie suave y no abrasiva como una alfombra o una base de cart n para evitar da arlo Pieza...

Страница 11: ...conjunto de enchufe D D C Montaje de la columna y del conjunto del casquillo 1 Enrosque la conjunto de enchufe D las columnas E F G y la base H juntos como se muestra en el diagrama Apriete a mano ha...

Страница 12: ...incluida consultando las marcas de la l mpara y o las etiquetas para saber la potencia m xima en vatios Enchufe el cable de alimentaci n I a la toma de corriente gire el interruptor y disfrute Interr...

Страница 13: ...ntaci n no est conectado Aseg rese de que el cable de alimentaci n est conectado a la toma de corriente Aseg rese de que el disyuntor est en la posici n de encendido ON El disyuntor est apagado Cuando...

Страница 14: ...egresar a la tienda llama al Servicio al Cliente de Hampton Bay de 8 a m a 7 p m hora est ndar del Este de Lunes a Viernes y de 9 a m a 6 p m hora est ndar del Este S bados 1 855 HD HAMPTON HAMPTONBAY...

Отзывы: