background image

2

Consumer Safety Information

IMPORTANT SAFEGUARDS

1.

Read all instructions.

2.

To protect against risk of electrical
shock, do not put the cord, plug, or
Mixer body in water or other liquid.

3.

Close supervision is necessary when
any appliance is used by or near chil-
dren.

4.

Unplug from outlet when not in use,
before putting on or taking off parts,
and before cleaning.

5.

Remove beaters and other attachments
from the Mixer before washing.

6.

Do not operate any appliance with 
a damaged cord or plug or after the
appliance malfunctions or is dropped 
or damaged in any manner. Call our 
toll-free customer service number for
information on examination, repair, or
electrical or mechanical adjustment.

7.

The use of attachments not recommend-
ed or sold by the appliance manufacturer
for use with this model may cause fire,
electric shock or injury.

8.

Avoid contacting moving parts. Keep
hands, hair, and clothing, as well as 
spatulas and other utensils, away from
beaters during operation to reduce risk
of injury to persons, and/or damage to
the Mixer.

9.

Do not use outdoors.

10.

Do not let cord hang over edge of table
or counter. Do not let cord contact hot
surfaces, including stove.

11.

Do not place on or near a hot gas or
electric burner, or in a heated oven.

12.

Check that control is off before plugging
cord into wall outlet. To disconnect, turn
control to O/OFF, then remove plug
from wall outlet.

13.

Do not use appliance for other than
intended purpose.

SAVE THESE INSTRUCTIONS

This appliance is intended for household
use only.

This appliance is equipped with a grounded-
type 3-wire cord (3-prong plug). This type of
plug will only fit into an electrical outlet
made for a 3-prong plug. This is a safety 
feature intended to help reduce the risk of
electrical shock. If the plug should fail to fit
contact a qualified electrician to replace the
obsolete outlet. Do not attempt to defeat
the safety purpose of the grounding pin by 
modifying the plug in any way.

To avoid an electrical circuit overload do not
use another high wattage appliance on the
same circuit with the mixer.

The length of the cord used on this appli-
ance was selected to reduce the hazards 
of becoming tangled in, or tripping over a
longer cord. If a longer cord is necessary an
approved extension cord may be used. 
The electrical rating of the extension cord
must be equal to or greater than the rating
of the mixer. Care must be taken to arrange
the extension cord so that it will not drape
over the countertop or tabletop where it can
be pulled on by children or accidentally
tripped over.

An extension cord should be connected to
the appliance first, before it is plugged into
the outlet.

When using electrical appliances, basic safety precautions should always be observed, 
including the following:

Содержание 840125800

Страница 1: ...840125800 Stand Mixer English 2 USA 1 800 851 8900 Canada 1 800 267 2826 México 01 800 71 16 100 ...

Страница 2: ...fore plugging cord into wall outlet To disconnect turn control to O OFF then remove plug from wall outlet 13 Do not use appliance for other than intended purpose SAVE THESE INSTRUCTIONS This appliance is intended for household use only This appliance is equipped with a grounded type 3 wire cord 3 prong plug This type of plug will only fit into an electrical outlet made for a 3 prong plug This is a...

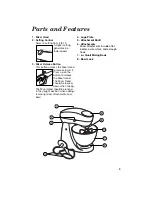
Страница 3: ... Head to raise or lower it Press up on the button to release the Mixer Head The Mixer Head should be locked down when mixing The Mixer Head should be locked in the upright position when adding removing mixer attachments and bowl 4 Logo Plate 5 Attachment Shaft 6 Attachments Mixer attachments include a flat beater a wire whisk and a dough hook 7 41 2 Quart Mixing Bowl 8 Bowl Lock ...

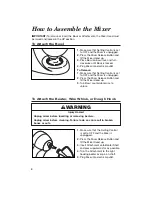
Страница 4: ...r is unplugged 2 Press the Mixer Release Button and tilt the Mixer Head up 3 Turn Bowl counterclockwise to unlock To Attach the Bowl wWARNING Injury Hazard Unplug mixer before inserting or removing beaters Unplug mixer before cleaning Failure to do so can result in broken bones or cuts 1 Make sure that the Setting Control is set to OFF and the Mixer is unplugged 2 Press the Mixer Release Button an...

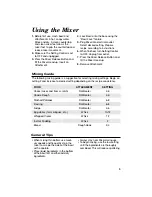
Страница 5: ...e mixer movement 2 Make sure the Setting Control is set to OFF and unplugged 3 Press the Mixer Release Button and tilt the Mixer Head up Insert an Attachment 4 Lock Bowl onto the base using the Bowl Lock feature 5 Plug Mixer into electrical outlet Select desired setting Prepare recipe according to instructions 6 When finished turn Setting Control to OFF Unplug from outlet 7 Press the Mixer Release...

Страница 6: ...ent For a perfect place to raise bread place bread in a micro wave oven or regular oven with a pan of steaming water Do not turn oven on but close the door Knead yeast bread dough until the dough has a satin appearance The dough hook is designed with a weighted balance on the lip to enhance kneading performance Dough Hook Tips Flat Beater Tips Use the flat beater attachment to mix cakes cookie dou...

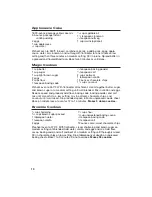
Страница 7: ...rd Continue to mix on setting 3 until blended Spoon into a greased 2 quart baking dish Bake for 20 minutes or until bubbly Serve with crackers or thinly sliced baguettes Makes 4 cups Chicken n Basket 8 ounces cream cheese softened 1 can chicken drained 1 small onion chopped 1 4 teaspoon salt 1 4 teaspoon pepper Preheat oven to 375ºF With flat beater attachment mix cream cheese chicken onion salt p...

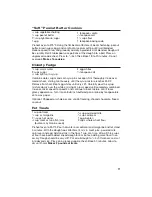
Страница 8: ...the potato skins place on cookie sheet and bake for 30 minutes or until peaks are golden brown Makes 6 servings Decorator s Buttercream Icing 1 cup solid vegetable shorting 2 tablespoons water 1 teaspoon vanilla extract In the bowl combine shortening water and vanilla With the flat beater attachment mix at a low setting until well blended With the mixer on a medi um setting add sugar one cup at a ...

Страница 9: ... mixing bowl mix egg whites and cream of tarter until soft peak forms Add salt reduce to medium setting and gradually add sugar Mix on high est setting until sugar is dissolved and stiff peaks form With rubber spatula fold in flour mixture and extracts just until they disappear Pour mixture into an ungreased 10 inch tube pan Bake 30 35 minutes until cake springs back when lightly touched Invert ca...

Страница 10: ...in oatmeal chocolate chips and coconut until well mixed Drop rounded spoon full onto ungreased cookie sheet Bake on middle rack of oven for 12 to 14 minutes Makes 3 dozen cookies Brownie Cookies 2 3 cup shortening 11 2 cups brown sugar packed 1 tablespoon water 1 teaspoon vanilla 2 eggs Preaheat oven to 375ºF With flat beater cream shortening and brown sugar on medium setting until blended Add wat...

Страница 11: ...our the syrup mixture slowly over the whites mixing at a low speed until completely combined Increase mixer speed to speed 4 and continue to beat mixture until it loses glassy appearance Turn into an 8x8 inch buttered pan or drop by teaspoonfuls on to wax paper Optional Chopped or whole pecans vanilla flavoring shaved chocolate flaked coconut Pet Treats 1 cup oatmeal 1 3 cup or margarine 11 4 cups...

Страница 12: ... SPECIAL INCIDENTAL AND CONSEQUENTIAL DAMAGES ARE HEREBY EXCLUDED There is no warranty with respect to the following which may be supplied with this product glass parts glass containers cutter strainer blades and or agitators This warranty extends only to the original consumer purchaser and does not cover a defect resulting from abuse misuse neglect use for commercial purposes or any use not in co...

Отзывы: