background image

2

Voraussetzungen
Konsole

•  Ein VGA-, SVGA- oder Multisync-Monitor, der in der Lage ist, die höchste Aufl ösung darzustellen, die Sie auf einem der zu 
 

installierenden Computer verwenden möchten

• Eine 

USB-Tastatur

• Eine 

USB-Maus

Computer

Auf den Computern, die mit dem System verbunden werden sollen, muss mindestens folgendes installiert sein:
•  Eine VGA-, SVGA- oder Multisync-Grafi kkarte
•  Ein USB-Anschluss Typ A

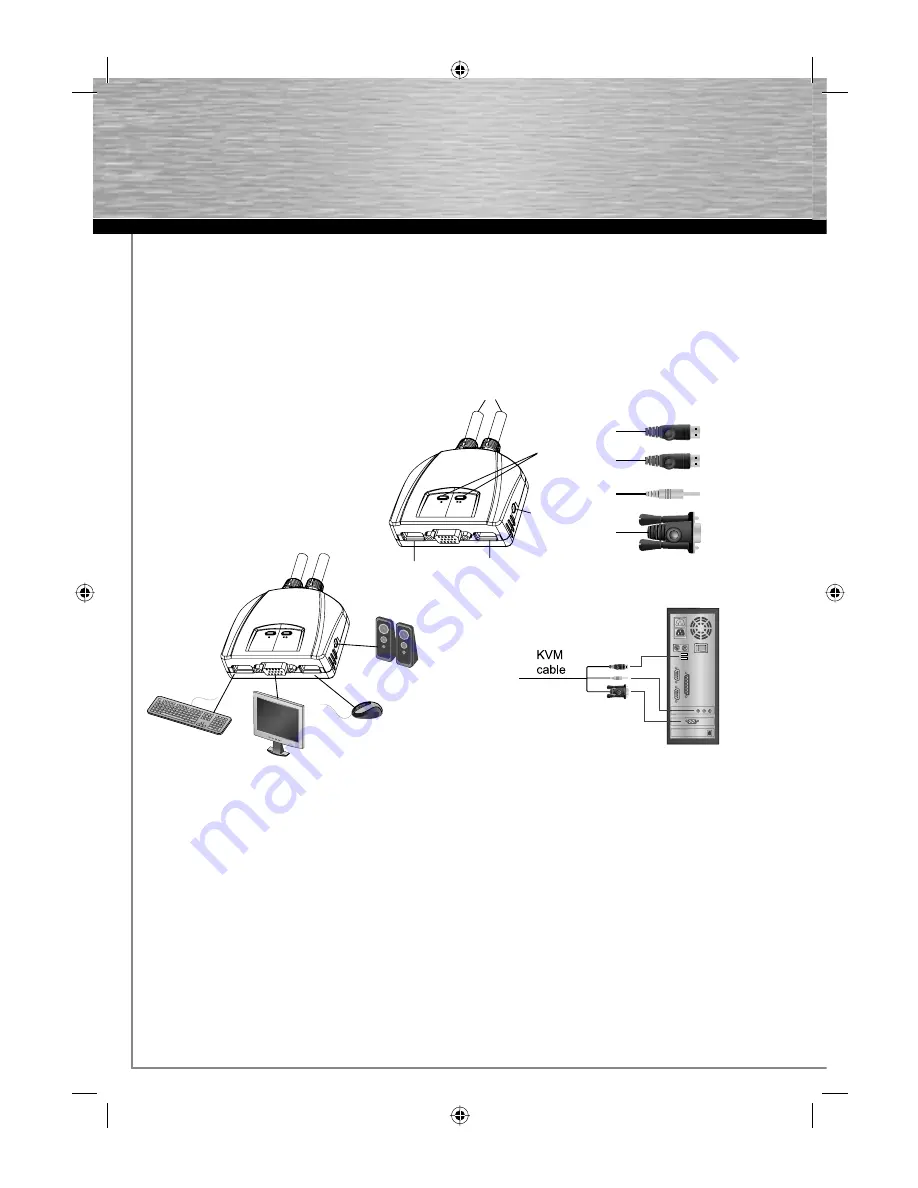
Hardwareübersicht 

1.   Port-LEDs
2.   KVM-Kabel
3.   Lautsprecherbuche
4.   Konsolports
5. USB-Mausanschluss
6.   USB-Tastaturanschluss
7.   Lautsprecherstecker
8.   Stecker für Grafi ksignal

Installation 

Wichtig

1.   Schalten Sie vor der Installation alle anzuschließenden Geräte aus. Bei Computern, die sich über die Tastatur einschalten lassen,  
 

müssen Sie den Netzstecker ziehen. Anderenfalls wird der Switch vom Computer gespeist.

2.   Um eine Beschädigung Ihrer Geräte zu vermeiden, müssen alle angeschlossenen Geräte ordnungsgemäß geerdet sein.

Zur Installation des S2110 müssen Sie die folgenden Schritte durchführen:

1.   Verbinden Sie Tastatur, Maus, Monitor und Lautsprecher mit den Konsolports des S2110. 
 

Jede Buchse ist durch ein entsprechendes Symbol gekennzeichnet.

2.  Verbinden Sie die Lautsprecher mit der dafür vorgesehenen Buchse am S2110. Dieser Schritt ist optional.
3.  Verbinden Sie die am Gerät angebrachten KVM-Kabel für Tastatur, Monitor, Maus und Lautsprecher mit den entsprechenden 
 

Ports der zu installierenden Computer.

4.   Schalten Sie Ihren Computer ein


Hinweis:

 Standardmäßig schaltet der S2110 auf den ersten Computer um, der eingeschaltet wird.

d

Bedienungsanleitung

&

(

/

%

!

"

$

§

$

00052349bda.indd   Abs2:2

00052349bda.indd   Abs2:2

10.07.2008   13:52:05 Uhr

10.07.2008   13:52:05 Uhr

Содержание S2110

Страница 1: ...mpanies Errors and omissions excepted and subject to technical changes Our general terms of delivery and payment are applied Hama GmbH Co KG D 86651 Monheim Germany www hama com 00052349bda indd Abs1 2 00052349bda indd Abs1 2 10 07 2008 13 52 04 Uhr 10 07 2008 13 52 04 Uhr ...

Страница 2: ...S2110 2 Port KVM Switch Datenumschalter Data Switch Commutateur de données C O M P U T E R 00052349 00052349bda indd Abs2 1 00052349bda indd Abs2 1 10 07 2008 13 52 05 Uhr 10 07 2008 13 52 05 Uhr ...

Страница 3: ...ssen Sie den Netzstecker ziehen Anderenfalls wird der Switch vom Computer gespeist 2 Um eine Beschädigung Ihrer Geräte zu vermeiden müssen alle angeschlossenen Geräte ordnungsgemäß geerdet sein Zur Installation des S2110 müssen Sie die folgenden Schritte durchführen 1 Verbinden Sie Tastatur Maus Monitor und Lautsprecher mit den Konsolports des S2110 Jede Buchse ist durch ein entsprechendes Symbol ...

Страница 4: ...mbination verwenden Siehe die folgende Tabelle Tabelle Umschaltintervall n Sekunden 1 3 Sekunden 2 5 Sekunden Standard 3 10 Sekunden 4 20 Sekunden Beendet den Hotkey Modus und die automatische Umschaltung Esc oder Leertaste Hotkey Tastenkonfiguration Nachdem Sie den Hotkey Modus Strg F12 aktiviert haben drücken Sie eine der folgenden Tasten um die entsprechende Funktion aufzurufen Taste Funktion F...

Страница 5: ...chirm Maus Lautsprecher Anschlüsse Tastatur Maus KVM Ports Bildschirm Lautsprecher 1 x USB Typ A Weiblein schwarz 1 x HDB 15 Weiblein blau 1 x USB Typ A Weiblein schwarz 1 x Mini Stereo Buchse Weiblein grün 2 x USB Typ A Männlein schwarz 2 x HDB 15 Männlein blau 2 x Mini Stereo Stecker Männlein grün LED Anzeigen Ausgewählt 2 grün Kabellänge Computer 1 2 m Emulation Tastatur Maus USB Bildschirm 204...

Страница 6: ...ain Ctrl F2 Props Ctrl F3 Undo Ctrl F4 Front Ctrl F5 Copy Ctrl F6 Open Ctrl F7 Paste Ctrl F8 Find Ctrl F9 Cut Ctrl F10 Compose Application Windows Ctrl 1 Ctrl 2 Ctrl 3 Ctrl 4 Help Ctrl H 00052349bda indd Abs2 5 00052349bda indd Abs2 5 10 07 2008 13 52 08 Uhr 10 07 2008 13 52 08 Uhr ...

Страница 7: ...rd Shift Shift Control Ctrl Win Ctrl 1 Ctrl 2 Ctrl 3 Ctrl 4 Left alt option Alt F13 Print Screen F14 Scroll Lock return Enter delete Back Space help Ins F15 Ctrl Windows 00052349bda indd Abs2 6 00052349bda indd Abs2 6 10 07 2008 13 52 08 Uhr 10 07 2008 13 52 08 Uhr ...

Страница 8: ...ill receive power from the computer 2 To prevent damage to your equipement make sure that all the devices you will be connecting are properly grounded Installing your new S2110 involves the following steps 1 Plug your keyboard monitor mouse and speaker into the Console ports on the S2110 Each port is labeled with an appropriate icon 2 Plug your speakers into the S2110 s speaker jack Note This step...

Страница 9: ...ombination See the table below Scan Interval Table n Scan Interval 1 3 Sec 2 5 Sec default 3 10 Sec 4 20 Sec Terminates the hotkey mode and the automatic switch over Esc or space bar Hotkey key configuration When you have activated the hotkey mode Strg F12 press one of the following buttons to invoke the corresponding function Key Operation F1 Recognizes and stores the hardware sided keyboard envi...

Страница 10: ...rd Console Video Mouse Speaker Connectors Keyboard Mouse KVM Ports Video Speaker 1 x USB Typ A Female black 1 x HDB 15 Female blue 1 x USB Typ A Female black 1 x Mini Stereo Jack Female green 2 x USB Typ A Male black 2 x HDB 15 Male blue 2 x Mini Stereo Plug Male green LEDs Selected 2 green Cable Length Computers 1 2 m Emulation Keyboard Mouse USB Video 2048 x 1536 DDC2B Scan Intervall 5 Seconds O...

Страница 11: ...in Ctrl F2 Props Ctrl F3 Undo Ctrl F4 Front Ctrl F5 Copy Ctrl F6 Open Ctrl F7 Paste Ctrl F8 Find Ctrl F9 Cut Ctrl F10 Compose Application Windows Ctrl 1 Ctrl 2 Ctrl 3 Ctrl 4 Help Ctrl H 00052349bda indd Abs2 10 00052349bda indd Abs2 10 10 07 2008 13 52 11 Uhr 10 07 2008 13 52 11 Uhr ...

Страница 12: ...d Shift Shift Control Ctrl Win Ctrl 1 Ctrl 2 Ctrl 3 Ctrl 4 Left alt option Alt F13 Print Screen F14 Scroll Lock return Enter delete Back Space help Ins F15 Ctrl Windows 00052349bda indd Abs2 11 00052349bda indd Abs2 11 10 07 2008 13 52 11 Uhr 10 07 2008 13 52 11 Uhr ...

Страница 13: ...votre appareil assurez vous que tous les périphériques connectés sont correctement mis à la terre Pour installer votre nouveau S2110 suivez ces étapes 1 Branchez votre clavier votre écran votre souris et votre haut parleurs dans les ports de console du S2110 La fonction de chaque port est indiquée par un pictogramme 2 Branchez vos haut parleurs dans la prise de haut parleurs du S2110 Remarque Cett...

Страница 14: ...n de touches de raccourci voir le tableau ci dessous Tabelau Intervalle de commutation n Scan Interval 1 3 Sec 2 5 Sec default 3 10 Sec 4 20 Sec Termine le mode de combinaison de touches et la commutation automatique Esc ou touche d espacement Configuration des touches d activation Après avoir activé le mode de combinaison de touches Strg F12 veuillez appuyer sur une des touches suivantes pour app...

Страница 15: ... Souris Haut parleurs Connecteurs Clavier Souris Ports KVM Moniteur Haut parleurs 1 connecteur USB femelle de type A noir 1 connecteur HDB femelle à 15 broches bleu 1 connecteur USB femelle de type A noir 1 mini connecteurs stéréo mâles vert 2 connecteurs USB mâles de type A noir 2 connecteur HDB mâle à 15 broches bleu 2 mini connecteurs stéréo mâles vert Voyants Sélectionné 2 vert Longeur de câbl...

Страница 16: ...in Ctrl F2 Props Ctrl F3 Undo Ctrl F4 Front Ctrl F5 Copy Ctrl F6 Open Ctrl F7 Paste Ctrl F8 Find Ctrl F9 Cut Ctrl F10 Compose Application Windows Ctrl 1 Ctrl 2 Ctrl 3 Ctrl 4 Help Ctrl H 00052349bda indd Abs2 15 00052349bda indd Abs2 15 10 07 2008 13 52 14 Uhr 10 07 2008 13 52 14 Uhr ...

Страница 17: ...d Shift Shift Control Ctrl Win Ctrl 1 Ctrl 2 Ctrl 3 Ctrl 4 Left alt option Alt F13 Print Screen F14 Scroll Lock return Enter delete Back Space help Ins F15 Ctrl Windows 00052349bda indd Abs2 16 00052349bda indd Abs2 16 10 07 2008 13 52 15 Uhr 10 07 2008 13 52 15 Uhr ...

Страница 18: ...17 00052349bda indd Abs2 17 00052349bda indd Abs2 17 10 07 2008 13 52 15 Uhr 10 07 2008 13 52 15 Uhr ...

Отзывы: