Hama M620 Скачать руководство пользователя страница 5

4

L

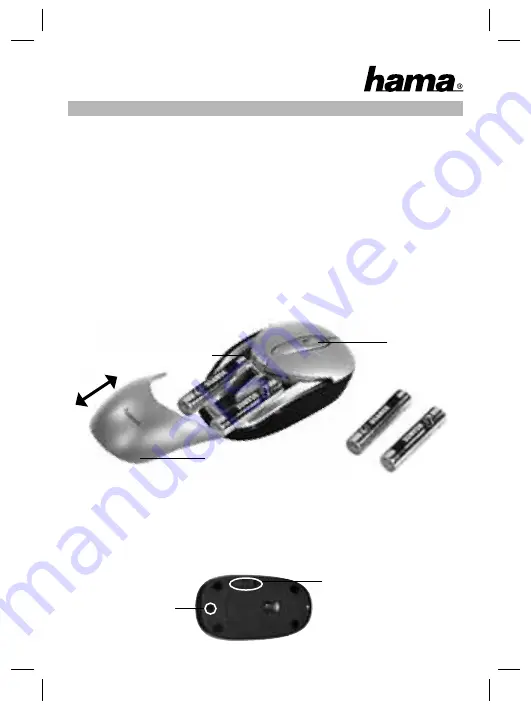
Operating Instruction

battery compartment button

ON-OFF switch

connect button

battery control 
lamp

Fig.1

+

+

-

-

Fig.2

battery cover

1. Package contents

·  Wireless optical notebook mouse
· USB 

receiver

·  Two AAA batteries
· Instructions

2.  Installing the hardware
2.1 Inserting Batteries

a)  Press the battery compartment button and pull the battery cover back at the 
 

same time (Fig. 1)

b)  Insert the two AAA batteries into the battery compartment pointed in the correct 
 

direction. The correct poles are indicated there.     

c)  Put the battery cover back in place so that is securely closed.

2.2 Connecting the USB receiver

a)  Connect the USB receiver to a free USB port on the PC.
b)  Switch on your computer if you have not already done so.
c)  Windows® now detects the USB plug and integrates it into the operating 
 

system.   

d)  Set the ON-OFF switch on the base of the mouse to “ON” (Fig. 2).

Содержание M620

Страница 1: ...yeznek az R TTE Irányelvek 99 5 EG ajánlásaival www hama com Prohlášení o shodě podle směrnice R TTE 99 5 EG naleznete na www hama com Prehlásenie o zhode podμa R TTE smernice 99 5 EG nájdete na www hama com e www hama com Hama GmbH Co KG Postfach 80 86651 Monheim Germany Tel 49 0 9091 502 0 Fax 49 0 9091 502 274 hama hama de www hama com 00052495 07 06 D Dieses Gerät darf nur in den folgenden Län...

Страница 2: ...M u s t e r 3 Wireless Optical Mouse M620 M622 M624 00052495 00052496 00052497 ...

Страница 3: ... Batteriedeckel nach hinten Abb 1 b Legen Sie die beiden AAA Batterien polrichtig in das Batteriefach Die richtige Polarität ist dort aufgezeichnet c Bringen Sie die Batterieabdeckung wieder so an dass sie fest verschlossen ist 2 2Anschließen des USB Empfängers a Verbinden Sie den USB Empfänger mit einem freien USB Anschluss am PC b Sofern noch nicht geschehen schalten Sie den Computer ein c Der U...

Страница 4: ...er Syncronisationsprozess erfolgreich abgeschlossen wurde Die Maus ist nun betriebsbereit Sollte sich der Mauszeiger nicht bewegen wiederholen Sie die Schritte 3a b Dies gilt auch falls während des Betriebes Störungen Interferenzen durch andere Funk Mäuse oder Tastaturen auftreten 4 Batteriekontrolleuchte Wenn der Spannungspegel der Batterien den vorgegebenen Wert unterschritten hat und die Maus d...

Страница 5: ...e battery cover back at the same time Fig 1 b Insert the two AAA batteries into the battery compartment pointed in the correct direction The correct poles are indicated there c Put the battery cover back in place so that is securely closed 2 2Connecting the USB receiver a Connect the USB receiver to a free USB port on the PC b Switch on your computer if you have not already done so c Windows now d...

Страница 6: ...isation process has been completed successfully The mouse is now ready for use If the cursor does not move then repeat steps 3a b This also applies if interference originating from other radio mice or keyboards occurs during operation 4 Battery control lamp If the voltage level of the batteries drops below the preset value and the mouse is actuated by movement or clicking then the battery control ...

Страница 7: ...es et faites glisser simultanément le couvercle vers l arrière fig 1 b Insérez les deux piles LR03 AAA dans le compartiment en respectant la polarité La bonne polarité est indiquée à l intérieur du compartiment c Refermez le couvercle du compartiment à batteries 2 2Branchement du récepteur USB a Raccordez le récepteur USB à une connexion USB libre du PC b Mettez votre ordinateur sous tension c Le ...

Страница 8: ...t correctement réalisée Votre souris est alors prête à fonctionner Répétez les étapes 3 a b dans le cas où le pointeur ne bouge pas La souris et le récepteur doivent être également à nouveau synchronisés s il se produit des interférences avec d autres souris ou claviers radio en cours de fonctionnement 4 Voyant de contrôle des piles Lorsque le niveau de charge des piles est faible le voyant de con...

Отзывы: