background image

Page  95

RoboScrub Service Manual

Содержание Minuteman MAX RIDE 20

Страница 1: ...Minuteman International Inc A Member of the Hako Group RoboScrub 20 Service Manual...

Страница 2: ...le of Contents Technical Specifications 4 Limited Warranty 6 Testing and Troubleshooting 8 3D Camera 42 Modem 46 Steering 48 Enter Settings 52 Lower Lidar Removal 78 Error Codes 92 Testing Manual Auto...

Страница 3: ...Page 4 RoboScrub Service Manual Technical Specifications...

Страница 4: ...Page 5 RoboScrub Service Manual...

Страница 5: ...Page 6 RoboScrub Service Manual Limited Warranty...

Страница 6: ...Page 7 RoboScrub Service Manual...

Страница 7: ...Page 8 RoboScrub Service Manual Testing and Troubleshooting Testing and Troubleshooting Drive System Disconnect Batteries...

Страница 8: ...Page 9 RoboScrub Service Manual Remove back panel...

Страница 9: ...Page 10 RoboScrub Service Manual Secure panel for ease of access...

Страница 10: ...Page 11 RoboScrub Service Manual Locate and disconnect P3 connector from controller...

Страница 11: ...Page 12 RoboScrub Service Manual Place probes on pins 20 BLK PNK and 10 BLK WHT Set meter to OHMs Depress Accelerator Pedal Reading should be 0 3 Static to 1 7 Full Throttle...

Страница 12: ...Page 13 RoboScrub Service Manual Plug P3 back into Controller Place probes on Controller leads as shown...

Страница 13: ...t switch 4 With meter in lap select Forward on Right Touch Pad and depress Accelerator Pedal At static Stopped voltage should be 0 0 VDC As pedal is depressed the voltage should increase all the way u...

Страница 14: ...Page 15 RoboScrub Service Manual Testing Pedal Circuit Bypass Seat Switch Circuit...

Страница 15: ...Page 16 RoboScrub Service Manual Bypass Seat Switch Circuit...

Страница 16: ...Page 17 RoboScrub Service Manual Remove back access cover...

Страница 17: ...Page 18 RoboScrub Service Manual Locate P3 connector on Kinetec Drive Controller and disconnect...

Страница 18: ...Page 19 RoboScrub Service Manual Set meter to ohms Place probes on PIN 20 BLK WHT WIRE and PIN 10 BLK PINK WIRE...

Страница 19: ...Page 20 RoboScrub Service Manual Static Pedal not pressed should read 0 3 OHMS 0 1 Fully activated pedal should read 1 7 OHMS 0 1 If reading not within above readings replace...

Страница 20: ...Page 21 RoboScrub Service Manual THESE INSTRUCTIONS ARE A GUIDELINE FOR REPLACEMENT OF DRIVE WIRING PLATES FOR THE MR20 AUTONOMOUS MACHINE...

Страница 21: ...Page 22 RoboScrub Service Manual LOOSEN CHAIN TENSIONER TO GAIN CHAIN SLACK REMOVE SCREW WASHER FROM LARGE SPROCKET REMOVE MASTER LINK THEN REMOVE CHAN FROM SPROCKETS...

Страница 22: ...Page 23 RoboScrub Service Manual LOOSEN BOTH SET SCREWS AND REMOVE SPROCKET FROM STEERING SPINDLE REMOVE STEERING PIVOT STOP AND KEY NOT SHOWN FROM STEERING SPINDLE...

Страница 23: ...Page 24 RoboScrub Service Manual REMOVE STEERING SPINDLE DRIVE MOTOR AND PLACE ON WORKBENCH...

Страница 24: ...Page 25 RoboScrub Service Manual REMOVE OLD DRIVE WIRING PLATE AND REPLACE WITH NEW DRIVE WIRING PLATE...

Страница 25: ...Service Manual REINSTALL DRIVE MOTOR ORIENTED LIKE SHOWN WRAP THE CABLE CONDUIT LOOSELY AROUND THE DRIVE MOTOR AND HOLD IN POSITION WITH TIE WRAPS TIE WRAPS INSTALL SUPPLEMENTAL DRIVE PLATE SEE FOLLOW...

Страница 26: ...Page 27 RoboScrub Service Manual...

Страница 27: ...Page 28 RoboScrub Service Manual ROTATE DRIVE MOTOR TO VERIFY CABLES ARTICULATE PROPERLY REASSEMBLE MACHINE IN REVERSE ORDER OF ASSEMBLY...

Страница 28: ...B C x D E F G H I J K 5 L w M A N O P Q R S T 6 0 7 U V W X Y Z y 1 8 z _ a b c d e f g 9 2 h i j k l m n o 3 p q r s t u v f A N g O h P B Q C R i S j T U V k W z l D E X m n F Y Z o p G y q r H I s...

Страница 29: ...ey Switch UI Screen and Control Console To remove the MinuteMan Cowling remove the 5 32 hex screw on each side of the upper portion of the cowling as well as the five 1 8 hex screws that secure the Sl...

Страница 30: ...RoboScrub Service Manual MinuteMan RoboScrub 20 Removing the MinuteMan Cowling Wheel E Stop Key Switch UI Screen and Control Console The cowling can be lifted up and off the two hooks at the top of t...

Страница 31: ...Removing the MinuteMan Cowling Wheel E Stop Key Switch UI Screen and Control Console Use a socket to remove the locking nut and washer Pull the wheel straight up to remove There is a semi circle key t...

Страница 32: ...Removing the MinuteMan Cowling Wheel E Stop Key Switch UI Screen and Control Console Use a socket to remove the locking nut and washer Pull the wheel straight up to remove There is a semi circle key t...

Страница 33: ...nual MinuteMan RoboScrub 20 Removing the MinuteMan Cowling Wheel E Stop Key Switch UI Screen and Control Console Use a 3 32 hex key to remove the two screws that secure the E Stop Slide over the metal...

Страница 34: ...Switch UI Screen and Control Console Use a 3 32 hex key to remove the two screws that secure the Key Switch Decouple the white connector to free the hardware Use a 3 32 hex key to remove the four scre...

Страница 35: ...RoboScrub 20 Removing the MinuteMan Cowling Wheel E Stop Key Switch UI Screen and Control Console Use a 3 32 hex key to remove the four screws that secure the Control Console Carefully unplug the two...

Страница 36: ...e Manual 2D Camera 2 2DCAMERA If machine software does not boot up freeze during start up the most likely cause is the right 2D camera is not working This is the only camera that HAS TO BE WORKING for...

Страница 37: ...Page 38 RoboScrub Service Manual Disconnect the 2D Camera a ected and check for 5VDC on pins 2 and 4...

Страница 38: ...e Manual If this is the right camera or front camera and voltage is present please swap it with the left camera and test to ensure that the issue follows the camera If the issue follows the camera it...

Страница 39: ...Page 40 RoboScrub Service Manual If voltage is not present test the following for continuity for the suspect camera...

Страница 40: ...Page 41 RoboScrub Service Manual If no continuity present repalce UP TRUNK...

Страница 41: ...If you receive a side IFM error check to see if the camera has power If the LED is blinking or lit the camera has power In this case try reseting the communication cable going to the camera on the UP...

Страница 42: ...Page 43 RoboScrub Service Manual If the LED is not blinking or lit check voltage on the powet cable to confirm ther is 24VDC If there is power to camera may need to be replaced...

Страница 43: ...ror check to see if the camera has power If the four LED s on the front of the camera are blinking or lit the camera has power In this case try resetting the communication cable going to the camera fr...

Страница 44: ...Page 45 RoboScrub Service Manual If the four LED s are not blinking or lit check voltage on the power cable to confirm there is 24VDC If ther eis power the camera may need to be replaced...

Страница 45: ...ge 46 RoboScrub Service Manual Modem MODEM From the modem there are four connections which interface with the Modem USB Power connector micro USB Data connector and 2 antenna connectors MIM01 and MIM0...

Страница 46: ...ital Multimeter measure the voltage at the pins on the M12 female connector as shown below note the location of the M12 notch voltageshould be 5 VDC If there is voltage measured across ALL three pins...

Страница 47: ...Page 48 RoboScrub Service Manual Steering Place steering wheel in zero position as shown below...

Страница 48: ...Page 49 RoboScrub Service Manual Verify that drive wheel is also in the zero position as shown below...

Страница 49: ...Page 50 RoboScrub Service Manual If Steering wheel and Drive wheel do not line up remove front cowling and check for loose missing Encoder set screws or slack jumped gear in steering gear assembly...

Страница 50: ...Page 51 RoboScrub Service Manual Turn machine on when prompted enter Operator PIN 1337...

Страница 51: ...Page 52 RoboScrub Service Manual Enter Settings...

Страница 52: ...Page 53 RoboScrub Service Manual...

Страница 53: ...Page 54 RoboScrub Service Manual Enter service PIN if you do not have one contact Minuteman Tech Support...

Страница 54: ...Page 55 RoboScrub Service Manual Enter Service Tools...

Страница 55: ...Page 56 RoboScrub Service Manual Enter Steering...

Страница 56: ...Page 57 RoboScrub Service Manual Enter Steering Assembly...

Страница 57: ...Page 58 RoboScrub Service Manual Enter Sensor View...

Страница 58: ...Page 59 RoboScrub Service Manual Move steering from left to right the return to zero position and recheck screen encoder position...

Страница 59: ...Page 60 RoboScrub Service Manual Move steering fron left to right then return to the zero position and recheck screen encoder position...

Страница 60: ...Page 61 RoboScrub Service Manual Move steering right until it stops Screen encoder shoould line up with 90 degree mark Do the same for the left If o set return to zero and re adjust...

Страница 61: ...Page 62 RoboScrub Service Manual Back out to Steering Assembly screen Enter steering longevity...

Страница 62: ...Page 63 RoboScrub Service Manual Follow on screen instructions...

Страница 63: ...Page 64 RoboScrub Service Manual Follow on screen instruction press start Steering wheel will start moving left and right After a minimim of 5 times in both directions select cancel...

Страница 64: ...Page 65 RoboScrub Service Manual Back out to steering assembly screen and select run...

Страница 65: ...Page 66 RoboScrub Service Manual Follow on screen instructions...

Страница 66: ...Page 67 RoboScrub Service Manual Continued...

Страница 67: ...Page 68 RoboScrub Service Manual After Diagnostic run screen will show SUCCESS with a green check mark steps are complete...

Страница 68: ...e rear of the machine To remove the MinuteMan Cowling remove the 5 32 hex screw on each side of the upper portion of the cowling as well as the five 1 8 hex screws that secure the Slanted LIDAR shield...

Страница 69: ...Page 70 RoboScrub Service Manual MinuteMan RoboScrub 20 Replacing the MinuteMan BCM The cowling can be lifted up and off the two hooks at the top of the unit...

Страница 70: ...n BCM Unscrew the four bundled black connectors that couple to the BCM Decouple the fan connector Cut the indicated zip ties and place the BCM to the side Remove the six 3mm hex screws that secure the...

Страница 71: ...robot can establish ROC connection Verify ROC Connectivity Power on the unit and verify that the screen loads past the spinning Brain logo and ends on the Security PIN screen The ROC icon located in...

Страница 72: ...infrastructure Moving the scrubber to a different part of the property or even outside the building may improve connectivity Train a short test route Print the home marker found on the following page...

Страница 73: ...Page 74 RoboScrub Service Manual MinuteMan RoboScrub 20 Replacing the MinuteMan BCM...

Страница 74: ...Page 75 RoboScrub Service Manual MinuteMan RoboScrub 20 Replacing the MinuteMan BCM Enter the PIN code and select Teach Route Teach a short route that starts and ends at the same home marker location...

Страница 75: ...Page 76 RoboScrub Service Manual MinuteMan RoboScrub 20 Replacing the MinuteMan BCM...

Страница 76: ...sure that the robot follows the path without difficulty At some point during the replay step in the robots path and continue to block it until an assist is triggered The goal is to leave the unit powe...

Страница 77: ...Page 78 RoboScrub Service Manual Lower Lidar Removal Lower Lidar Removal...

Страница 78: ...Page 79 RoboScrub Service Manual Front Panel Removal...

Страница 79: ...Page 80 RoboScrub Service Manual 1 Remove these three screws...

Страница 80: ...Page 81 RoboScrub Service Manual 2 Remove these two screws Remove Upper Lidar cover plate...

Страница 81: ...Page 82 RoboScrub Service Manual 3 Remove two nuts positioned inside frame underneath There are two access holes to alow for removal...

Страница 82: ...Page 83 RoboScrub Service Manual...

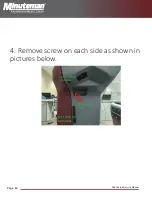
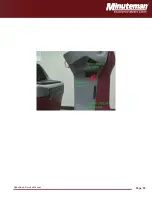
Страница 83: ...Page 84 RoboScrub Service Manual 4 Remove screw on each side as shown in pictures below...

Страница 84: ...Page 85 RoboScrub Service Manual...

Страница 85: ...Page 86 RoboScrub Service Manual Removal of lower jaw and Lidar...

Страница 86: ...Page 87 RoboScrub Service Manual 1 Disconnect cables...

Страница 87: ...Page 88 RoboScrub Service Manual 2 Remove these four screws Then remove bracket...

Страница 88: ...MOTOR PM MOTOR PM MOTOR PM MOTOR PM MOTOR ACCEL_WIPER FRESH WATER LEVEL SWITCH NC DIRTY WATER LEVEL SWITCH NO SEAT SWITCH NO DGND BRAKE COIL CLEAN_DOSE_ADJUST_COIL FRESH_WATER_FLOW_COIL 24V 1 2 3 4 5...

Страница 89: ...FIT Jr PART THE MATING CONNECTOR PART NUMBER IS AS FOLLOWS MOLEX Mini Fit Jr 20 SOCKET RECEPTACLE 39 01 2200 MOLEX Mini Fit Jr CRIMP TERMINAL 39 00 0039 TILLER INTERFACE 15 16 17 18 19 20 15 16 17 18...

Страница 90: ...Page 91 RoboScrub Service Manual 3 Remove these two screws Now Lidar is ready to remove...

Страница 91: ...Page 92 RoboScrub Service Manual How to read Kinetek Error Codes Step one Locate the rear panel and remove the 7 screws and remove the panel Step Two Locate the Nidec Kinetek controller Error Codes...

Страница 92: ...ep Four If the light is flashing the board has an error it will blink in a series of fast flashes and then slow flashes Count the flashes and see the table below to get your hex code See document Kine...

Страница 93: ...7DX X IOL6X 20 X FMFIX X 9EX X 002 2I NFJX 23X FX 7DX X HO22522X FMFIX X 7DX X 002 2J NFJX DX 7DX X Q8M06X 23X FX 7DX X 0OOBX FNFIX Q8M06X DX 7DX X HO22522X Q7N06X DX 7DX X JOL6X FMFIX Q8M06X DX 7DX X...

Страница 94: ...Page 95 RoboScrub Service Manual...

Страница 95: ...5 72 1 25 5 6 257 8 7 3527 7 21 586 29 5 855 17 3527 7 21 586 6 257 5 8 7 3527 7 21 75 7 21 7 5 1 8 7 75 7 21 5 7 5 1 8 7 75 7 21 5 9 56 29 5 855 17 3527 7 21 75 7 21 25 5 29 5 855 17 3527 7 21 586 5...

Страница 96: ...9 49 0 9 80 0 A4 0 969 B9 0 30 8 3490 1 30 4 0 9 49 0 9 80 0 A4 0 A 6 30 492 969 B9 9 11 30 8 3490 4 0 9 9 9 30 8 3490 9 0 A4 41 4 0 9 49 0 4 4 9 0 00 492 9 11 30 8 3490 4 0 9 9 9 30 8 3490 9 0 A4 41...

Страница 97: ...4 7 60 60 0 30 3 4 70 4A0 9D 70 0 80 0 30 0 9 4 3 4 7 60 60 0 30 3 4 70 4A0 9D 70 0 80 0 30 0 9 4 3 4 7 60 60 0 30 3 4 70 4A0 9D 70 0 80 0 30 0 9 4 3490 4 11 3 77 B 30 B 9 4A0 30 8 3490 30 34237423 0...

Страница 98: ...4 7 60 60 0 30 3 4 70 4A0 9D 70 0 80 0 30 0 9 4 3 4 7 60 60 0 30 3 4 70 4A0 9D 70 0 80 0 30 0 9 4 3 4 7 60 60 0 30 3 4 70 4A0 9D 70 0 80 0 30 0 9 4 3490 4 11 3 77 B 30 B 9 4A0 30 8 3490 30 34237423 0...

Страница 99: ...30 30 9 1 8 20 0 4 5 0 7 0 900 0 1 9 4 0 0 1 9 0 30 0 9 0 80 1 30 4 0 9 49 0 9 80 0 A4 0 70 8 9 0 30 A 8 9 3 0 1 8 20 0 4 1 30 3 0 4 609 9 80 0 A4 0 4 8 9 0 30 A 8 9 3 0 1 8 20 0 4 1 30 3 0 4 70 0 30...

Страница 100: ...8 3490 9 0 30 0 6 1 8 20 9 9 30 8 3490 1 30 4 0 9 49 0 8 20 4 0 0 0 9 80 0 A4 0 4 0 6 9 11 9 49 0 8 3490 1 9 4 0 0 1 9 0 30 0 9 0 80 1 30 4 0 9 49 0 9 80 0 A4 0 70 3 0 0 0 60 0 30 30 9 0 0 7D 49 770 1...

Страница 101: ...90 1 30 4 0 9 49 0 9 80 0 A4 0 4 3 70 9 0 30 3 70 1 9 4 0 0 1 9 0 30 0 9 0 80 1 30 4 0 9 49 0 9 D 0 A4 4 60 0 7 9 0 30 60 0 7 1 9 4 0 0 1 9 0 30 0 9 0 80 1 30 4 0 9 49 0 9 D 0 A4 4 09 30 6 49 2 0 4A0...

Страница 102: ...0 60 0 30 3 4 70 4A0 9D 70 0 80 0 30 0 9 4 4 8B 0 00 492 71 9 4 9 00 492 9 11 30 8 3490 4 0 9 9 9 30 8 3490 9 0 A4 41 4 0 9 49 0 4 3 4 7 60 60 0 30 3 4 70 4A0 9D 70 0 80 0 30 0 9 4 0 7 0 0 60 0 30 0 7...

Страница 103: ...7 3 9 0 1 8 20 4 9 1 9 4 0 0 1 9 0 30 0 9 0 80 4 01 09 0 9 492 70 9 30 701 09 B4 3 70 9 84 14 0 7 3 9 0 1 8 20 0 30 8 3490 4 423 09 0 9 492 70 9 30 423 09 B4 3 70 9 84 14 0 7 3 9 0 1 8 20 0 30 8 3490...

Страница 104: ...4 423 4 0 70 0 0 0 9 0 30 8 3490 9 30 9 492 0 4A0 9D 70 1 70 0 30 0 9 0 80 4 09 4 7 E 0 0 0 9 0 30 8 3490 60 0 30 3 1 30 8 3490 4 70 4A0 9D 70 1 30 3 4 70 0 30 0 9 0 80 4 7411 0 0 0 60 0 30 8 3490 4 9...

Страница 105: ...D 0 A4 4 3490 9 11 9 49 0 8 3490 1 9 4 0 0 1 9 0 30 0 9 0 80 1 30 4 0 9 49 0 9 D 0 A4 4 3 3490 4 11 3 77 B 30 B 9 4A0 30 8 3490 30 34237423 0 3 60 0 30 3 4 70 0 80 0 30 0 9 4 3 4 8 D 3490 4 11 3 77 B...

Страница 106: ...30 3 4 70 4A0 9D 70 0 80 0 30 0 9 4 3 7 0 3 4 7 60 60 0 30 3 4 70 4A0 9D 70 0 80 0 30 0 9 4 920 3 4 7 60 60 0 30 3 4 70 4A0 9D 70 0 80 0 30 0 9 4 3492 70 3 4 7 60 60 0 30 3 4 70 4A0 9D 70 0 80 0 30 0...

Страница 107: ...11 30 8 3490 4 0 9 9 9 30 8 3490 9 0 A4 41 708 9 49 0 4 80 209 D 92 20 9 0 30 8 3490 9 30 9 492 0 1 70 070 0 30 080 209 D D 9 11 30 8 3490 4 990 30 0 D 70 1 0 9 0 990 30 70 9 9 9 30 8 3490 1 30 4 0 9...

Страница 108: ...3490 41D D 0 A4 1 34 4 0 9 49 7 0 30 0 0 9 8 0 34 8 3490 B477 900 0 0 74 0 4 3 4 7 60 60 0 30 3 4 70 4A0 9D 70 0 80 0 30 0 9 4 3 4 7 60 60 0 30 3 4 70 4A0 9D 70 0 80 0 30 0 9 4 3 77 B492 0 30 8 3490 1...

Страница 109: ...9 30 8 3490 9 0 A4 41 708 9 49 0 969 B9 9 11 9 49 0 30 8 3490 0 30 8 3490 1 30 4 0 9 49 0 9 80 0 A4 0 9 74 0 09 09 9 74 0 0 492 74 0 9 80 0 A4 0 0 09 0 9 492 70 9 30 0 09 B4 3 70 9 84 14 0 7 3 9 0 1...

Страница 110: ...490 0 09 0 9 492 70 9 30 0 09 B4 3 70 9 84 14 0 7 3 9 0 1 8 20 4 9 0 30 8 3490 B0 09 0 9 492 70 9 30 7 B0 09 B4 3 70 9 84 14 0 7 3 9 0 1 8 20 4 9 0 30 8 3490 3490 0 9 492 0 30 8 3490 80 0 0 9 492 0 30...

Страница 111: ...84 14 0 7 3 9 0 1 8 20 0 30 8 3490 0 09 0 9 492 70 9 30 0 09 B4 3 70 9 84 14 0 7 3 9 0 1 8 20 0 30 8 3490 B0 09 0 9 492 70 9 30 7 B0 09 B4 3 70 9 84 14 0 7 3 9 0 1 8 20 0 30 8 3490 09 0 9 492 0 30 8...

Страница 112: ...70 9 84 14 0 7 3 9 0 1 8 20 0 30 8 3490 01 09 0 9 492 70 9 30 701 09 B4 3 70 9 84 14 0 7 3 9 0 1 8 20 0 30 8 3490 01 09 0 9 492 70 9 30 701 09 B4 3 70 9 84 14 0 7 3 9 0 1 8 20 0 30 8 3490 423 09 0 9...

Страница 113: ...4 3 70 9 84 14 0 7 3 9 0 1 8 20 0 30 8 3490 0 09 0 9 492 70 9 30 0 09 B4 3 70 9 84 14 0 7 3 9 0 1 8 20 0 30 8 3490 0 09 0 9 492 70 9 30 0 09 B4 3 70 9 84 14 0 7 3 9 0 1 8 20 0 30 8 3490 B0 09 0 9 492...

Страница 114: ...490 09 0 0 30 8 3490 4 B0 09 4 D 9 0 9 70 9 30 8 09 0 30 8 3490 1 30 4 0 9 49 0 9 D 0 A4 4 0 09 4 D 9 0 9 70 9 30 0 09 0 30 8 3490 1 30 4 0 9 49 0 9 D 0 A4 4 9 80 4 D 9 0 9 70 9 30 09 0 30 8 3490 1 30...

Страница 115: ...0 1 8 20 4 9 1 9 4 0 0 1 9 0 30 0 9 0 80 4 09 70 9 77 30 09 B4 3 70 9 84 14 0 7 3 9 0 1 8 20 4 9 1 9 4 0 0 1 9 0 30 0 9 0 80 4 09 70 9 77 30 09 B4 3 70 9 84 14 0 7 3 9 0 1 8 20 4 9 1 9 4 0 0 1 9 0 30...

Страница 116: ...70 1 70 0 30 0 9 0 80 4 01 4 0 70 0 0 0 9 0 30 8 3490 9 30 9 492 0 4A0 9D 70 1 70 0 30 0 9 0 80 4 423 4 0 70 0 0 0 9 0 30 8 3490 9 30 9 492 0 4A0 9D 70 1 70 0 30 0 9 0 80 4 0 4A0 30 8 3490 30 80 60 0...

Страница 117: ...30 0 0 70 B 849 0 7 92 D 9 11 30 8 3490 4 990 30 0 D 70 1 0 9 0 990 30 70 9 9 9 30 8 3490 1 30 4 0 9 49 0 9 80 0 A4 0 0 0 49 30 0 9 4A0 6B B3470 49492 30 0 09 70 9 30 7 B0 09 B4 3 70 9 84 14 0 7 3 9...

Страница 118: ...Scrub Service Manual 0 0 49 30 0 492 9 09 492 30 80 80 60 0 0 1 470 A0 0 49 30 0 0 0 49 30 0 492 9 09 492 30 80 80 60 D 9 11 30 8 3490 4 990 30 0 D 70 1 0 9 0 990 30 70 9 9 9 30 8 3490 1 30 4 0 9 49 0...

Страница 119: ...Service Manual 969 B9 9 11 30 8 3490 4 0 9 9 9 30 8 3490 9 0 A4 41 708 9 49 0 969 B9 0 30 8 3490 1 30 4 0 9 49 0 9 80 0 A4 0 969 B9 470 7 0 70 0 D 2 49 4 00 492 9 11 30 8 3490 4 0 9 9 9 30 8 3490 9 0...

Страница 120: ...9 0 30 8 3490 1 30 4 0 9 49 0 9 D 0 A4 4 D 9 11 9 49 0 30 8 3490 0 30 8 3490 1 30 4 0 9 49 0 9 80 0 A4 0 4 D 08 9 11 30 8 3490 4 0 9 9 9 30 8 3490 1 30 4 0 9 49 0 9 D 0 A4 4 00 492 9 11 30 8 3490 4 0...

Страница 121: ...49 7 0 30 0 0 9 8 0 34 8 3490 B477 900 0 0 74 0 4 09 4 7 E 0 0 0 9 0 30 0 1 8 0 7 09 4 7 4A0 30 8 3490 1 30 7 92 30 3 0 80 0 30 0 9 4 7 492 30 74 0 07 D 1 470 0 0 0 0 3490 9 11 9 49 0 8 3490 1 9 4 0 0...

Страница 122: ...0 34 8 3490 B477 900 0 0 74 0 4 A492 B3470 0 49 9 8 8 0 3490 9 11 9 49 0 8 3490 1 9 4 0 0 1 9 0 30 8 3490 1 30 4 0 9 49 0 9 D 0 A4 4 429414 9 8 A0809 49 8 9 7 B4 3 9 90 49 30 0 3490 9 11 9 49 0 8 3490...

Страница 123: ...Page 124 RoboScrub Service Manual Testing Manual Auto Switch Set Meter to DC voltage Place Black Probe on Main Battery Negative...

Страница 124: ...ircuit How to Test To test a diode you will need a continuity tester or an OHM meter To test the diode 1 Put your OHM meter on the highest scale i e R x 10 000 scale and zero out your meter and remove...

Страница 125: ...Page 126 RoboScrub Service Manual Set Switch in Auto Position 11 o clock...

Страница 126: ...Page 127 RoboScrub Service Manual...

Страница 127: ...Page 128 RoboScrub Service Manual Place Switch in Manual Position 2 o clock...

Страница 128: ...Page 129 RoboScrub Service Manual...

Страница 129: ...10 D 0 3 94 7 07 D 0 470 88 94 492 3490 9 11 9 49 0 8 3490 1 9 4 0 0 1 9 0 30 8 3490 1 30 4 0 9 49 0 9 D 0 A4 4 74 4 9 4A0 30 8 3490 6 30 3 2492 4 9 9 11 30 8 3490 41D D 0 A4 1 34 4 0 9 49 7 0 30 0 0...

Страница 130: ...HDG WKH RPH 0DUNHU 5 7 21B 7 B 2 6B127B 67 8QDEOH WR ILQG UHTXLUHG GDWD RQ WKH PDFKLQH 77 5 B 85 DLOHG WR FROOHFW DQ YROWDJH GDWD IURP WKH EDWWHU 92 7 B722B 2 7KH YROWDJH RQ WKH EDWWHU LV WRR ORZ 92 7...

Страница 131: ...QQHFW WR HIW DPHUD 7B B 0 5 B 5525 5217B B 211 7 21B 5525 DLOHG WR FRQQHFW WR URQW DPHUD 5217B B 0 5 B 5525 5 7B B 211 7 21B 5525 DLOHG WR FRQQHFW WR 5LJKW DPHUD 5 7B B 0 5 B 5525 86 5B 5525 67 5 1 B...

Страница 132: ...0 5 B12B 7 1R GDWD FROOHFWHG IURP HIW DPHUD 5217B B 0 5 B12B 7 1R GDWD FROOHFWHG IURP URQW DPHUD 5 7B B 0 5 B12B 7 1R GDWD FROOHFWHG IURP 5LJKW DPHUD 2 5B 5B12B 7 1R GDWD FROOHFWHG IURP RZHU 5 833 5B...

Страница 133: ...B7 0 287B 5525 7RRN WRR ORQJ WR YHULI WKH FRQILJXUDWLRQ RI WKH 5LJKW DPHUD 5 7B B 21 B5 B 5525 8QDEOH WR UHDG WKH FRQILJXUDWLRQ RI WKH 5LJKW DPHUD 5 7B B 21 B 203 5 B 5525 8QH SHFWHG FRQILJXUDWLRQ RQ...

Страница 134: ...screen Installation in Ferrite P N 275 00156 01 Ferrite Core Hinged 348ohm 10mm ID Install 1 ferrite approximately 1 5 from the connector on the LCD Install 1 ferrite approximately 1 0 from the first...

Страница 135: ...aster Contactor E Stop Trunk side Red to Pin 59 on Down Trunk Figure A x Check for connectivity from the Master Contactor E Stop Trunk side Black to Pin 52 on the Down Trunk Figure B x Check for 24VDC...

Страница 136: ...Page 137 RoboScrub Service Manual Figure A Figure B...

Страница 137: ...Page 138 RoboScrub Service Manual Figure C Figure D...

Страница 138: ...Page 139 RoboScrub Service Manual...

Страница 139: ...WXUHU31 47 6WUDLQ 5HOLHI 6WUDLQ 5HOLHI 2LO 5HVLVWDQW 3 2YHUPROGHG DEOH 6WRFN 86 8 6KLHOGHG ODFN DFNHW 1 7HFK 7 DEOH 6WRFN RQGXFWRU 6KLHOGHG UD DFNHW DURO 6 DEOH 6WRFN RQGXFWRU 6KLHOGHG UD DFNHW DURO 6...

Страница 140: ...1 6 6 5 1 6 1 37 B6 1625B 1 3 0L X 3 3LQ 3 9 5 1 1 7 067B3 0B287 5 1 6 6 5 1 86 3 0B 5217B86 5 1 3 0 3LQ 3 9 5 86 1 7 1 6 6 5 1 6 B 37 B 5217B 7 25 1 3 0 3LQ 0 B 5 1 B 25 1 B 5 1 6 6 5 1 6 1 0B 1 3 0L...

Страница 141: ...XUHU 0DQXIDFWXUHU31 47 6WUDLQ 5HOLHI 3 2YHUPROGHG DEOH 6WRFN RQGXFWRU 6KLHOGHG UD DFNHW DURO 6 DEOH 6WRFN RQGXFWRU 6KLHOGHG ODFN DFNHW OSKD LUH DEOH 6WRFN RQGXFWRU 6KLHOGHG 5HG DFNHW OSKD LUH 5 DEOH 6...

Страница 142: ...XUHU 0DQXIDFWXUHU31 47 6WUDLQ 5HOLHI 3 2YHUPROGHG DEOH 6WRFN RQGXFWRU 6KLHOGHG UD DFNHW DURO 6 DEOH 6WRFN RQGXFWRU 6KLHOGHG ODFN DFNHW OSKD LUH DEOH 6WRFN RQGXFWRU 6KLHOGHG 5HG DFNHW OSKD LUH 5 DEOH 6...

Страница 143: ...PP GGHG PDQXIDFWXUHU WUDFHDELOLW QXPEHU WR ODEHO 0 5HSODFHG DOO ILHOG LQVWDOODEOH 0 FRQQHFWRUV ZLWK VKLHOGHG RYHUPROGHG HTXLYDOHQWV KDQJHG ODEHO IURP D KHDWVKULQN ODEHO WR ODVHU HQJUDYLQJ RQ WKH VWUD...

Страница 144: ...0 12 1XPEHU 6 5 37 21 0DQXIDFWXUHU 0DQXIDFWXUHU31 47 6WUDLQ 5HOLHI 2LO 5HVLVWDQW 3 0 LVFUHWLRQ DEOH 6WRFN RQGXFWRU 6KLHOGHG UD DFNHW DURO 6 DEOH UD 5 RQGXFWRU HQHUDO DEOH DURO UDQG 6 DEOH RQGXFWRU OS...

Страница 145: ...6 5 1 6 3 9 5B 5 B3 5 5 3 0 3LQ 1 6 6 5 1 6 B 63B 7 25 1 3 0 3LQ B 5 1 B 25 1 B 5 1 6 6 5 1 6 5 B 67 57B3 86 5 3 0L X 3 3LQ 5 B 67 57B3 86 5 1 3 9 7 1 67 5 1 3 0 3LQ 7 0 12 3 9 8 3 9 3853 3 0B 9 5 5B...

Страница 146: ...DQG 67 57B3 86 SLQV WR PDWFK 0 VFKHPDWLF 0 KDQJHG FRQQHFWRU H LW RULHQWDWLRQ IURP WR 0 5HSODFHG DOO ILHOG LQVWDOODEOH 0 FRQQHFWRUV ZLWK VKLHOGHG RYHUPROGHG HTXLYDOHQWV KDQJHG ODEHO IURP D KHDWVKULQN O...

Страница 147: ...8 RoboScrub Service Manual Hard Reset Process H Hard Reset Process The following steps are to be done once Modem and Right 2D Camera have been confirmed working properly and Brain Program still will n...

Страница 148: ...Page 149 RoboScrub Service Manual Turn key to off position disconnect batteries...

Страница 149: ...stored power off Reconnect batteries turn key switch to on position Allow machine to stay turned on for a minimum of 15 minutes if after 20 minutes program does not load repeat the above steps A minim...

Страница 150: ...te 20 Pingree Grove IL 60140 USA Phone 800 323 9420 www minutemanintl com A Member of the Hako Group Excellence Meets Clean Minuteman is a Full Line Manufacturer of Sweepers and Scrubbers for Industri...

Отзывы: