background image


Haklift Oy 

Asessorinkatu 3-7  

20780 Kaarina, Finland 

Tel. +358 2 511 5511 

[email protected] 

www.haklift.com 


Lifting Solutions Group 
Axel Johnson International 


7. General 


Overload limiting clutch:

 The overload limiting clutch is designed to allow the intermediate gear to 

slip on an excessive overload. An overload is indicated when the hoist will not raise the load. Also, 
some clutching noise may be heard if the hoist is loaded beyond rated capacity. 
 

Caution:  If  the  load  being  lifted  exceeds  the  lifting  capability  of  the  overload  clutch,  the  motor  will 
continue  to  run,  causing  overheating  of  both  clutch  and  motor.  Under  no  circumstance  should  the 
clutch be allowed to slip for more than a few seconds.


Chain bag: 

For installations where the slack chain hanging from the hoist may be objectionable or 

hazardous, the use of a chain container is highly recommended 


Load  chain:

  The  chain  should  feed  smoothly  into  and  away  from  the  hoist  and  hook  block  If  the 

chain binds, jumps or is noisy, First clean and lubricate the chain, if trouble persists inspect chain 
and mating parts for wear, distortion and other damages. 


Load  chain  lubrication:

  Always  lubricate  load  chain  weekly  or  more  frequently  depending  on 

severity of service. Be sure the lubricant reaches the bearing surfaces between the links. Remove 
the excess oil from the chain. 


Chain end stop:

 The end stop on the dead-end chain should be mounted on the 11th link. (No less 

than 11 links should be in between the dead-end and the chain stop). 


Load chain cleaning:

 Clean the load chain with acid-free solvent and coat with new ISO VG-320 or 

equivalent gear oil. Wipe excess Oil to prevent dripping. Never apply grease to the chain 

 
8. Chain replacement 


With chain in hoist 

1. 

With the unit placing on workbench or motor up position, run the hook to its up limit.  


2. 

Remove the load block assembly from the old chain.  


3. 

Make a “C” link, attach the new chain to the load end of the old chain.  


4. 

Carefully pull the trigger and run the joined pieces of chain into the lifting motor until about 40cm 
of new chain comes out the other side.  


5. 

Remove the “C” link and the old chain. Remove the chain stop from the old chain by a hex head 

screwdriver.  


6. 

Attach the chain stop to the slack end of the new chain by capturing the 12th link with the two  

         stop halves. Be sure there are no twists in the chain.  
 
7.      Attach the load block on new chain by a hex head screwdriver. 


Without chain in hoist 

1. 

With the unit placing on workbench, run the hook to its up limit.  


2. 

Remove the load block assembly from the old chain.  


3. 

Remove the chain stop from the old chain.  


4. 

Carefully pull the trigger and detach the old chain out of the lifting motor.  


Содержание SKTH50018V

Страница 1: ...haklift com www haklift com Lifting Solutions Group Axel Johnson International Rev 20200115 ORIGINAL INSTRUCTIONS K NN S ALKUPER ISEST K YTT OHJEESTA VERS TTNING AV ORIGINAL BRUKSANVISNING BATTERY CH...

Страница 2: ...e installation check Check for transit damage Check that all fasteners and joints are tight and secure Check the capacity of the lifting unit and bottom block Check that all external wiring is in good...

Страница 3: ...the load chain to the load Check all suspension connections as well as the control cable Remove all people from the area before you start lifting the load Do not allow any people to stand under the m...

Страница 4: ...the lubricant reaches the bearing surfaces between the links Remove the excess oil from the chain Chain end stop The end stop on the dead end chain should be mounted on the 11th link No less than 11...

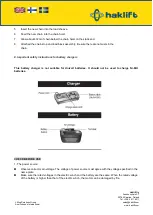
Страница 5: ...ssembly Be sure there are no twists in the chain 9 Important safety instructions for battery chargers This battery charger is not suitable for Univolt batteries It should not be used to charge Ni MH b...

Страница 6: ...on 2 Insert the battery in the battery charger considering the polarity and the charging will be started immediately 3 When the battery working time is remarkably short despite full charging the life...

Страница 7: ...normal temperature and after the cooling indication charges to red flowing and charging begins 3 This charger detects charging status of the battery and always keeps the battery in full charge state...

Страница 8: ...ways unplug the charger from the power supply or turn off the power supply when there is no battery pack in the cavity Unplug the charger before attempting to clean it To assist in the cooling of the...

Страница 9: ...amista Tarkista kuljetusvauriot Tarkista ett kaikki kiinnitykset ja sulkimet ja liitokset ovat varmistettuja ja tiiviit Tarkista nostoyksik n ja alaosan kapasiteetti Tarkista ett ulkoinen johdotus on...

Страница 10: ...ohjainpaneelin johto Siirr ihmiset nostoalueelta ennen nostamista Kuorman alla liikkuminen tulee est Varmista ett n et kuorman esteett koko nostomatkan ajan 5 Varotoimet ja laitteen k sittely l koska...

Страница 11: ...en v liset kantavat pinnat Poista ylim r inen voiteluaine ljy ketjupinnoilta Ketjupys ytin Ketjupys ytin tulee liitt 11 lenkkiin Ketjun p n ja pys yttimen v lill tulee olla v hint n 11 lenkki Ketjun p...

Страница 12: ...ita koskien latureita T m laturi ei ole yhteensopiva Univolt akkujen kanssa Sit ei pid kaytt Ni Mh akkujen kanssa Charger Laturi Battery Akku Power cord Virtajohto Charge state LED Lataustilaa ilmaise...

Страница 13: ...itt m sti 3 Kun akun ty skentelyaika on eritt in lyhyt huolimatta t ydest latauksesta akun k ytt ik on todenn k isesti ohitse Vaihda akku v litt m sti LATAUSPROSESSI K yt ainoastaan laitteelle tarkoit...

Страница 14: ...e 30 ladattu 4 Akku tyhj tai ep kuntoinen Latausohje T RKE Parhaan tuloksen saavuttamiseksi ja akun k ytt i n pident miseksi lataus tulisi suorittaa oikein L lataa akkua alle 0 C l mp tilassa tai l mp...

Страница 15: ...TALLIESINEISIIN LATAUKSEN AIKANA L ASETA RIKKONTUNUTTA TAI VAUROITUNUTTA AKKUA LATURIIN PID LATURI ET LL KOSTEISTA TAI M RIST OLOSUHTEISTA JA VESIL HTEIST VARMISTA ETT VIRTAL HDE SIJAITSEE PAIKASSA JO...

Страница 16: ...era f r fraktskador Kontrollera att alla f stanordningar och fogar r fastsatta och s krade Kontrollera kapaciteten p lyftenheten och bottenblocket Kontrollera att alla externa elektriska ledningar r i...

Страница 17: ...anslutningar s v l som kontrollkabeln till triggerkontrollen Avl gsna alla personer fr n omr det f re du b rjar lyfta lasten Till t ingen att st under lasten Se till att du kan se lastens fullst ndiga...

Страница 18: ...gstoppet b r monteras p den 11 e l nken Inget f rre n 11 l nkar b r vara mellan slutpunkten och k ttingens slut Reng ring av lastk tting Reng r lastk tting med reng ringsmedel utan syra och t ck med n...

Страница 19: ...k llan Notera den r tta huvudsp nningen Str mk llans sp nning m ste st mma verens med sp nningen p namnplattan Se till att de angivna sp nningarna i den elektriska vinschen och i batteriet r de samma...

Страница 20: ...kationer Gr na blinkningar F re laddning R da blinkningar Under laddning Gr nt ljus Laddning klar R da blinkningar verhettningsf rdr jning Batteri verhettning Gula blinkningar Laddning ej m jlig 2 Om...

Страница 21: ...ekt LADDA EJ batteripaketet i en lufttemperatur under 0 C eller ver 40 C Det h r r viktigt och kommer att f rhindra allvarliga skador p batteripaketet Det r normalt f r laddaren och batteripaketet att...

Страница 22: ...den inte med ledande metallf rem l under laddning S tt inte in spruckna eller skadade batterier i laddaren Se till att inga v tskor hamnar i laddaren H ll den borta fr n vatten och fukt Se till att n...

Страница 23: ...klift Oy Asessorinkatu 3 7 20780 Kaarina Finland Tel 358 2 511 5511 sales haklift com www haklift com Lifting Solutions Group Axel Johnson International Battery chain hoist 500 kg Exploded view pictur...

Страница 24: ...PAWL 5 FIX SPRING 29 SPRING 6 MOTOR SHAFTGEAR 26 MOTOR SHAFT ARBOR 6 1 SCREW 30 NUT 7 BEARING 31 BEARING 8 NUT 32 SNAP RING 9 SCREW 33 GEAR 9 1 CHAIN BOLT 34 KEY 10 MAIN BODY MOTOR END 35 GEAR SHAFT 1...

Страница 25: ...511 sales haklift com www haklift com Lifting Solutions Group Axel Johnson International 19 SCREW 47 3 5 mm X 2C CABLE 20 NUT 48 TRIGGER SWITCH LI ION 21 BRAKE FIXER 49 CHARGER LI ION 22 SCREW 50 LI I...

Отзывы: