22
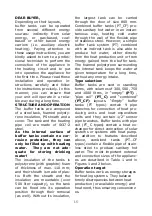
PUTTING INTO OPERATION
Deploying the unit and putting it
into operation can only be per-
formed by a professional techni-
cian. After mounting, the pipe-
lines and the tank have to be
flushed thoroughly, then the
tank has to be filled up with wa-
ter. Check the operation of the
security valve and have the pos-
sibly accumulated air blown
down. Before its first use, the
buffer tank has to be fully filled
up with water and cleaned from
air. The maximum buffer tem-
perature set on the boilers con-
nected into one system together
with the buffer tank should not
exceed 95
o
C-ot. After the first
heating, check the sealings.
TURN TO A PROFESSIONAL
TECHNICIAN TO CHECK THE
FIRST HEATING.
OPERATION
AND MAINTENANCE
In order to ensure secure opera-
tion, it is rational to have a
check of the appliances per-
formed by a plumber every now
and then (every year), with a
special regards on the tightness
of connections and on the cor-
rect operation of the safety
valve.
Furthermore, it is rational to air
the appliance out every year and
to empty it in case of frost dan-
ger.
It is obligatory to build in a
security valve and an expan-
sion tank
A security valve with checked
quality is permitted to be used.
Every element of the system
must bear the operating pres-
sure.
It is strictly forbidden to
mount a closing fitting be-
tween the security valve and
the tank.
The maximum opening pressure
of the security valve should be
not more than 7 bar (0,7MPa)!
IN CASE OF INDIRECT HEATING,
PROTECTION AGAINST OVER-
HEATING SHOULD BE PER-
FORMED BY THE INDIRECT
HEATING UNIT.
It is strictly forbidden to apply
any sharp metal object or acid
on the heat exchanger to re-
move deposited scale.
Water drainage
ATTENTION! HOT WATER MAY
OUTFLOW
DURING
WATER
DRAINAGE!
The drainage of the water tank is
performed through the drainage
tap mounted on the drainage
pipe branch of the buffer tank
(except for PT300, PT300C
types).
In case of appliances of PT300,
PT300C types, the function of
the drainage pipe branch is tak-
en by the lowest RP 1/2” pipe
branch.
Содержание PT 1000 ErP
Страница 9: ...9 Aj nlott f t si kapcsol s 1 3 bra...
Страница 10: ...10 Aj nlott f t si kapcsol s 2 4 bra...
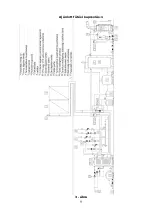
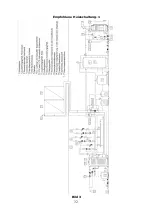
Страница 20: ...20 Recommended heating connection 1 Figure 3...
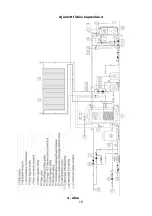
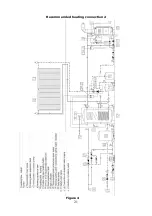
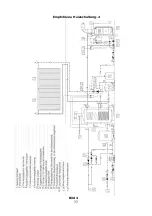
Страница 21: ...21 Recommended heating connection 2 Figure 4...
Страница 32: ...32 Empfohlene Heizschaltung 1 Bild 3...
Страница 33: ...33 Empfohlene Heizschaltung 2 Bild 4...
Страница 39: ...39 110 500 80 PT_CF 300 500 750 1000 PT PT_C PT_CF 9 6 4 1 2 _ PT_CF...
Страница 41: ...41 1 PT300 PT300C 1 Rp6 4 2 4 7 9 Rp1 2 3 5 8 10 Rp6 4 6 11 Rp3 4 12 13 15 Rp6 4 14 Rp6 4 100 120...
Страница 43: ...43 110 120 50 6 4 70 1...
Страница 44: ...44 1 3...
Страница 45: ...45 2 4...
Страница 46: ...46 95o C 7 0 7 PT300 PT300C PT300 PT300C...
Страница 47: ...47 1 2 3 4 5 6 7 8 9 10...
Страница 48: ...48 60...
Страница 49: ...49...
Страница 55: ...55 Schem de montaj recomandat 1 Imaginea nr 3...
Страница 56: ...56 Schem de montaj recomandat 2 Imaginea nr 4...
Страница 68: ...68 7 495 7685422 www hajduvostok ru email hajdu pochta ru 201 20 20 20 20 20 20 20 20 20 20 20 20 20 20 20 20...
Страница 70: ...70...
Страница 71: ...71...
Страница 72: ...72...

