


MB21 (21 Slot) Chassis
F-MB21X-R Chassis Removable Fan Tray
MB6 and MB21 Multichannel Chassis Installation Guide, v2.0, Issue 01
23
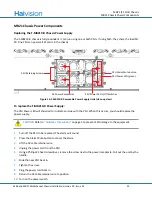
Replacing the F-MB21X-R Chassis Fan Tray
NOTE
You can remove and replace the fan tray without powering off the unit, which allows you to per-
form this maintenance procedure without stopping the service.
However, do so only if you are able to replace the fan tray within five minutes. Otherwise, we recom-
mend that you power off the unit before replacing a fan tray to avoid overheating.
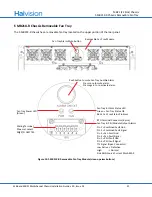
Figure 15: F-MB21X-R Removable Fan Tray Module
To replace the F-MB21X-R Chassis fan tray:
Refer to
on page 22 to determine when to replace the fan tray. During a failure condition, the Fan LED on
the fan tray will show red.
CAUTION
Refer to
5 to prevent ESD damage to the equipment.
1.
Using a flat screwdriver, loosen all five captive screws (
A-B-C-D-E
) on the fan tray by turning them counter-
clockwise. Note that the screws are spring-attached to the panel.
2.
If an RTU cable is connected, disconnect the cable.
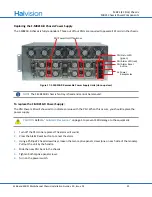
3.
Remove the fan tray by pulling it away from the chassis. Set it on an antistatic surface or repack it in packing
materials.
4.
Insert a new fan tray in the slot and slide it all the way into the chassis until the captive screws make contact
with the chassis.
5.
Tighten the five screws to lock the fan tray into the slot.
6.
If the device is powered on, listen for the fans. You should immediately hear them operating. If you do not
hear them, ensure that the fan tray is inserted completely in the chassis.
7.
Verify that the Power LED is green. If the LED is not green, one or more fans are faulty. If this problem occurs,
contact your customer service representative for a replacement part.
Replacement fan trays are available from Haivision. Please contact your sales representative or email
Haivision at:
Removable Fan Tray Module
Ventilation Rear Outtake(x6)
(secured to enclosure using 5 screws
Fan Tray Alarm Mute button
A-B-C-D-E
as shown)
A
B
C
E
D
Содержание MB6
Страница 1: ...MB6 and MB21 Multichannel Chassis Installation Guide v2 0 HVS ID IG MB6 MB21 20 Issue 01...
Страница 29: ......


