background image

Quick change-over system mandoteX 
Safety  

Order h49 7144.907-333 


17 


2.6  Other safety instructions 


WARNING 

Serious head injuries caused by bending into the 
working area of the machine! 


Only ever bend into the working area of the ma-
chine if there are no cutting tools or sharp objects 
in it, or if these are covered. 


Never move body parts under parts in the working 
area  of  the  machine  with  the  potential  to  drop 
down. 


WARNING 

Serious  injuries  caused  by  snagging  body  parts 
on the rotating machine spindle! 


Never  reach  into  the  product  while  the  machine 
spindle is still rotating. 


Before  working  on  the  product,  ensure  that  the 
machine spindle is unable to start up. 


WARNING 

Serious injuries caused by reaching into slots and 
bores! 


Never reach into slots or bores. 


WARNING 

Serious  injuries  caused  by  the  use  of  damaged 
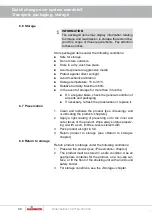
products  or  by  their  components  and  accesso-
ries! 


Check products or their components and acces-
sories on a regular basis for visible signs of dam-
age  [see  »Inspections«  and  »Cleaning«  chap-
ters]. 


Use of damaged products, their damaged compo-
nents  and/or  their  damaged  accessories  is  pro-
hibited. 


Report damage to the operator immediately. 


Damaged components / accessories must be re-
placed  with  genuine  spare  parts  /  accessories 
made by the manufacturer. 


CAUTION 

Cut injuries caused by sharp edges and burrs re-
sulting from wear and/or repeated rework! 


Remove sharp edges and burrs. 


If necessary, replace worn components with gen-
uine parts made by the manufacturer. 

Содержание mandoteX

Страница 1: ...Operating instructions incl installation manual Quick change over system mandoteX quick change over adapter EN ...

Страница 2: ...Quick change over system mandoteX 2 Order hotline 49 7144 907 333 Translation of the original operating instructions Order hotli ne 49 7144 907 333 ...

Страница 3: ...tive equipment 14 2 5 Particular hazards 15 2 6 Other safety instructions 17 2 7 Screws 18 2 8 Functionality 18 2 9 Environmental protection 19 3 Technical data 20 3 1 General information 20 3 2 Performance values 21 3 3 Balancing quality 21 3 4 Speed 21 3 5 Operating conditions 22 3 6 Type designation 22 4 Layout and function 23 4 1 Overview and brief description 23 4 2 Accessories required 23 4 ...

Страница 4: ...related safety 37 8 2 Installation of the clamping device 38 8 3 Removal of the clamping device 43 8 4 Tests 45 8 5 Procedure after a collision 46 9 Activities after end of production 47 10 Removal 48 10 1 Safe removal 48 10 2 Preparing the machine for removal 49 10 3 Removal of the product 50 10 3 1 Removal of the product from a machine adapter 50 11 Maintenance 51 11 1 Maintenance safety 51 11 2...

Страница 5: ...y of tables Table 1 Technical data 20 Table 2 Operating conditions 22 Table 3 Screw tightening torques metric control threads 32 Table 4 Screw tightening torques for aluminum components 32 Table 5 Maintenance table 52 Table 6 Selection of lubricants 57 Table 7 Fault table 60 ...

Страница 6: ...onfigu ration of the product WARNING Serious injuries caused by individual products or by inappropriate combinations of them Read and pay attention to all operating instruc tions for individual products and combinations of them 1 2 Key to symbols Safety instructions in this manual are designated by sym bols The safety notices are invoked by signal words that ex press the level of hazard involved A...

Страница 7: ... injury to people and damage to ma terials warns of stored energy for example involving springs warns of hand injuries draws attention to the fact that the operating instructions of the product must be read 1 3 Definition of terms 1 3 1 Release setting Release setting means that the clamping device is released If the clamping device is released this also releases the workpiece 1 3 2 Complete clamp...

Страница 8: ...elivery terms of the manufacturer and all legislative stipula tions valid at the time of conclusion of this contract 1 5 Copyright This manual is protected by copyright and are only intended for internal use The dissemination of this manual to third parties reproduc tions in any shape or form even in part as well as com mercial use and or communication of their contents are pro hibited for anythin...

Страница 9: ...the machine tool caused by an incorrect or defective spare parts Always use genuine spare parts made by the orig inal manufacturer NOTE Damage malfunctions or total failure of the prod uct or the machine tool caused by an incorrect or defective machine adapter Always use genuine machine adapters made by the original manufacturer Spare parts and accessories can be sourced from contract dealers or d...

Страница 10: ...ANGER Serious injuries caused by parts being ejected centrifugally due to a drop in actuating force sup ply pressure On the machine ensure that the actuating force the supply pressure do not drop while the product is in use If no precautions have been taken on the machine to maintain the actuating force the supply pres sure it is prohibited to use this product on the ma chine Pay attention to the ...

Страница 11: ...be performed by skilled staff from the relevant specialist field WARNING Serious injuries caused by unauthorized presence of unauthorized personnel in the working area Keep unauthorized people away from the working area If in doubt speak to people and direct them to leave the working area Interrupt work until unauthorized people have left the working area NOTE Serious damage to materials caused by...

Страница 12: ...systems and can inde pendently identify and avoid potential hazards Electricians Electricians are trained in the specific task profile for which they are employed and are familiar with the relevant stand ards and legislative provisions Due to their vocational training and experience electricians can work on electrical systems and can independently iden tify and avoid potential hazards Trainees Tra...

Страница 13: ...hedule chapter When used for its intended purpose the operational safety of the product is assured subject to compliance with relevant safety stipulations to the full extent foreseeable Intended use also includes compliance with all stipulations in this manual Any form of use beyond the scope of intended use or other forms of use of the product is considered as misuse and can lead to dangerous sit...

Страница 14: ...tended use Here are some examples of unintended use of the product If people fail to observe the safety stipulations when working on the product by failing to use additional pro tective equipment if the product is used on machines machine adapters or clamping devices for which it is not intended 2 4 Personal protective equipment During work it is essential to wear personal protective equip ment to...

Страница 15: ...of this manual The following section explains these additional items of personal protec tive equipment Protective gloves To protect the hands from friction chafing stabbing or deeper injuries and from contact with hot surfaces Hard hat To protect against falling and projectile parts and materials 2 5 Particular hazards The following section names residual risks resulting from the installation of t...

Страница 16: ... crushing injuries without a clamping de vice installed caused by the stroke of the product Never install and actuate a quick change over unit on the machine adapter without first installing a clamping device Prevent accidental initiation of the clamping pro cess for example due to an installation error with the power supply or a programming error Sharp edged parts WARNING Serious cut injuries cau...

Страница 17: ...ine spindle is unable to start up WARNING Serious injuries caused by reaching into slots and bores Never reach into slots or bores WARNING Serious injuries caused by the use of damaged products or by their components and accesso ries Check products or their components and acces sories on a regular basis for visible signs of dam age see Inspections and Cleaning chap ters Use of damaged products the...

Страница 18: ...n using a standard medium strength screw adhesive and tightened to the specified tightening torque see nomenclature or the Screw tightening torques chapter Before reinstallation clean and degrease the screw and internal thread Radially mounted screws and threaded pins that were not bonded with sealing lacquer or an adhe sive need to tightened back down to the specified tightening torque see nomenc...

Страница 19: ...entally hazardous substances enter the environment accidentally take immediate re medial action If in doubt notify the relevant municipal authori ties about the incident The following environmentally hazardous substances are used Lubricants auxiliary materials and operating fluids Lubricants such as grease and oil can contain toxic sub stances These must not enter the environment Dispose of enviro...

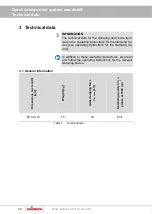
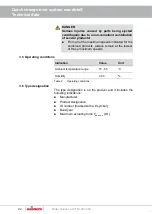
Страница 20: ...ctions for the clamping de vice see operating instructions for the clamping de vice In addition to these operating instructions also read and follow the operating instructions for the relevant clamping device 3 1 General information Dimensions ø x length 𝒎𝒎 Weight 𝒌𝒈 Axial clamping force 𝑭 𝒂𝒙 𝒎𝒂𝒙 𝒌𝑵 Balancing quality 𝑮 in 𝒏 planes at 7000 𝒎𝒊𝒏 𝟏 Ø139 x 10 1 5 35 6 3 1 Table 1 Technical data ...

Страница 21: ...se performance values are no long legible refer to the operating instructions The achievable actuation forces may vary as a result of the maintenance status lubrication status and level of contami nation of the product see Maintenance schedule chap ter 3 3 Balancing quality The product is balanced before leaving the factory balanc ing quality see General information chapter DANGER Serious injuries...

Страница 22: ... speeds indicated for the combined products always remain at the lowest of those maximum speeds 3 5 Operating conditions Indication Value Unit Ambient temperature range 15 65 C Humidity 80 Table 2 Operating conditions 3 6 Type designation The type designation is on the product and it includes the following indications Manufacturer Product designation ID number marked with a symbol Build year Maxim...

Страница 23: ... and the quick change over adapter form the quick change over unit The machine adapter is secured to the machine spindle The quick change over unit is bolted to the machine adapter The actuation mechanism of the power actuated clamping device is connected to the machine adapter by the bayonet coupling on the quick change over adapter 4 2 Accessories required 4 2 1 Machine adapter The machine adapt...

Страница 24: ...its general field of application this product was designed and developed for use when necessary in a specific and documented application see clamping situa tion drawing or order confirmation Any other fields of application require the explicit approval of the manufacturer 5 2 Limits of use The application limits of the quick change over system apply see operating instructions for the machine adapt...

Страница 25: ...ng lifting gear use appropriate load bearing equipment and lifting tackle WARNING Serious injuries caused by transporting off center equipment Pay attention to marks on the packaging items Attach the crane hook directly above the center of gravity Raise carefully and correct the lifting points if nec essary WARNING Serious injuries caused by incorrect transport with lifting gear Never raise loads ...

Страница 26: ...y Keep packaging items dry and protect them from the in gress of water Position designation Points to the correct upright position of the packaging item 6 3 Transport inspection Check the delivery on receipt immediately to ensure it is complete and has not been damaged in transit Proceed as follows if you find any externally visible signs of damage while in transit Refuse to accept the delivery or...

Страница 27: ...prevent it from rolling away 6 When transporting on a trolley or car ensure that the product is securely mounted on a non slip surface be fore starting to move it 6 5 Packaging The individual packaging items are packaged in an appropri ate manner for the type of transportation involved Always use environmentally compatible materials for packaging pur poses Packaging should protect individual compo...

Страница 28: ...basis check the general condition of all parts and packaging If necessary refresh the preservation or replace it 6 7 Preservation 1 Clean and lubricate the product see Cleaning and Lubricating the product chapters 2 Apply a light coating of preserving oil to the inner and outer faces of the product Wipe away surplus preserv ing oil with a sort lint free tear resistant cloth 3 Pack product air tigh...

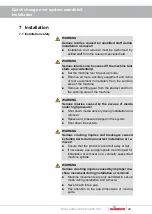
Страница 29: ... from the working area of the machine WARNING Serious injuries caused by the escape of media under high pressure Shut down media delivery during installation and removal Relieve any pressure trapped in the system Shut down the system WARNING Serious crushing injuries and breakages caused by falling parts during incorrect installation or re moval Ensure that the product cannot roll away or fall If ...

Страница 30: ...allation or installing on a vertically suspended machine spindle WARNING High level of physical strain due to the weight of the product or of its components if not trans ported properly From a weight of 10 kg use appropriate transport equipment lifting gear and lifting tackle NOTE Damage to materials caused by lifting gear left in the product Always remove lifting gear immediately after in stallin...

Страница 31: ... mating surfaces Pay attention to notes about lubricants see Use of lub ricants chapter Avoid too much lubricant on the locating face because this can cause face run out errors Apply grease to the sealing elements for example O rings rectangular rings and sealing surfaces Pay atten tion to notes about greases see Use of lubricants chapter Do not damage the functional surfaces flat mating ta pered ...

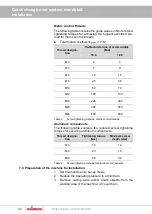
Страница 32: ...0 70 M12 100 130 M16 220 300 M20 400 550 M24 600 800 Table 3 Screw tightening torques metric control threads Aluminum components The following table contains the reduced screw tightening torques for securing aluminum components Thread designa tion Tightening torque Nm Minimum screw depth mm M6 10 12 M8 23 16 M10 46 20 Table 4 Screw tightening torques for aluminum components 7 4 Preparation of the ...

Страница 33: ...ine for in stallation chapter prepare for the following steps 7 5 1 Compatibility check Check the compatibility of the product and the connection point of the machine adapter For this check that the connection point and the product share the same adaptation geometry Also check if the actu ating element coupling element is suitable 7 5 2 Preparation of the product The product is supplied in assembl...

Страница 34: ... the operating instructions for the associated machine adapter 1 Install the product INFORMATION The alignment process is performed after initial instal lation of the quick change over unit on the machine adapter after repeated initial installation after cleaning the product and also when required INFORMATION When removing a MANDO T211 T212 or a MAXXOS T211 the fixing screws on the quick change ov...

Страница 35: ... fixing screws and tighten them gently 4 Check the face run out of the clamping device on a suit able test surface ideally 0 005 mm and if necessary correct carefully with a plastic hammer 5 Tighten the fixing screws on the clamping device to the specified tightening torque see Screw tightening tor ques chapter ...

Страница 36: ...er unit see Removal of the product from a machine adapter chapter 9 Remove the clamping device from the product see Re moval of clamping device chapter 10 Clean the locating surface and mating surfaces of the flange and the clamping device 11 When a burr or slight damage occurs rub down the lo cating surfaces of the clamping device and flange with an oil stone 12 Install the clamping device again ...

Страница 37: ...e clamping device Installation removal of the clamping device must be performed by skilled specialists from the rele vant field WARNING High level of physical strain due to the weight of the product or of its components if not trans ported properly From a weight of 10 kg use appropriate transport equipment lifting gear and lifting tackle NOTE Damage to materials caused by lifting gear left in the ...

Страница 38: ... contains no particles measuring 100 microns filtered with a mesh width of 100 mi crons NOTE Damage to seals caused by using the wrong cool ant lubricants To clean the product never use a cooling lubri cant that attacks and damages the sealing ele ments installed Those installed sealing elements can be made of NBR Viton and PUR materials Never use cooling lubricants that contain ester or a polar s...

Страница 39: ... not re quired To install the clamping device use the man doteX fixing screws that are also needed 1 Screw the bayonet coupling firmly home in the clamping device INFORMATION The set up dimension describes the axial spacing di mension between the flat surface of the bayonet cou pling and the flat surface of the clamping device adapter INFORMATION The tolerance of the set up dimension is 0 25 𝑚𝑚 of...

Страница 40: ... Order hotline 49 7144 907 333 3 Gently tighten one of the clamping screws on the bayo net coupling tightening torque approximately 3 Nm 4 Fit the clamping device to the flange aligning the hole patterns on the clamping device and the flange ...

Страница 41: ...nting in a clockwise direction If the angle points clockwise the position of the clamp ing device together with the ring adapter kit must be turned through one hole in the hole pattern on the clamping device 5 Ensure that the relative positions of clamping device and flange are correct INFORMATION The fixing screws on the clamping device are the shorter screws from the additional mandoteX fixing s...

Страница 42: ...removed 7 Mark the clamping device fixing screws 8 Untighten the bayonet coupling until the intended line between the bayonet lugs and the line on the surface of the flange are aligned 9 Screw in the clamping screws on the bayonet coupling and tighten to the specified tightening torque see mark ing INFORMATION The tolerance of the set up dimension is 0 25 𝑚𝑚 of the nominal dimension 10 Check the s...

Страница 43: ... A Bayonet coupling A1 Bayonet coupling clamping screws B Flange C Clamping device C1 Fixing screws clamping device In addition to these operating instructions also read and follow the operating instructions for the relevant clamping device 1 Unfasten and remove the fixing screws from the clamp ing device ...

Страница 44: ...ick change over system mandoteX Use 44 Order hotline 49 7144 907 333 2 Dismount the clamping device from the flange 3 Unfasten the clamping screws in the bayonet coupling a few turns without removing them ...

Страница 45: ... and or before every time the products are put into service The products used are undamaged All fixing screws are present on the products and are tightened to the correct tightening torque None of the edges and races are chipped or show any signs of wear The speed set on the machine tool must not exceed the maximum speed of the product Always take the lowest value of all maximum speeds for combine...

Страница 46: ...e after a collision In the event of a collision the product and its components must be checked for cracks and damage before being used again For this remove the product from the machine see Re moval of the product chapter and dismantle it for level of disassembly see Cleaning chapter ...

Страница 47: ...on 2 Open the safety door hood WARNING Eye injuries and cuts caused by failure to wear protective clothing during cleaning operation Never use compressed air to clean the product Also wear the following items of personal protec tive equipment in addition to the basic equip ment 3 Clean the product of swarf and production residue with a soft lint free cloth and apply a light coating of oil 4 Close ...

Страница 48: ...e tool starts up accidentally Set the machine tool into set up mode Remove all tools auxiliary equipment and items of test equipment immediately from the working area of the machine Remove all lifting gear from the product and from the working area of the machine WARNING Serious injuries caused by the escape of media under high pressure Shut down media delivery during installation and removal Reli...

Страница 49: ...to drop down Depending on weight use an appropriate mount ing aid for installation or installing on a vertically suspended machine spindle WARNING High level of physical strain due to the weight of the product or of its components if not trans ported properly From a weight of 10 kg use appropriate transport equipment lifting gear and lifting tackle INFORMATION If necessary use any forcing extracti...

Страница 50: ...ce 1 As described in the Preparing the machine for re moval chapter prepare for the following steps 10 3 1Removal of the product from a machine adapter INFORMATION Installation removal of the product is described in the operating instructions for the machine adapter In addition to these operating instructions you should also read and follow the operating instructions for the associated machine ada...

Страница 51: ...after a loss of clamping power Maintain the maintenance and cleaning intervals of the product at all times CAUTION Health risks caused by incorrect handling of cleaning agents Pay attention to hazard specifications and the safety data sheet of the manufacturer INFORMATION If necessary use any forcing extraction threads in the components of the product changing parts or clamping elements ...

Страница 52: ...on of wearing points nicks and cracks see the Visual inspection chapter Visual inspection of the rubber on the CENTREX ring and on the locating taper for wearing points nicks and cracks see Visual inspection chapter Complete cleaning operation if heavily soiled see the Clean ing chapter weekly or after 40 operating hours Remove the product see the Removal of the product chap ter Remove clean and r...

Страница 53: ... cleaning operation Never use compressed air to clean the product Also wear the following items of personal protec tive equipment in addition to the basic equip ment NOTE Damage to seals caused by the wrong solvent To clean the product never use a solvent that at tacks and damages the sealing elements in stalled Those installed sealing elements can be made of NBR Viton and PUR materials To clean t...

Страница 54: ...g device In addition to these operating instructions also read and follow the operating instructions for the relevant clamping device WARNING Serious injuries caused by imbalance resulting from incorrect reassembly The product components must be installed back in the same position If necessary mark out the relative positions of components prior to disassembly NOTE Damage to materials caused by inc...

Страница 55: ...y attention to notes about greases see Use of lubricants chapter Before installing the CENTREX ring apply a light coating of grease to its contact surface 6 Install the clamping device on the product see Instal lation of the clamping device chapter 11 4 Visual inspection Perform a daily visual inspection of the product to identify any damage to the product at an early stage Check the product for c...

Страница 56: ...ubrication is insufficient Always comply with the maintenance intervals see Maintenance schedule chapter Lubrication takes place every time the system is cleaned maintained or assembled and also when required 1 Dismantle the product for lubrication purposes Consult the Cleaning chapter for details of the level of disas sembly required 2 At all lubrication points remove escaping consumed or surplus...

Страница 57: ...ecause these cause an operational malfunc tion if they come between two interference fit surfaces For this the following lubricants are recommended GP 355 universal grease see the HAINBUCH product catalogue Alternatively Lubricants Manufacturer Product designa tion Grease MicroGleit GP 355 Klüber QNB 50 Zeller Gmelin DIVINOL SD24440 Bremer Leguill RIVOLTA W A P Table 6 Selection of lubricants NOTE...

Страница 58: ... haz ardous substances Lubricants auxiliary materials and operating flu ids are governed by legislation for the processing of special category waste All disposal to be per formed by authorized waste disposal specialists Catch exchanged oils and greases in suitable containers and dispose of them in accordance with applicable local provi sions The local municipal authority or specialist waste dispos...

Страница 59: ...o ple or capital equipment press the Emergency Stop but ton on the machine tool immediately 2 Establish the cause of the fault 3 If troubleshooting requires work to be conducted in the danger area switch the machine tool into set up mode 4 Notify the person on location of the fault immediately 5 Depending on the type of fault get it remedied by au thorized and appropriately skilled specialists INF...

Страница 60: ...ee the operating instruc tions for the machine adapter Skilled special ist Geometry deviation on the workpiece Concentricity error on the clamping device Check axial run out of the quick change over system and the clamping device and correct if necessary Skilled special ist Face run out error of the clamping de vice Check top run out on the quick change over system and the clamping device and if r...

Страница 61: ...7144 907 333 Tracking hotline Current status of your order Just call 49 7144 907 222 24 hour emergency phone line Has a system crash occurred or some other technical emer gency Our experts are there for you around the clock 49 7144 907 444 For advice or help you can contact the sales partners and service staff listed in www hainbuch com 14 2 Manufacturer certification Manufacturer certification is...

Страница 62: ...s 19 57 M Maintenance schedule 52 Misuse 13 O Operating conditions 22 P Packaging 27 Performance values 21 Personnel requirements 11 Electricians 12 Hydraulics specialist 12 Pneumatics specialist 12 Skilled specialist 11 Trainees 12 Preservation 28 Protective equipment Hair net 15 Hard hat 15 Protective gloves 15 Protective goggles 15 Safety footwear 15 Workplace clothing 14 R Removal Clamping dev...

Страница 63: ...Quick change over system mandoteX Order hotline 49 7144 907 333 63 U Unpacking 27 Use 24 W Warranty 9 ...

Страница 64: ...cations reserved HAINBUCH GMBH SPANNENDE TECHNIK Postfach 1262 71667 Marbach Erdmannhäuser Strasse 57 71672 Marbach Germany Tel 49 7144 907 0 Fax 49 7144 18826 verkauf hainbuch de www hainbuch com 24 hour emergency phone line 49 7144 907 444 ...

Отзывы: