


25
en
WARNING
Risk of injury!
Only climb the ladder when the rungs are locked.
The locking guides must be completely filled in
GREEN.
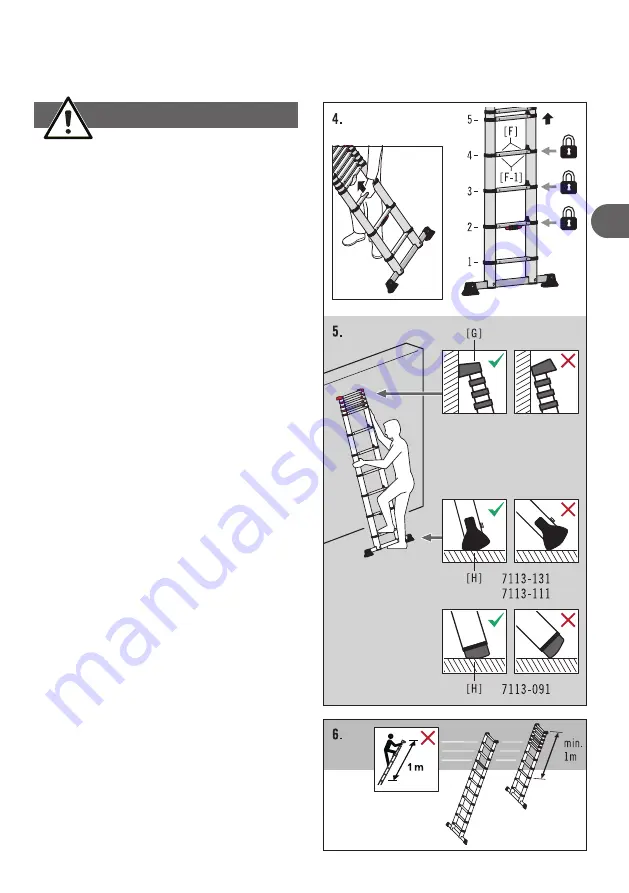
4. Repeat this work step to extend the telescopic
ladder (the next extendable rung is the 5th rung
from the bottom).
Then extend each additional ladder section (only
one at a time) until the desired ladder height is
reached. A block formation (group of unextended
ladder rungs) must only occur in the uppermost
ladder section.
If necessary, the extended ladder must be kept
horizontal to extend the higher ladder sections.
Both locking guides [F], directly below each ex-
tended area, must be completely filled in GREEN
and the GREEN markings [F-1] must be visible.
5. Setting up the telescopic ladder.
The angled edge of the ladder foot [H] must
rest flat on the ground and the wide, projecting
side of the wall impact support [G] must lie flat
against the wall.
The extended ladder is then positioned at a
clearance angle of approx. 75°.
If possible, secure / tie down the upper end of
the extended ladder as well.
The telescopic ladder can now be ascended.
6. Overview of the ladder rungs that must not be
used as a support surface.
Содержание FlexLine T80
Страница 129: ...129 EN 131 6 150 ru A B A B A B C e A B C 2...
Страница 130: ...130 3 170 e Hailo C A 7113 131 B 7113 111 A B C D E F G H C 7113 091 A B C D E F G H...
Страница 131: ...131 4 ru A 7113 131 1 x 1 x 1 x 2 x M8 2 x 1 x 2 x B 7113 111 1 x 1 x 1 x 2 x M8 2 x 1 x 2 x C 7113 091 1 x 1 x...
Страница 132: ...132 5 5...
Страница 133: ...133 ru I 6...
Страница 134: ...134 5 5 1...
Страница 135: ...135 6 ru 6 7113 111 7113 131 1 H 1 H 2 H A 3 7113 111 7113 131...
Страница 136: ...136 7 7 1 1 2 1 E 3 B y 4 3 F 2 3 F 1...
Страница 137: ...137 ru 4 5 F F 1 5 H G 75 6...
Страница 138: ...138 1 D 2 3 7 2 7...
Страница 139: ...139 2 8 ru...
Страница 141: ...141 13 ru 1 5 1 2 3 4 5...
Страница 171: ...171...