background image

English


4

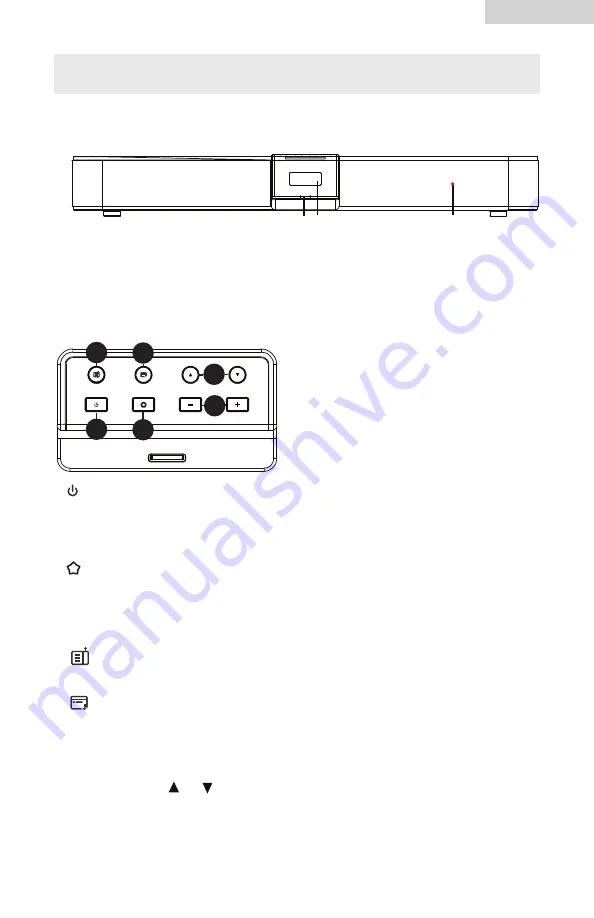
Note that Remote Control Sensor detects the controls signal from the remote control. 
Do not to block its direct line of sight to the remote control.

Dock ing for iPod, iPhone , iPad

display screen

remote control sensor

UNIT FEATURES

1.       Standby/on button

2.) Pre


ss to switch on or off your unit.


2.       Audio button

   Press repeatedly to view the audio modes: Normal, Movie and

    Music. 

Figure 2. Key buttons on  top panel

4

1

2

3

6

5

4.           Source button

     Press to shift to another mode, such as iPod/Line-in/Optical/Coaxial/AUX/ FM/AM.

3.  - Buttons

      Press repeatedly to adjust volume level.

Figure 1. Front unit

6.

the scroll up/down

       or       button

     Press to forward or backward view options.

            MENU button

 sync iPod clock  ,  iPod video, LCD contrast and LCD backlight. 


Press and hold

o activate menu setting options, such as seek, clock/date, set bass, set treble, audio delay, 

 t

5.

1.) Connect the Power Adaptor to the DC socket on the back of the unit. Then insert the Power Adaptor 

     into the desired wall outlet.

Press

 to confirm an appointed option.

Содержание SBEV40-3D

Страница 1: ...User Manual MODEL NUMBER SBEV40 3D Model Number SBEV40 3D App Driven 5 1 Channel 40 3D Soundbar with built in subwoofer and iPod iPhone and iPad Dock ...

Страница 2: ...tey Instructions 2 3 4 5 Wall Mount 5 General Operation 6 System Settings 7 Remote Control Features 7 Quick Start Guide 8 Download APPs to the iPod iPhone iPad 9 Limited Warranty Unit Features 9 10 Specifications TABLE OF CONTENTS ...

Страница 3: ...egisters stoves or other WARNING TO REDUCE THE RISK OF FIRE OR ELECTRIC SHOCK DO NOT EXPOSE THIS DEVICE TO RAIN OR MOISTURE IMPORTANT SAFETY INSTRUCTIONS To reduce the risk of electrical shock fire etc 8 Unplug this device during lightning storms or when unused for long periods of time 4 The device shall not be exposed to dripping or splashing and no objects filled with liquids such as vases shall...

Страница 4: ...oofers deliver an amazing audio experience Unique designed iPod iPhone iPad Docking SAVE THESE INSTRUCTIONS IMPORTANT To prevent fire or shock hazard do not use this plug with an extension cord or other outlet unless the blades can be fully inserted to prevent blade exposure To prevent fire or shock hazard do not expose this device to rain or moisture To prevent electrical shock match wide blade p...

Страница 5: ...panel 4 1 2 3 6 5 4 Source button Press to shift to another mode such as iPod Line in Optical Coaxial AUX FM AM 3 Volume Buttons Press repeatedly to adjust volume level Figure 1 Front unit 6 the scroll up down or button Press to forward or backward view options MENU button sync iPod clock iPod video LCD contrast and LCD backlight Press and hold o activate menu setting options such as seek clock da...

Страница 6: ...Wall Mount or equivalent 5 1 Connect video cables to both video out sockets of your radio and video source of your TV 4 Insert iPod iPhone iPad into the dock 2 Press SOURCE to shift your radio into iPod mode 5 Shift your iPod iPhone iPad in movie mode then enjoy it 3 Press and hold MENU until it goes into systemsettingand then press or to How to play video b a 2 4 3 5 1 This socket connects to an ...

Страница 7: ...preset and how to recall 2 Press the relevant preset number via remote control The way of access to preset stations the latest 2 Press or to view while your selecting program is showing up trhen wait for a moment your radio will access to the appointed program quickly Repeatedly press SOURCE Repeatedly press SOURCE to convert into iPod mode or press the iPad button on your remote control or press ...

Страница 8: ...lume press to forward view options press to backward view options press to activate select function to confirm press and hold to enter main menu options press to enter corresponding Audio souce iPod iPhone iPad mode use only press to pause press again to play again REMOTE CONTROL FEATURES 1 Press and hold MENU Press or to Clock Date Press MENU to confirm press MENU to confirm 1 Press and hold MENU...

Страница 9: ... the volume button Congratulations on your purchase of product SBEV40 3D The latest in 3D Audio Home Theater technology Compatible Sources A B C Common Connection Type Computer C Common Connection Type Game Console A B Common Connection Type CD DVD Player A B Common Connection Type Laptop C Common Connection Type Press the button to turn on Press the SOURCE to shift to another mode 3 4 4 5 6 7 Pre...

Страница 10: ...l take to download Once it is complete you can access your new app Getting apps onto your iPod Touch iPhone iPad by following the below procedure 1 In your iPod Touch iPhone iPad s main menu open the App Store by click the App store icon 2 In the App store search for Haier soundbar1 3 Touch Haier soundbar1 icon and then hit the free button it will then change the free to App Store icon Power Suppl...

Страница 11: ...ime period described herein on behalf of Haier The warranties described herein shall be the sole and exclusive remedy available to the purchaser Corrections of defects in the manner and for the period of time described herein shall constitute complete fulfillment of all abilities and Responsibility of Haier to the purchaser with respect to the product and shall constitute full satisfaction of all ...

Страница 12: ...n problème avec cet appareil veuillez contacter le service à la clientèle de Haier au 1 877 337 3639 IL EST OBLIGATOIRE DE FOURNIR UNE PREUVE D ACHAT DATÉE LE NUMÉRO DU MODÈLE ET SON NUMÉRO DE SÉRIE AFIN DE BÉNÉFICIER DE LA COUVERTURE DE LA GARANTIE IMPORTANTE No Devuelva Este Producto al Establecimiento Compra Si tiene problemas con este producto por favor póngase en contacto con el Centro Haier ...

Отзывы: