background image

Connection Instructions

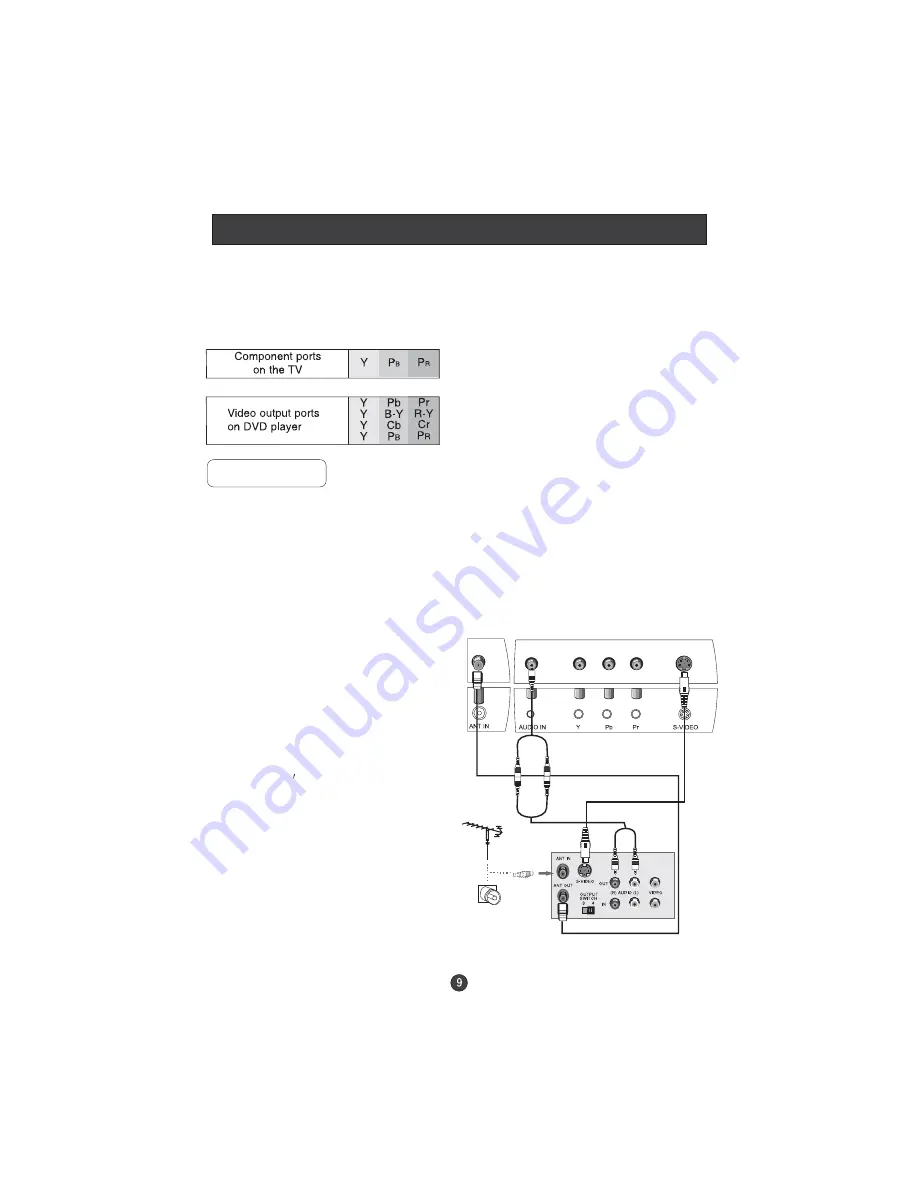
COMPONENT (If connected to S-VIDEO,select the S-VIDEO external
input source.)
3. Refer to the DVD player's manual for operating instructions.

To get better picture quality, connect a DVD player to the component
input ports as shown below.

Component Input ports

S-VIDEO Input

Connection and use steps:

1.Read the user guide supplied with your AV devices and ensure that it has

S-Video connectors;

2.Make sure that the power of the LCD-TV and the AV device are switched off;

.Turn on the power of the LCD-TV first ;

and then turn on the power of the AV
device;

4.Press the

button to set the video

input mode of the LCD-TV to S-VIDEO
mode .

SOURCE

Connection Option 1

Set VCR output switch to 3 or 4 and then
tune TV to the same channel number.

Connection Option 2

1. Connect the audio and S-VIDEO cables

from the VCR's output jacks to the TV
input jacks, as shown in the figure.

2. Insert a video tape into the VCR and

press PLAY on the VCR. (Refer to the
VCR owner

s manual.)

3

- To avoid picture noise (interference), leave an adequate distance between the

VCR and TV

.

VCR

1

2

Содержание LT15R1WW

Страница 1: ...ep this manual for future reference MODEL L15T11W A L15TA11W L15T11W C L15TC11W L19T11W A L19TA11W L19T11W C L19TC11W L22T11W A L22TA11W L22T11W C L22TC11W L15T12W A L15TA12W L15T12W C L15TC12W L19T12W A L19TA12W L19T12W C L19TC12W L22T12W A L22TA12W L22T12W C L22TC12W LT15T1W LT19T1W LT22T1W LT15T1BW LT19T1BW LT22T1BW LT15T1WW LT19T1WW LT22T1WW ...

Страница 2: ...ns Function Menu Options Adjust Menu Options Tuning Menu Options DVB T Main Menu Operations Installation Favourite Lists Channel Edit Timers Settings TELE TEXT Basic Playback Advanced Playback Special Function Playback JPEG DISC PLAYBACK SCREEN SAVER FUNCTION DVD System SETUP General Setup Process General Setup Page Preferencel Page Playable Discs Disc Protection and DVD Characteristics Troublesho...

Страница 3: ... unit is corresponds with your house electrical supply Do not place the unit on unstable or in dusty and humid places Never put the unit in direct sunlight or near heat sources Allow enough space for proper ventilation Please keep water away from the LCD TV If water comes in to contact with the LCD TV disconnect the power cord from the power source then wipe the set with a dry soft cloth Do not re...

Страница 4: ...rientation to adjust the item Press to enter 5 CH TV channel down to select the item in the menu CH TV channel up to select the item in the menu 6 Power indicator Illuminates red in standby mode illuminates green when the display is turned on 7 Remote Sensor 6 7 SOURCE MENU VOL VOL CH CH POWER 2 3 4 5 1 SOURCE MENU VOL VOL CH CH STANDBY The figure above and the description of the button may be dif...

Страница 5: ...nna signals to the TV either direc tly or through your cable box Earphone port VGA COMPONENT S VIDEO Audio Input Connect the PC output connector from a PC to the audio input port SCART Connect to the DVD VCR broadcasting receiver or other equipment ANT IN Y Pr S VIDEO TV SCART VGA IN AUDIO IN Pb HDMI HDMI Connect to HDMI output of other equipment ANT IN Y Pr S VIDEO TV SCART VGA IN AUDIO IN Pb HDM...

Страница 6: ...n Green button Yellow button Blue button DVD 10 DVD Audio DVD SETUP DVD PROGRAM DVB T EPG button DVD SEARCH DVD TITLE PBC DVB T information button DVD FAST REVERSE DVD FAST FORWARD DVD PREVIOUS DVD CALL TELETEXT BUTTONS Buttons on the remote control UP DOWN LEFT RIGHT STANDBY OPEN CLOSE SCAN SWAP CALL MUTE 1 2 3 4 5 6 7 8 9 0 SOURCE DTV DVD P P V V MENU ZOOM AUDIO STOP SETUP PAUSE STEP REV FWD PRE...

Страница 7: ... DVB T Cursor Move button DVB T favourite Exit Screen Display RED button Green button Blue button Yellow button DVB T EPG button DVB T information button TELETEXT BUTTONS TEXT BUTTON Language fast button in DTV UP DOWN LEFT RIGHT STANDBY NICAM PC AUTO AD DISPLAY MUTE 1 2 3 4 5 6 7 8 9 0 SOURCE DTV TV P P V V MENU S SM ZOOM SUBCODE MIX MODE REVEAL SIZE TIME INDEX D MENU TEXT EPG SUBTITLE FAV INFO E...

Страница 8: ...nd television set As strong light may interfere the signals change your position to operate the remote controller if the television cannot be turned on or off as you expect Keep the remote controller away from heat source or humid area to ensure effective performance of the remote controller Make sure that two AA 1 5V alkaline batteries are loaded The batteries must be of the same type The batteri...

Страница 9: ...ity adjust antenna direction if needed Multi family Dwellings Apartments Connect to wall antenna socket wall antenna socket VHF antenna UHF antenna outdoor antenna Single family Dwellings Houses Connect to wall jack for outdoor antenna Be careful not to bend the bronze wire when connecting the antenna To improve picture quality in a poor signal area purchase and install a signal amplifier If the a...

Страница 10: ...heck the image on your TV There may be noise associated with the resolution vertical pattern contrast or brightness in PC mode If noise is present change the PC mode to another resolution change the refresh rate to another rate or adjust the brightness and contrast on the menu until the picture is clear If the refresh rate of the PC graphic card cannot be changed change the PC graphic card or cons...

Страница 11: ...wer of the LCD TV and the AV device are switched off Turn on the power of the LCD TV first and then turn on the power of the AV device 4 Press the button to set the video input mode of the LCD TV to S VIDEO mode SOURCE Connection Option 1 Set VCR output switch to 3 or 4 and then tune TV to the same channel number Connection Option 2 1 Connect the audio and S VIDEO cables from the VCR s output jack...

Страница 12: ...shown in the figure 1 Select the HDMI source by using the button on the remote control 2 Operate the corresponding external equipment Refer to external equipment operating guide SOURCE SCART External equipment Note The audio cable included with the TV should be used when connected with PC COMPONENT S VIDEO TV HDMI Devices Wall Mounting Use 4 machine screws M4x8mm not included to mount the TV on th...

Страница 13: ...l go into standby mode and the indicator light turns red You can also turn on the TV from standby mode by pressing the digits 1 9 or P POWER STANDBY POWER STANDBY Audio Control 1 Press the button to increase the volume 2 Press the button to decrease the volume V V Mute 1 Press the button to mute the sound temporarily A mute icon appears on the screen 2 Press the button or to restore the sound The ...

Страница 14: ...dicated on the screen Enter the two digits of the channel number you want to watch for example select channel 16 Note if you want to choose one digit channel in this condition you should press 0 first and then one digit number key Picture Mode Press button on the remote control for menu display For desired mode as follows PERSONAL STANDARD MILD FRESH P STD Program Swap 1 2 3 Suppose the channel nu...

Страница 15: ... picture quality on the screen can be adjusted as follows 1 Press button and until the following menu appears on the screen MENU V V 2 Press button to enter the picture menu and to go up and down to select the desired option P P TV S VIDEO DVD SCART DTV MENU PC MENU PICTURE BRIGHTNESS CONTRAST SHARPNESS COLOUR TEMP 30 30 30 2 COLD PICTURE BRIGHTNESS CONTRAST SHARPNESS COLOUR H POSITION V POSITION ...

Страница 16: ...cture SHARPNESS By increasing the level it will show cleaner and clearer images and by decreasing the level it will make picture smoother COLOUR Press to adjust the colour NOISE REDUCTION Adjust the quality of the picture by selecting OFF LOW MID HIGH COLOUR TEMP Press to select the colour temperature from WARM NORMAL COLD H POSITION Picture horizontal adjust V POSITION Picture vertical position a...

Страница 17: ...udio output from left to right When indication value of balance increases towards 100 sound of the left speaker becomes weaker When indication value of balance decreases towards 0 sound of the right speaker become weaker Press to select among PERSONAL VOICE MUSIC and THEATRE AVL Automatic Volume Limit Control reduces the effect of the large volume by the same volume of all the channels Functions V...

Страница 18: ...e between 4 3 16 9 and FULL SCREEN 6 BLUE SCREEN To set On the screen will be in blue screen after 3 seconds if there is no signal 7 RESET Press to reset some settings to the factory default 8 HOTEL LOCK Press to enter it and the following appears on the screen MENU V V P P V V V V INPUT SOURCE TV TXT LANGUAGE PAN EUROPEAN TXT EAST WEST EAST BLUE SCREEN ON DISPLAY MODE 4 3 LANGUAGE ENGLISH RESET H...

Страница 19: ...OCK OFF or operate CLEAR LOCK PROG SET Opted for setting up start condition Press P button to select it Press button sources can be swapped in HDMI DVD COMPONENT PC S VIDEO SCART TV DTV OFFmode After setup the set mode will be entered if the television is switched off and on again To set Off the television will memory the off mode PROG NUM Opted for setting up preset channel Press button to select...

Страница 20: ...d with the mute mode and Lock icon when you enter the source In lock on mode when screen is blank SOURCE LOCK will be always displayed on the screen enter SOURCE LOCK submenu and set the mode off or activate CLEAR LOCK MAX VOLUME Press button to select it Press button for adjustment between 0 100 If a certain value is set when volume is being adjusted the sound value can not exceed that maximum vo...

Страница 21: ... to change the TV channel V V EDIT NAME Press V to enter it then press V to select the position you want to edit and press P to input the emblem such as character and so on There are 8 position for you to edit totally COLOUR SYSTEM Select the TV colour system from AUTO PAL SECAM TUNING PROGRAM COUNTRY UNITED KINGDOM AUTO SEARCH TUNING CHANNEL 1 EDIT NAME COLOUR SYSTEM AUTO SOUND SYSTEM DK SKIP OFF...

Страница 22: ...the channel Press the button to start to search the channel and the following menu will appears on the screen Press to select YES or NO and menu to confirm You could press MENU to stop the search V P V V P V P V P V V V V NOTE If you want to search the channels in L or L system you need to set the sound system to L in OSD FROM 1 TO 9 EXCHANGE EXCHANGE MANUAL SEARCH UP DOWN AUTO SEARCH YES NO SOUND...

Страница 23: ...er the sub menu Main Menu Installation Favourite Lists Channel Edit Timers Settings OK EXIT Installation Automatic Search Manual Search First Time Installation OK EXIT Automatic Search Press button to select Automatic Search Press OK button to enter the sub menu and press button to select Yes or No then press OK to confirm This screen shows you the services searched and the progress in scan Please...

Страница 24: ...elect and OK button to display the password confirmation menu The password is 0000 and then press button to select Yes and OK to enter the sub menu First Time Installation First Time Installation Favourite Lists 1 Press button the main menu will appear MENU D 2 Press button to select Favourite Lists and OK button to confirm enter the sub menu 3 Then press to select the pre difined list Main Menu I...

Страница 25: ...ll appear MENU D 2 Press button to select Channel Edit and OK button to confirm enter the submenu Main Menu Installation Favourite Lists Channel Edit Timers Settings OK EXIT TV Channel Edit 001 BBC FOUR OK EXIT Delete Favourites Move Lock Delete Press the button to select the and then press the button select the Delete P channel ress the OK button to delete the channel A confirmation screen will b...

Страница 26: ...y or weekly Monday Tuesday Wednesday Thursday Friday Saturday and Sunday Main Menu Installation Favourite Lists Channel Edit Timers Settings OK EXIT Add No Channel Name Start Duration Date Programme Timers OK EXIT Delete Modify Timers Programme timers Info Panel Timeout OK EXIT Favourite Press the button to select the Favourite and then press the OK button to enter the Favourite List menu You can ...

Страница 27: ...when Repeat is set Once The day month and year Press button to select the position and digits button to set Start Time hh mm Begin time of the service to record with the format hh mm Duration Total time to record with the format hh mm 3 Press OK to save this timer and EXIT to give up this timer Modify timer This function allows you to modify the programmed timers from the timers list 1 Press butto...

Страница 28: ...btitle Language the default subtitle language for all services selected from the pre defined list by pressing button 4 TV Type Allows you to set as 4 3 or 16 9 according to the received data by pressing button 5 Subtitle Allows you to set as ON or OFF by pressing the button Normally when it is set to On the subtitle will be displayed during viewing 6 Press OK button to save all settings Parental C...

Страница 29: ...Setting screen is used to set the local time in two modes Automatic mode and Manual mode 1 Mode Press button to select the Automatic or Manual mode 2 Automatic mode in this mode date and time is automatically set by the time information from the data received You need only to set the Local Time Offset to GMT and the Summer Time Local Time Offset you can set the offset from the list by pressing but...

Страница 30: ...TEXT button on the handset To switch off Teletext press the button again Note all menu functions are not available in Teletext mode Only a few direct button control functions are available in TELETEXT mode they are To select a Teletext page enter the page number using the numeric key pad on the remote control or use the P or P buttons or the coloured Fast text buttons To view the TV picture while ...

Страница 31: ...o read Reveal Pressing the button will reveal hidden text This feature is used to reveal information such as answers to Teletext on line interactive puzzles Time While in normal TV mode only pressing the button will display the teletext time in the top right hand corner for a few seconds Fast text coloured buttons Fast text automatically displays the four most commonly used pages that the broadcas...

Страница 32: ... playback press PREV key can go back to the beginning of this chapter then each press of this key will skip a chapter till the start of the disc note Disc function may vary depending on disc format Each press of NEXT key during playback will skip the current chapter and play the next one Fast forward and Fast reverse 1 2 3 4 Press FWD to fast forward through the disc Each time the FWD button is pr...

Страница 33: ...ess this key to display root menu select item according to your preference This function will work with a DVD having a multi layer menu ANGLE When enjoying sports concert or theatre press this key to watch same actions in different angles Valid for discs possessing this function Using a disc recorded in multi angle you can view the scene from different angles for example front side whole view and ...

Страница 34: ...e TV screen Some slide show transition modes are provided use PROGRAM key to select Customer can set transition effects for each picture To display an image indefinitely press the PAUSE key To view the next or previous picture press NEXT or PREV key To resume the slide show press the PLAY ENTER key Press the STOP button to preview the photos in a folder Press navigation buttons to rotate a picture...

Страница 35: ...work the disc must be specially coded Such discs are uncommon 4 3 LB LB Letter Box You may select this if you have a normal aspect ratio 4 3 TV Widescreen material will be shown in pure unaltered form allowing the entire picture area of the original film to be viewed without any side cropping Black bars will appear above and below the picture 16 9 You may select this if you have a widescreen 16 9 ...

Страница 36: ...ure of DVD on the screen whenever the DVD player is idle for more than 3 minutes General Setup Page General Setup Page On Off This item allows you to set Angle Mark ON or OFF Angle Mark Users can select a particular camera angle when playing a DVD which offers multiple angles On Off On Screen Display OSD Language Users can select on screen display language General Setup Page English French German ...

Страница 37: ... the family watches There are up to 8 censorship classes for DVDs 1 To change this setting you must enter your password Initial password is 1234 2 When set to OFF all discs may be viewed Password change You can change your password by entering 4 digits Your must confirm the 4 digits before the new password can be accepted NOTE If you forget your password or a password is accidentally set enter 136...

Страница 38: ... password and parental lock status for this DVD player back to the manufacturers original settings Press ENTER to perform the reset Note Some functions may not be available depending on the type of disc Preference Page Reset TV Type Parental Password Default Auto SETUP PLAY ENTER ...

Страница 39: ...ted above You cannot play non standardized discs even if they may be labeled as above The performance of CD R or CD RW disc is depend on the way of disc burning In a few cases their performance may not be very well or even not playable Support discs DVD CD R CD RW HDCD JPEG CD G Kodak CD W MA ...

Страница 40: ...inutes 12cm Disc diameter 30cm 20cm Horizontal resolution More than 500 line No more than 430 line Multiple kinds Picture proportion One kind Subtitle 32 kinds 16 kinds at most Sound quality 48KHz 96KHz 6 20 24bit 44 1KHz 16bit Single side single layer 4 7G Double side single layer 8 5G Single side double layer 9 4G Double side double layer 17G Dics Protection and DVD Characteristics ...

Страница 41: ...n and verify if Mute mode is set Switch to other channel and verify if the same problem happens Press VOL button to see if the problem can be solved Poor sound Verify if sound system is correct Refer to for adjustment user s manual No picture in some channel Verify if correct channel is selected Adjust the antenna Make adjustments by FINE TUNE and MANUAL SEARCH No color for some channel program bl...

Страница 42: ...C input S VIDEO input Audio input SCART Antenna input HDMI input 150 240V 50 60Hz PAL SECAM B G I D K L L Working 5 C 35 C Storage 15 C 45 C Power consumption 60W Model 50W Remote control Batteries Owner s manual Audio cable 70W Humidity Working 20 80 Storage 5 90 L15T11W A L15TA11W L15T11W C L15TC11W L15T12W A L15TA12W L15T12W C L15TC12W LT15T1W LT15T1BW LT15T1WW L19T11W A L19TA11W L19T11W C L19T...

Отзывы: