background image

WALL MOUNTING INSTALLATION GUIDELINES


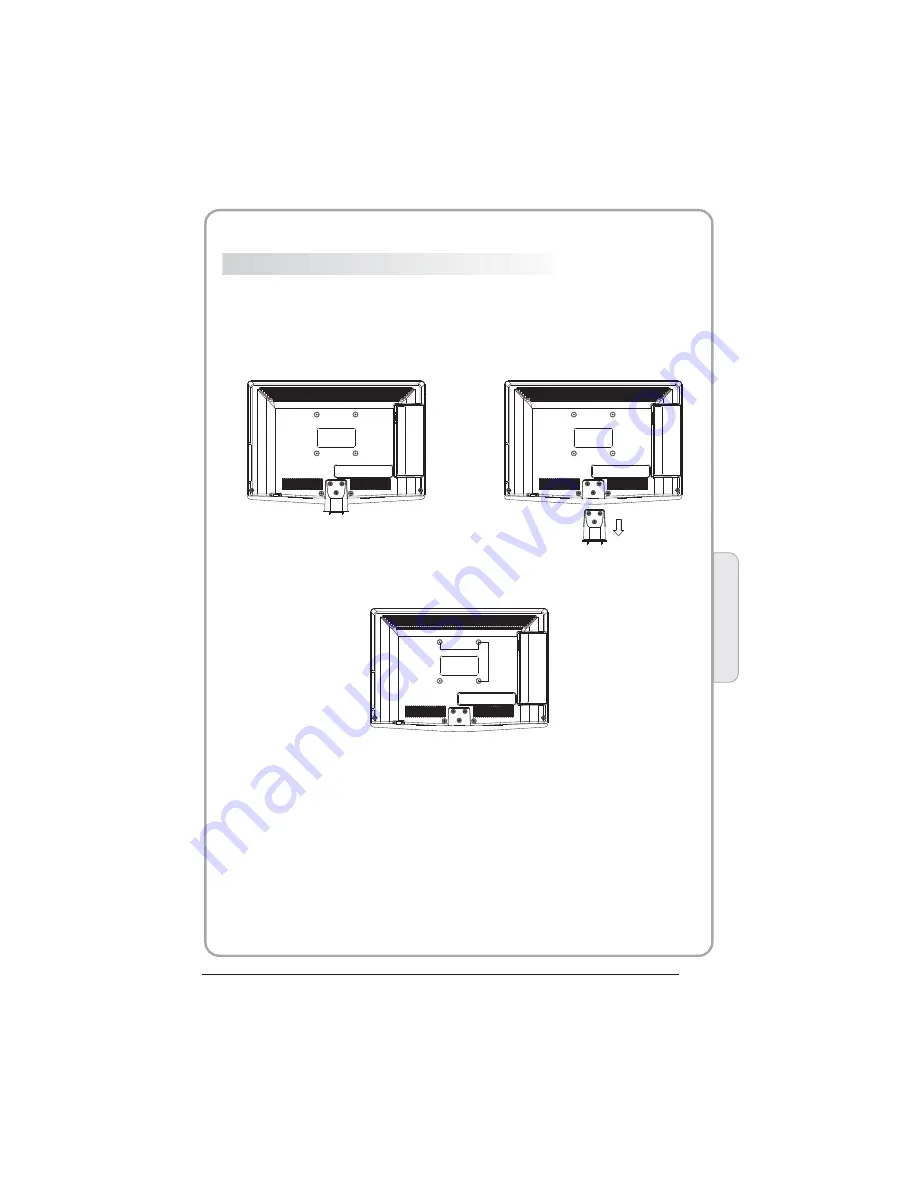
This television can be wall mounted as follows:

1.Place the LED LCD Television onto a solid surface. Please place some soft material 

over the front of the screen to protect it from any damage.

2.Remove the screws from the lower part of the television, where the base joins to the 

TV, and take away the stand (put the stand somewhere safe for future use).                      

3.Use the four screws provided to fix the TV onto a wall mounting bracket  (not included) 

via the four VESA  standard holes on the back of the television.

100mm

100mm

P.08

02

Introduction

Содержание LET19C430

Страница 1: ...LED LCD TV RECEIVER USER MANUAL Please read this manual carefully before using your television and keep this manual in a good place for future reference MODEL LET19C430 LET22C430 LET24C430 ...

Страница 2: ......

Страница 3: ...ontrol AAA ba x2 Instruction Manual Quick start guide ttery 22 Full HD 1080P Digital LED LCD TV Remote control AAA ba x2 Instruction Manual Quick start guide ttery 24 Full HD 1080P Digital LED LCD TV Remote control AAA ba x2 Instruction Manual Quick start guide ttery Scart cable x1 Adaptor Scart cable x1 Adaptor Scart cable x1 Adaptor ...

Страница 4: ...P 03 ...

Страница 5: ... trap the power supply cord under the television receiver Caution Never stand on lean on or suddenly push the television or its stand You should pay special attention to children Serious injury may result if it should fall Caution Do not place your television on an unstable cart stand shelf or table Serious injury to an individual and damage to the television may result if it should fall Caution W...

Страница 6: ... When you clean up dust or water drops on the LED PANEL or CABINET the power cord should be pulled out from the receptacle then wipe the TV with a dry soft cloth During thunder and lighting unplug the power cord and antenna cord to prevent damage to your TV All repairs to this TV should only be performed by qualified TV service personnel Panel Power supply 2x3W CompositeVideo input 350 YPbPr 400 1...

Страница 7: ...ESET MODE PC P 06 02 Introduction 3 5 6 1024x768 1280x1024 60 60 1 640x480 60 31 47 2 800x600 60 37 88 48 36 63 98 RESOLUTION V Freq Hz H Freq KHz 4 1360x768 60 47 7 1920x1080 Olny for 21 5 23 6 60 66 64 ...

Страница 8: ...omfortable viewing Allow enough space between the TV and the wall to permit ventilation Avoid excessively warm locations to prevent possible damage to the cabinet or premature component failure Base Stand Assembly Instruction 1 Place the TV with the display side down on a flat surface Use a cloth to protect Locate the bottom at the stand 2 Fix the bottom with turning the screw tightly on the stand...

Страница 9: ... of the screen to protect it from any damage 2 Remove the screws from the lower part of the television where the base joins to the TV and take away the stand put the stand somewhere safe for future use 3 Use the four screws provided to fix the TV onto a wall mounting bracket not included via the four VESA standard holes on the back of the television 100mm 100mm P 08 02 Introduction ...

Страница 10: ...U Displaymain MENU 3 4 CH CH InTV mode press CH or CH to change the channel up and down In MENU press CH or CH to select items In standby mode it can Turn on theTV STANDBY 2 VOL VOL Adjust sound level In MENU adjust the item that you Selected 5 Remote Control SOURCE MENU CH CH VOL VOL STANDBY AV L R Y Pb Pr HDMI2 1 2 3 4 5 HDMI1 USB PC AUDIO VGA ANT SCART COMMON INTERFACE CI 6 7 8 10 9 11 12 DC Po...

Страница 11: ...P 10 02 Introduction ...

Страница 12: ...your Common Interface service provider to get more information about the modules and subscription Please noted that CA modules and smart cards are neither supplied nor optional accessories from us COMMON INTERFACE ATV Manual Tuning Programme Edit Signal Informatio n CHANNEL Auto Tuning DTV Manual Tuning Softw are Update USB Softw are Update OAD Off CI Informatio n P 11 ...

Страница 13: ...xit TELETEXT 24 INFO T 25 SUBTITLE T For direct access to channels et timer to turn off the TV o display information about the program being viewed and what s on next in DTV mode o access your favourite channels list in TV or DTV mode o return to the previous menu or exit menu sed to switch between digital TV channels and radio stations o display information about the channel being viewed or furth...

Страница 14: ...ication appears top left To freeze the page To display or hide the concealed information games solutions The user can set four favorite pages to be directly linked to the four color keys While list mode is activated it is not possibility to use TOP or FLOF navigation with the colorkeys The favorite page numbers should be stored and restored to from nonvolatile memory for each channel by the system...

Страница 15: ...uning the channel will skip to the first DTV channel 2 DTV Manual tuning You can select a DTV channel then find the program in this channel Pls press to select the channel then press OK to search the programs NOTE Bad Normal Good means signal intensity Switzerland NewZealand Norway Poland Portugal Slovenia Spain Sweden Country OK Rumania Russian Serbia Morocco Tunis Algeria UK Dansk Deutsch Hrvats...

Страница 16: ... card s information MENU Picture Mode Standard Contrast 82 Brightness 50 Color 50 Sharpness 50 Tint 50 Color Temperature Medium Red 40 Green 31 Blue 50 MENU Rename Only can rename ATV programs Move the cursor to the program press teletext green button to rename the program Press to choose the character Press to move the cursor Press MENU button to exit edit Press EXIT to exit the menu Note ATV pro...

Страница 17: ...inutes there is no signal the TV will auto sleep if Auto Sleep is set ON The clock time can get from the DTV system auto Off Time On Time Sleep Timer Auto Sleep Time Zone Clock TIME 7 EPG Menu Electronic Program Guide The EPG menu is used to look at what is being broadcasted on DTV or Radio channel in the day To access the EPG menu press the EPG botton the following menu will be displayed 28 Apr 0...

Страница 18: ...ange into Success Note please check the term speed If it is HD support that means the speed of USB device is available for time shift and record If not please format the device to make sure the device available The default Free Record Limit is 6 hour if the space on the disk is big enough If the space is not big enough the record time should be shorter depends on the room on the device During the ...

Страница 19: ...the time shift size Time Shift Size Time Shift Disk Size 512 MB SB 14 Mins HD 4 Mins Do not unplug USB device Formatting please wait Format disk As playing the DTV source choose the channel and click record the record frame will pop up Click record again the record frame will disappear and the REC icon still on the left top It will disappear until you click stop In USB the record program will be s...

Страница 20: ... at least 2 minutes Please do not turn off the power or remove the USB device during formatting During formatting a speed test will be done on the USB device If it fails it means the USB device may not support the Time Shift function Record a paused DTV program to USB storage device 1 While in the DTV input source insert USB storage device to the USB port on the side of your TV 2 Press PAUSE 33 to...

Страница 21: ...ments 3 Do Not remove USB disk or switch off the power during Time Shift operations It will abort once the signal is lost 4 Do Not remove the signal source during Time Shift operations 5 Do Not quickly and repeatedly change operations between PLAY PAUSE FWD REV 6 Sleep timer will be terminated if it had been set before Time Shift 7 Video may become pixelated when Video bit rate is too low 8 Not al...

Страница 22: ...eview frame will pop up Press the button to play the media file in full screen When the media file photo music Movie or text type is playing press the OK or Info button can display the control bar Press to select the function icon press OK button to confirm the function Press or EXIT button to exit the control bar NOTE You can adjust the audio track or program in the Info menu while Playing the vi...

Страница 23: ...nections are not correct No picture Mute Power cord is not inserted Power switch is not opened Contrast and brightness volume setup Press standby key on the remote control for inspecting No colour Normal audio Colour control Picture breaking up Normal audio or weak retune channel No colour Noise TVsystem Normal audio antenna position direction or connection Trouble shooting Trouble phenomenon Symp...

Страница 24: ...TV set provided here are for reference only Difierences may occur as product technology is updated Design and specifications are subject to change without notice PAL B G I D K SECAM B G D K L L HDMI 480i p 576i p Scart input output description 720p 1080i 1080p User manual Remote control Battery x2 Quick start guide 15 C 45 C Storage humidity 5 90 ATV DTV TV Source SCART Out Other Source ATV DTV AT...

Страница 25: ...HER BEDIENUNGSANLEITUNG Bitte lesen Sie die Bedienungsanleitung aufmerksam durch bevor Sie Ihren Fernseher benutzen Bewahren Sie die Anleitungen für zukünftigen Nachschlagen auf MODELL LET19C430 LET22C430 LET24C430 ...

Страница 26: ...rn und Vorsichtshinweise S 05 02 Einleitung Parameter S 07 Standfuß montieren S 09 Wandmontage S 10 Frontblende S 11 AV Anschlüsse S 11 Fernseher anschließen S 13 Common Interface S 14 03 Fernbedienung Fernbedienung S 15 04 Bedienungshinweise Installation S 17 05 Störungserkennung Störungserkennung S 30 Spezifikationen S 31 ...

Страница 27: ...E SIE FÜR SPÄTERES NACHSCHLAGEN AUF VORSICHT STROMSCHLAGGEFAHR NICHT ÖFFNEN VORSICHT ZUR VERMEIDUNG VON STROMSCHLAG ÖFFNEN SIE DAS GERÄTEGEHÄUSE NICHT ES BEFINDEN SICH KEINE VOM VERBRAUCHER WARTBAREN TEILE IM INNERN DES GERÄTS WENDEN SIE SICH MIT PROBLEMEN UND FRAGEN ZUR WARTUNG AN DEN KUNDENDIENST DER BLITZ IM GLEICHSEITIGEN DREIECK BEDEUTET DASS IM GERÄT HOCHSPANNUNGSGEFAHR BESTEHT DAS AUFRUFUNG...

Страница 28: ...en und Schäden verursachen Stellen Sie keine schweren oder scharfkantigen Gegenstände auf dem Gerät ab Benutzen Sie nur das mitgelieferte Netzteil Die Benutzung eines fremden Netzteils führt zum Verlust Ihrer Garantieansprüche Ziehen Sie nach der Benutzung den Netzstecker Entsorgen Sie Batterien umweltgerecht WARNUNG Batterien oder Akkus dürfen nicht übermäßiger Hitze ausgesetzt werden direkte Son...

Страница 29: ...Reparaturarbeiten stets an den autorisierten Kundendienst Zur Vermeidung von Feuer und Stromschlag setzen Sie das Gerät nicht Regen oder Feuchtigkeit aus Führen Sie keine Fremdkörper in das Gerät ein stoßen Sie es nicht stark an Verschütten Sie keine Flüssigkeiten auf Ihrem Fernseher Blockieren Sie nicht die Ventilationsöffnungen sie werden zur Belüftung benötigt ...

Страница 30: ...häden verursachen wenn er umfällt Stellen Sie das Gerät nicht auf einem unstabilen Wagen Aufsteller Stativ Tisch oder einer Halterung auf Es kann herunterfallen und Verletzungen und Schäden verursachen Bei längerer Nichtbenutzung des Fernsehers ziehen Sie bitte das Netzkabel ab Mindestabstände Wird der Fernseher eingebaut so achten Sie bitte auf die Mindestabstände Hitzestau kann die Lebensdauer I...

Страница 31: ...zu einer Überforderung der Augen führen Weiche und indirekte Beleuchtung wird für komfortables Fernsehen empfohlen Lassen Sie auf der Rückseite des Fernsehers ausreichend Platz zur Ventilation Vermeiden Sie besonders warme Standorte um einen Hitzestau im Gerät und vorzeitige Schäden zu vermeiden Decken Sie die Lüftungsöffnungen während des Betriebs nicht ab Ausstattungsmerkmale 1 Nutzbar als Ferns...

Страница 32: ...8 PC VOREINSTELLUNGEN AUFLÖSUNG V Freq Hz H Freq kHz 1 800x600 60 37 88 2 640x480 60 31 47 3 1024x768 60 48 36 4 1280x1024 60 63 98 ...

Страница 33: ... HINWEISE ZUR INSTALLATION Stellen Sie den Fernseher vor direkter Sonneneinstrahlung geschützt auf Dunkelheit und Reflektionen auf dem Bildschirm können zu einer Überforderung der Augen führen Weiche und indirekte Beleuchtung wird für komfortables Fernsehen empfohlen Lassen Sie auf der Rückseite des Fernsehers ausreichend Platz zur Ventilation Vermeiden Sie besonders warme Standorte um einen Hitze...

Страница 34: ...m auf eine flache Arbeitsfläche Legen Sie ein Tuch unter um den Bildschirm zu schützen 2 Schrauben Sie die Halterung für den Standfuß unten am Fernseher ab bewahren Sie den Standfuß für späteren Gebrauch auf 3 Schrauben Sie den Fernseher mit den vier vorgesehenen Schrauben an einer VESA Wandhalterung nicht mitgeliefert ...

Страница 35: ...Menü der Eingangsquellen anzeigen 2 MENU Hauptmenü anzeigen 3 CH CH Im TV Modus schalten Sie mit CH oder CH den Kanal aufwärts oder abwärts um Im MENÜ wählen Sie mit CH oder CH einen Menüpunkt In Stand by Modus schalten Sie den Fernseher ein 4 VOL VOL Lautstärke einstellen Im MENÜ stellen Sie den gewählten Menüpunkt ein 5 STANDBY ...

Страница 36: ...ckseite 1 AV Eingang 2 L R AUDIO Eingang 3 DC Netzteil Eingang 4 YPbPr Eingang 5 HDMI2 Eingang 6 HDMI1 Eingang 7 USB Eingang 8 PC AUDIO Eingang 9 COMMON INTERFACE CI Eingang 10 SCART Eingang 11 VGA Eingang 12 ANTENNE Eingang ...

Страница 37: ...rnseher oder mit der Fernbedienung den VGA Modus auf 6 Sie können den VGA Modus zu einer anderen Auflösung umschalten Helligkeit und Kontrast im Menü einstellen bis Sie ein klares Bild haben DVD PLAYER ODER VIDEOREKORDER AM FERNSEHER ANSCHLIEßEN Einen DVD Player oder Videorekorder können Sie auf zweierlei Weise anschließen Beide Geräte müssen zunächst ausgeschaltet sein 1 Schließen Sie die AV DVD ...

Страница 38: ...t das CA Modul und dann die Smartcard im CI Schacht an der Seite des Fernsehers ein CI SLOT CI Schacht CAM CA Modul Smart Card Smartcard 2 Schalten Sie den Fernseher ein die nachstehende Meldung wird angezeigt wenn das CA Modul erkannt wird Warten Sie einen Moment ab bis die Karte aktiviert ist 3 Drücken Sie MENU und dann zur Anzeige der CI Informationen 4 Detaillierte Informationen zur benutzten ...

Страница 39: ...V und Radiokanälen umschalten Programminformationen anzeigen verbergen 23 TEXT VIDEOTEXT aufrufen 24 INFO Im DTV Modus Informationen zum aktuellen Kanal anzeigen 25 SUBTITLE Im DTV Modus Untertitelsprachen umschalten 26 Im USB Modus zur nächsten Datei springen 27 Im USB Modus zur vorherigen Datei springen 28 REC REP Im DTV Modus aktuelles Programm aufzeichnen oder im USB Modus Wiederholung 29 Im U...

Страница 40: ...ks im Bild angezeigt Zum Aufrufen einer neuen Seite geben Sie die entsprechende Nummer ein Ist die gewählte Seite nicht vorhanden so läuft die Seitenzahl weiter UNTERSEITEN DIREKT AUFRUFEN Die Farbtasten entsprechen den Farbmarkierungen unten auf der Seite und dienen als Schnelltasten zum Aufrufen Der farbige Bereich blinkt wenn die Seite noch nicht zur Verfügung steht INDEX Inhaltsverzeichnis auf...

Страница 41: ... haben Wählen Sie Ihre Sprache und das Land damit wird die automatische Kanalsuche gestartet Anschließend wird der erste aufgefundene DTV Kanal angezeigt 1 KANALMENÜ Das erste Menü ist das Kanalmenü CHANNEL nur für TV oder DTV Quellen Hier können Sie Kanäle suchen und bearbeiten 1 Automatische Suche Alle Kanäle werden automatisch gesucht wählen Sie zwischen ATV und DTV ...

Страница 42: ...le aufgefundenen Kanäle gespeichert Der erste DTV Kanal wird angezeigt 2 DTV Manuelle Suche Sie können einen DTV Kanal wählen und dann das Programm suchen Drücken Sie zur Kanalwahl dann drücken Sie OK um das Programm zu suchen BITTE BEACHTEN SIE Bad Normal und Good steht für schlechte normale und gute Signalstärke 3 ATV Manuelle Suche Stellen Sie das Tonsystem zur Suche nach Analogkanälen ein dann...

Страница 43: ...tzeichen haben DTV Kanäle bis zu 25 Schriftzeichen Verschieben Mit den Navigationstasten wählen Sie den zu verschiebenden Kanal dann drücken Sie die gelbe Taste Mit den Navigationstasten verschieben Sie den Kanal mit OK bestätigen Sie Überspringen Drücken Sie zur Auswahl des Kanals und drücken Sie die blaue Taste um diesen Kanal zu überspringen Rechts vom Kanal wird angezeigt Zur Anzeige des übers...

Страница 44: ...rfügung medium mittel warm cool kühl und User benutzerdefiniert 3 Screen Bildschirm steht Ihnen nur im PC Modus zur Verfügung hier stellen Sie die horizontal und vertikale Position Größe und Phase ein 3 KLANGMENÜ Das dritte Menü ist das Klangmenü SOUND Hier stellen Sie die Klangeffekte wie Höhen Bässe Balance usw ein Drücken Sie zur Navigation und OK zur Einstellung Bitte beachten Sie Auto Volume ...

Страница 45: ...TIONSMENÜ Das fünfte Menü ist das Optionsmenü OPTION Hier stellen Sie die Menüsprache Audio und Untertitelsprache usw ein Im Menü PVR File System stellen Sie das USB Laufwerk für die PVR Aufnahme ein BITTE BEACHTEN SIE Mit Restore Factory Default Rückstellung zu den Werkseinstellungen werden alle Kanäle und das Passwort gelöscht 6 SPERRMENÜ Das sechste Menü ist das Sperrmenü LOCK Hier sperren Sie ...

Страница 46: ...ken Sie zur Auswahl der Bewertungsstufe 7 EPG Menü Elektronische Programmzeitschrift Das EPG Menü dient der Anzeige der Programmvorschau für DTV und Radiokanäle des Tages Zum Aufrufen des EPG Menüs drücken Sie EPG 1 INFO Mit wählen Sie den Kanal Drücken Sie INFO um die Programminformationen zu markieren 2 Planung Drücken Sie die gelbe Taste um die Planungsliste Schedule anzuzeigen drücken Sie zur ...

Страница 47: ...Sie die rote Taste um die Aufnahme des Programms einzustellen 4 Erinnerung Drücken Sie die blaue Taste und stellen Sie eine Erinnerungszeit ein Der Fernseher schaltet dann automatisch auf das gewählte Programm um ...

Страница 48: ...unden eingestellt sofern die Speicherkapazität ausreichend ist Anderenfalls ist die Aufnahmezeit kürzer Während der Überprüfung gemäß Check PVR File System drücken Sie bitte keine weiteren Tasten Die Aufnahmen im PVR System können nur auf diesem Fernseher wiedergegeben werden nicht auf dem Computer DVD Player usw der nicht mit dem TS Format kompatibel ist Zur Aufnahme werden Sie von Fernseher aufg...

Страница 49: ...25 Check PVR File System PVR Dateisystem überprüfen Vergewissern Sie sich dass das PVR Dateisystem für das USB Speichermedium eingestellt ist Format ...

Страница 50: ...mit High Speed FS zu formatieren wodurch sich die Aufnahme beschleunigt Nach Beendigung der Formatierung erhalten Sie nachstehendes Menü Bei Auswahl von Hi Speed FS können Sie die Timeshiftgröße einstellen 2 Programm aufzeichnen ...

Страница 51: ... Im USB Speichermedium wird das Programm im Ordner _MSTPVR gespeichert 1 Das USB Speichermedium muss zwischen 4 GB und 500 GB groß sein 2 Das Video kann verpixeln falls die Bitrate zu niedrig eingestellt ist 3 Nicht alle USB Speichermedien sind kompatibel Nachstehend finden Sie eine Liste der empfohlenen USB Speichermedien Nicht gelistete Modelle sind möglicherweise kompatibel das ist jedoch nicht...

Страница 52: ... Sie das Gerät während dieses Zeitraums nicht aus und trennen Sie das USB Speichermedium nicht ab Während der Formatierung wird für das USB Speichermedium ein Geschwindigkeitstest durchgeführt Schlägt dieser fehl so kann das USB Speichermedium nicht für die Timeshiftfunktion benutzt werden Unterbrochenes DTV Programm auf USB Speichermedium aufzeichnen 1 Im DTV Modus schließen Sie das USB Speicherm...

Страница 53: ...itrate zu niedrig eingestellt ist 8 Nicht alle USB Speichermedien sind kompatibel Das USB Laufwerk sollte wenigstens 500 mA haben Nachstehend Liste mit empfohlenen USB Laufwerken Nicht aufgeführte Modelle sind möglicherweise kompatibel das ist jedoch nicht garantiert SanDisk Extreme Contour USB Flash Drive 8GB SDCZ8 8192 E75 SanDisk Extreme Contour USB Flash Drive 16GB SDCZ8 016G A75 Kingston Data...

Страница 54: ... Mit oder wählen Sie die Datei das Vorschaufenster wird angezeigt Drücken Sie zur Wiedergabe als Vollbild Während der Wiedergabe Foto Musik Movie oder Text drücken Sie OK oder INFO zur Anzeige der Leister mit den Steuerungssymbolen Drücken Sie zur Auswahl der Funktion und OK zur Bestätigung Drücken Sie oder EXIT um die Leiste auszublenden BITTE BEACHTEN SIE Sie können den Audiotrack oder das Progr...

Страница 55: ...Geräte Fahrzeug Motorrad Neonlicht normales Bild stummgeschaltet Lautstärke stummgeschaltet oder Audioanschlüsse nicht korrekt kein Bild stummgeschaltet Kein Netzanschluss Gerät ausgeschaltet Kontrast und Helligkeit Lautstärke einstellen Drücken Sie STANDBY auf der Fernbedienung keine Farbe normaler Ton Farbe einstellen Bild verschwindet normaler Ton oder leise Kanal neu einstellen keine Farbe ges...

Страница 56: ... Audioausgang 2 x 3 W Umweltbedingungen Betriebstemperatur 5 C 35 C Betriebsluftfeuchtigkeit 20 80 Lagertemperatur 15 C 45 C Lagerluftfeuchtigkeit 5 90 Zubehör Bedienungsanleitung Fernbedienung Batterien x2 Schnellanleitung Einige der Spezifikationen nur als Referenz Abweichungen vom tatsächlichen Gerät nicht ausgeschlossen Änderung von Design und Spezifikationen vorbehalten SCART Eingang Ausgang ...

Страница 57: ...eur TV LCD MANUEL DE L UTILISATEUR Lisez attentivement ce manuel avant d utiliser votre téléviseur et conservez ce manuel dans un bon endroit pour toute référence ultérieure Modèle LET19C430 LET22C430 LET24C430 ...

Страница 58: ...ntroduction Principaux paramètres P 07 Instructions d assemblage du socle de base P 09 Directives d installation du support mural P 10 Panneau avant P 11 Lire les connexions AV P 11 Connexion de votre téléviseur P 13 Interface Commune P 14 03 Télécommande Télécommande P 15 04 Utilisation Guide d installation P 17 05 Dépannage Dépannage P 30 Spécification P 31 ...

Страница 59: ...ES RISQUE DE CHOC ELECTRIQUE N ENLEVEZ PAS LE COUVERCLE OU LE PANNEAU ARRIERE AUCUNE PIÈCE RÉPARABLE PAR L UTILISATEUR À L INTÉRIEUR POUR TOUT PROBLÈME ADRESSEZ VOUS AU SERVICE D ASSISTANCE CLIENT IL Y A UN SYMBOLE DE FLÈCHE D ÉCLAIR DANS UN TRIANGLE CE SYMBOLE INDIQUE QU UNE HAUTE TENSION EST PRESENTE À L INTÉRIEUR IL EST DONC DANGEREUX D ÉTABLIR LE MOINDRE CONTACT AVEC LES COMPOSANTS INTERNES DU...

Страница 60: ...r secteur fourni avec le produit L utilisation d un autre adaptateur annule la garantie Débranchez la prise de courant lorsque l appareil n est pas utilisé Il faut tenir compte de la protection de l environnement lors de l élimination des piles AVERTISSEMENT Les piles pile ou batterie ou bloc batterie ne doivent pas être exposées à une chaleur excessive telle que rayons du soleil feu etc AVERTISSE...

Страница 61: ...r prévenir tout risque d incendie ou d électrocution n exposez pas cet appareil à la pluie et à l humidité N introduisez pas d objets étrangers par les fentes des panneaux du téléviseur Ne renversez jamais de liquide sur le récepteur du téléviseur Ne bloquez pas les fentes d aération du panneau arrière L aération est essentielle pour éviter que les composants électriques ne tombent en panne Ne coi...

Страница 62: ...e ou une table instable Le téléviseur risque de tomber et peut provoquer des blessures graves et des dommages matériels importants Débranchez le téléviseur du secteur s il ne va pas être utilisé pour une longue période Distances minimales Si le téléviseur est placé dans un compartiment fermé il faut veiller à respecter les distances minimales L accumulation de chaleur réduit la durée de vie de ser...

Страница 63: ...peut provoquer une fatigue visuelle Un éclairage doux et indirect est recommandé pour une visualisation confortable Prévoyez suffisamment d espace entre le téléviseur et le mur pour permettre la ventilation Évitez les endroits trop chauds pour éviter tout dommage possible à l enceinte ou une défaillance prématurée des composants Ne couvrez pas les fentes de ventilation lors de l utilisation du tél...

Страница 64: ...8 PC MODE PRÉDÉFINI RESOLUTION V Fréq Hz H Fréq KHz 1 800 600 60 37 88 2 640 480 60 31 47 3 1024 768 60 48 36 4 1280 1024 60 63 98 ...

Страница 65: ...Placez le téléviseur dans une pièce où la lumière ne frappe pas directement sur l écran L obscurité totale ou une réflexion sur l écran peut provoquer une fatigue visuelle Un éclairage doux et indirect est recommandé pour une visualisation confortable Prévoyez suffisamment d espace entre le téléviseur et le mur pour permettre la ventilation Évitez les endroits trop chauds pour éviter tout dommage ...

Страница 66: ...ouple à l avant de l écran pour le protéger contre tout dommage 2 Retirez les vis de la partie inférieure du téléviseur où le socle est fixé au téléviseur et enlevez le socle rangez le socle dans un endroit sûr pour une utilisation ultérieure 3 Utilisez les quatre vis fournies pour fixer le téléviseur sur un support mural non inclus par les quatre trous VESA standard à l arrière du téléviseur ...

Страница 67: ...ur ouvrir le Menu principal 3 CH CH En mode TV appuyez sur CH ou CH pour passer au canal suivant ou précédent Dans MENU appuyez sur CH ou CH pour sélectionner des éléments En mode veille appuyez dessus pour allumer le téléviseur 4 VOL VOL Pour régler le niveau sonore Dans MENU permet de régler l élément sélectionné 5 VEILLE Prises arrières latérales ...

Страница 68: ...udio Gauche Droite Entrée 3 Sources d alimentation CC Entrée 4 YPBPR Entrée 5 HDMI2 Entrée 6 HDMI1 Entrée 7 USB Entrée 8 Audio PC Entrée 9 INTERFACE COMMUNE CI Entrée 10 PERITEL Entrée 11 Entrée VGA Entrée 12 ANT Entrée ...

Страница 69: ...lécommande 6 Une fois l image apparaît s il y a du bruit changez la résolution du mode VGA changez le taux de rafraîchissement ou réglez la luminosité et le contraste dans le menu jusqu à ce que l image soit claire CONNECTER UN LECTEUR DVD OU UN MAGNÉTOSCOPE À VOTRE TV Il y a deux manières pour connecter un lecteur DVD ou un magnétoscope à votre téléviseur Assurez vous que le téléviseur lecteur DV...

Страница 70: ...ctement le CAM module d accès conditionnel puis la carte à puce dans le logement CI qui se trouve sur le côté du téléviseur CI SLOT LOGEMENT D INTERFACE COMMUNE CAM CAM module d accès conditionnel Smart Card Carte à puce 2 Allumez le téléviseur le message ci dessous s affiche si un module CA est détecté Attendez quelques instants jusqu à ce que la carte soit activée 3 Appuyez sur la touche MENU pu...

Страница 71: ...ression des informations sur le programme 23 TEXT Pour afficher ou quitter le TELETEXTE 24 INFO Affichage des informations sur la chaîne regardée ou des informations supplémentaires sur le programme lorsque le petit écran EPG est affiché en mode DTV 25 SUBTITLE Pour changer de sous titrage en mode DTV 26 Pour passer au fichier suivant en mode USB 27 Pour revenir au fichier précédent en mode USB RE...

Страница 72: ...fficher une autre page Si le compteur continue à chercher cela signifie que la page n est pas transmise Sélectionnez un autre numéro ACCÈS DIRECT AUX ÉLÉMENTS Les touches de couleur sont comme elles sont affichées en bas de l écran Les 4 touches colorées permettent d accéder aux rubriques ou aux pages correspondantes Les zones colorées clignotent lorsque la rubrique ou la page n est pas encore dis...

Страница 73: ... le pays la recherche automatique des programmes Une fois cet écran tourné le téléviseur passe au premier programme télé numérique 1 MENU CANAL Le premier élément du MENU est le Menu canal pour la source TV ou DTV uniquement Ici vous pouvez rechercher les chaînes et modifier les programmes 1 Recherche automatique Pour rechercher toutes les chaînes automatiquement vous pouvez sélectionner ATV et DT...

Страница 74: ...e téléviseur se syntonise à la première chaîne de télévision numérique DTV 2 Recherche manuelle de chaînes numériques DTV Vous pouvez sélectionner un canal de télévision numérique DTV puis trouver le programme de ce canal Appuyez sur pour sélectionner le canal puis appuyez sur OK pour rechercher les chaînes REMARQUE Mauvais Normal Bon indique l intensité du signal 3 Recherche manuelle de programme...

Страница 75: ...re de 25 caractères Déplacer Utilisez les touches fléchées pour sélectionner la chaîne que vous souhaitez déplacer Ensuite appuyez sur la touche jaune pour sélectionner la fonction Déplacer Une fois activée utilisez les touches fléchées pour se déplacer et appuyez sur OK pour confirmer Ignorer Appuyez sur pour choisir le programme appuyez sur la touche télétexte bleue pour ignorer ce programme le ...

Страница 76: ...ponible en mode PC uniquement qui permet de régler la position horizontale verticale la taille et la phase 3 MENU AUDIO Le troisième élément du Menu principal est le Menu audio Ici vous pouvez régler l effet sonore tel que les aigus basses balance etc Appuyez sur pour se déplacer appuyez sur OK pour régler Remarque Volume automatique uniquement disponible lorsque le volume du signal d entrée est t...

Страница 77: ...la langue de sous titres etc Dans le système de fichiers PVR vous pouvez configurer le disque USB pour PVR REMARQUE La restauration des paramètres par défaut efface tous les programmes et mot de passe 6 MENU VERROUILLAGE Le sixième élément du Menu principal est le Menu verrouillage Vous pouvez verrouiller le système définir un mot de passe verrouiller des programmes et définir le contrôle parental...

Страница 78: ... Program Guide Guide Electronique des Programmes Le Menu EPG est utilisé pour avoir une idée sur les programmes télé et radio de la journée Pour accéder au Menu EPG appuyez sur la touche EPG le menu suivant s affiche 1 INFO Utilisez pour choisir les programmes appuyez sur la touche INFO pour afficher les informations du programme mis en surbrillance 2 Programme Appuyez sur la touche télétexte jaun...

Страница 79: ... par défaut Limite d enregistrement est 6 heures si l espace sur le disque est suffisant Si l espace n est pas suffisant le temps d enregistrement devrait être réduit en fonction de l espace disponible sur le disque Pendant le processus Vérifier le système de fichiers PVR ne faites aucune opération jusqu à ce qu il soit terminé Les enregistrements doivent être faits avec le système TV PVR Il ne pe...

Страница 80: ...ction de disque sélectionnez le disque pour enregistrer le fichier d enregistrement Vérifier le système de fichiers PVR vérifiez si le système de fichiers PVR est défini dans le dispositif USB ou pas Formater ...

Страница 81: ...ande vitesse ce qui peut accélérer l enregistrement Le menu ci dessous apparaît une fois le formatage terminé Si vous sélectionnez l option mode de formatage FS grande vitesse vous pouvez modifier la taille de lecture décalée TimeShift 2 Enregistrer le programme ...

Страница 82: ...gistrement Dans USB le programme enregistré sera sauvegardé dans le dossier _MSTPVR du dispositif 1 La taille de stockage USB doit être entre 4 Go et 500 Go 2 La vidéo risque de devenir pixélisée si le débit vidéo est trop faible 3 Pas tous les dispositifs USB sont compatibles Voici une liste des lecteurs USB recommandés Les modèles qui ne sont pas listés peuvent être compatibles mais ce n est pas...

Страница 83: ...E Le processus de formatage prendra au moins 2 minutes N éteignez pas l appareil et ne retirez pas le dispositif USB pendant le formatage Lors du formatage un test de vitesse sera effectué sur le dispositif USB S il échoue cela signifie que le dispositif USB peut ne pas supporter la fonction TimeShift lecture décalée Enregistrer une émission DTV télévision numérique mise en pause sur le dispositif...

Страница 84: ...ues durs USB devrait être 500 mA Voici une liste des lecteurs USB recommandés Les modèles qui ne sont pas listés peuvent être compatibles mais ce n est pas garanti Clé USB Flash SanDisk Extreme Contour SDCZ8 8192 E75 8Go Clé USB Flash SanDisk Extreme Contour SDCZ8 016G A75 16Go Clé USB 2 0 Flash Kingston DataTraveler 410 DT410 8Go Clé USB 2 0 Flash Kingston DataTraveler 410 DT410 16Go Clé USB 2 0 ...

Страница 85: ...chier multimédia en plein écran Lorsque le fichier multimédia photo musique film ou texte est en cours de lecture appuyez sur la touche OK ou sur la touche Info pour afficher la barre de contrôle Appuyez sur pour sélectionner l icône de la fonction appuyez sur la touche OK pour valider la fonction Appuyez sur ou EXIT pour quitter la barre de contrôle REMARQUE Vous pouvez régler la piste audio ou p...

Страница 86: ...normale Son coupé Volume vérifiez si muet est activé ou si les connexions du système audio ne sont pas corrects Pas d image Son coupé Le cordon d alimentation n est pas inséré L interrupteur d alimentation n est pas ouvert Configuration du contraste luminosité volume Appuyez sur la touche standby veille de la télécommande pour inspection Pas de couleur Audio normal Contrôle des couleurs Rupture de...

Страница 87: ...re de stockage 15 C 45 C Humidité de stockage 5 90 Accessoires Guide d utilisation Télécommande Piles x 2 Guide de démarrage rapide Les spécifications de ce téléviseur ne sont fournies ici qu à titre de référence Des différences peuvent apparaître car la technologie du produit est en amélioration continue La conception et les caractéristiques sont sujettes à modification sans préavis Description e...

Страница 88: ...TV LED MANUALE DELL UTENTE Leggete attentamente questo manuale prima di utilizzare il vostro televisore e conservatelo in un posto sicuro per future consultazioni MODELLO LET19C430 LET22C430 LET24C430 ...

Страница 89: ... 07 Istruzioni di assemblaggio della base di sostegno P 09 Linee guida per l installazione a muro P 10 Pannello anteriore P 11 Collegamenti AV supportati P 11 Collegare il vostro televisore P 13 Common interface P 14 03 Telecomando Telecomando P 15 04 Operatività Guida all installazione P 17 05 Risoluzione dei problemi Risoluzione dei problemi P 30 Specifiche P 31 ...

Страница 90: ... avvio Adesso potete iniziare INFORMAZIONI IMPORTANTI LEGGETE TUTTE LE ISTRUZIONI PRIMA DELL USO E CONSERVATELO PER FUTURE CONSULTAZIONI CAUTELA RISCHIO DI SHOCK ELETTRICO NON APRIRE CAUTELA PER RIDURRE IL RISCHIO DI SHOCK ELETTRICI NON RIMUOVETE IL COPERCHIO O IL RETRO ALL INTERNO NON VI SONO PARTI A CUI L UTENTE POSSA FARE MANUTENZIONE DA SOLO PER QUALUNQUE PROBLEMA FATE RIFERIMENTO PER LA MANUT...

Страница 91: ...I AD EFFETTUARE DA SOLI LA MANUTENZIONE POICHE POTREBBE PORTARE A FERITE O A DANNI AL PRODOTTO FATE RIFERIMENTO PER LA MANUTENZIONE ALLA LINEA DI AIUTO DEL CLIENTE DICHIARAZIONE DI CONFORMITA Si dichiara che questo apparecchio TV mod LET19C430 LET22C430 LET24C430 è stato fabbricato nell Unione Europea e risponde alle prescrizioni dell art 1 del DM 26 03 92 ed a quelle dell art 2 comma 1 del D M 28...

Страница 92: ...e Utilizzate solo l alimentatore AC incluso col prodotto Utilizzare qualunque altro alimentatore annullerà la garanzia Scollegate l alimentatore dalla presa quando l unità non è in uso Si deve fare attenzione agli aspetti ambientali perlo smaltimento delle batterie AVVISO Le batterie batteria batterie o pacco batterie non devono essere esposte a calore eccessivo come luce diretta del sole fuoco o ...

Страница 93: ...lo a personale di servizio qualificato Per prevenire il rischio di shock elettrico non esponete il televisore a pioggia o umidità Non lasciate cadere o spingete oggetti negli slot e aperture del televisore Non lasciate cadere alcun tipo di liquidi su di esso Non bloccate i fori di ventilazione sul retro Un adeguata ventilazione è essenziale per prevenire guasti ai componenti elettrici ...

Страница 94: ...olo instabile Se dovesse cadere potrebbe causare serie ferite alle persone e danni al televisore stesso Quando il televisore non viene utilizzato per un lungo periodo di tempo è consigliabile scollegare il cavo di alimentazione dalla presa AC Distanze minime Se il televisore dev essere integrato in un mobile o in uno spazio chiuso devono essere mantenute le distanze minime Tra l apparecchio e l al...

Страница 95: ... o i riflessi sullo schermo possono causare affaticamento oculare Si raccomanda un illuminazione indiretta e soffusa per una visione confortevole Lasciate abbastanza spazio tra il televisore e il muro per permettere la ventilazione Evitate luoghi eccessivamente caldi per prevenire eventuali danni al cabinet o guasto prematuro dei componenti Non coprite le aperture di ventilazione quando utilizzate...

Страница 96: ...do sul sostegno 2 Fissate il fondo stringendo saldamente le viti sul sostegno NOTE DI INSTALLAZIONE Posizionate il televisore in una stanza dove la luce non colpisca direttamente lo schermo L oscurità totale o i riflessi sullo schermo possono causare affaticamento oculare Si raccomanda un illuminazione indiretta e soffusa per una visione confortevole Lasciate abbastanza spazio tra il televisore e ...

Страница 97: ...lla parte anteriore dello schermo per proteggerlo da qualunque danno 2 Rimuovete le viti dalla parte inferiore del televisore dove la base si collega al televisore e rimuovete il sostegno Conservatelo per un uso futuro 3 Utilizzate le quattro viti fornite per fissare il televisore su un braccio di sostegno a muro non incluso attraverso i quattro fori standard VESA sul retro del televisore ...

Страница 98: ... menù delle sorgenti in ingresso 2 MENU Visualizza il Menù principale 3 CH CH In modalità TV premete i tasti CH o CH per andare al canale successivo o precedente In modalità MENU premete CH o CH per selezionare gli oggetti In modalità standby accende il televisore 4 VOL VOL Controllo del volume audio In menù regola l oggetto selezionato 5 STANDBY STANDBY ...

Страница 99: ...ngresso 2 AUDIO L R Ingresso 3 Alimentazione DC Ingresso 4 YpbPr Ingresso 5 HDMI2 Ingresso 6 HDMI1 Ingresso 7 USB Ingresso 8 AUDIO PC Ingresso 9 COMMON IN INTERFACE CI Ingresso 10 SCART Ingresso 11 Ingresso VGA Ingresso 12 ANT Ingresso ...

Страница 100: ...volta che viene visualizzata l immagine se ci sono disturbi cambiate la modalità VGA in un altra risoluzione cambiate la frequenza di aggiornamento o regolate la luminosità e il contrasto sul menù fino a che l immagine risulta nitida COLLEGARE UN LETTORE DVD O UN VIDEOREGISTRATORE AL VOSTRO TELEVISORE Ci sono due modi per collegare un lettore DVD o un videoregistratore al vostro televisore Assicur...

Страница 101: ...Interface 1 Inserite la CAM correttamente quindi inserite la Smart Card nello slot CI posizionato sul lato del televisore Slot CI Slot CI CAM CAM Smart Card Smart Card 2 Accendete il televisore ed esso visualizzerà il messaggio sottostante se il modulo CA viene identificato Aspettate qualche momento perché la scheda si attivi 3 Premete il tasto MENU quindi premete il tasto per selezionare l opzion...

Страница 102: ...ilizzato per scambiare tra i canali della televisione digitali e le stazioni radio Visualizza rimuove le informazioni sul programma 23 TEXT televideo Per accedere od uscire dal TELEVIDEO 24 INFO Per visualizzare le informazioni sul canale in visione o per vedere informazioni aggiuntive sul programma quando appare la piccola schermata EPG in modalità DTV 25 SUBTITLE sottotitoli Per cambiare tra i d...

Страница 103: ...per vedere un altra pagina Se il contatore continua a cercare significa che quella pagina non è trasmessa Selezionate un altro numero ACCESSO DIRETTO AGLI OGGETTI I colori sono quelli visualizzati in fondo allo schermo I quattro tasti colorati sono utilizzati per accedere agli oggetti o alle pagine corrispondenti Le aree colorate lampeggiano quando l oggetto o la pagina non sono disponibili INDICE...

Страница 104: ...liere lingua e nazione e girare automaticamente i canali Dopo aver acceso lo schermo salterà al primo programma DTV 1 CHANNEL MENU menù canali Il primo oggetto del MENU è il channel menù menù canali solo per sorgenti TV o DTV Per ricercare e modificare i canali 1 Auto Tuning Sintonizzazione automatica Ricerca tutti i canali automaticamente voi potete seleziona ATV e DTV ...

Страница 105: ...po la sintonizzazione automatica il canale salterà al primo programma DTV 2 DTV Manual tuning Sintonizzazione manuale DTV Potete selezionare un canale DTV quindi trovare il programma in questo canale Premete per selezionare il canale quindi premete OK per ricercare il programma NOTA Basso Normale Buono indica l intensità del segnale 3 ATV Manual tuning Sintonizzazione manuale ATV Potete cambiare i...

Страница 106: ...ono essere di 25 lettere Move sposta Utilizzate i tasti freccia per selezionare il canale che volete spostare Quindi premete il tasto Giallo per selezionare la funzione Sposta Una volta attivato utilizzate i tasti freccia per spostare e quindi premete OK per confermare Skip salta Premete per scegliere il programma premete il tasto blu del televideo per saltare il programma Verrà visualizzato sul l...

Страница 107: ...TSC 2 Ci sono quattro modalità di temperatura colori che possono essere selezionate medio caldo freddo utente 3 Lo schermo è disponibile solo in modalità PC dove si può regolare la posizione orizzontale la posizione verticale la dimensione e la fase 3 SOUND MENU menù audio Il terzo oggetto del MENU è il SOUND MENU menù audio Potete regolare qui l effetto audio come alti bassi bilanciamento etc Pre...

Страница 108: ...5 OPTION MENU menù opzioni Il quinto oggetto del MENU è l OPTION MENU menù opzioni Potete regolare il Menu language lingua menù Audio language Lingua audio Subtitle language lingua sottotitoli etc Nel PVR File system menu menù file di sistema PVR potete impostare una scheda USB come PVR NOTA Ripristinare le impostazioni di fabbrica cancellerà tutti i programmi e le password 6 LOCK MENU menù blocco...

Страница 109: ...r vedere cos è trasmesso sul digitale terrestre DTV o sui canali radio durante la giornata Per accedere al menù EPG premete il tasto EPG verrà visualizzato il seguente menù 1 INFO Utilizzate per scegliere i programmi premete il tasto INFO potete visualizzare le informazioni del programma evidenziato 2 Schedule schema Premete il tasto giallo Può visualizzare la lista dello schema di promemoria prem...

Страница 110: ...vo sia disponibile Il Free Record Limit limite di registrazione libera è 6 ore se lo spazio sul disco è sufficiente Se lo spazio non è sufficiente il tempo di registrazione dovrebbe essere più breve a seconda dello spazio sul dispositivo Durante il controllo check PVR File System controllo del file di sistema PVR non effettuate altre operazioni fino a che non è finito Le registrazioni devono esser...

Страница 111: ...ezionate disco selezionate su quale disco salvare i file registrati Controllate il PVR File system file di sistema PVR controllate se il PVR File System è impostato sul dispositivo USB o no Format formattare ...

Страница 112: ...n High Speed Fs che può velocizzare la registrazione Il menù sottostante appare dopo la fine della Formattazione Se selezionate la modalità di formattazione Hi Speed FS allora potete cambiare la dimensione della differita 2 Registrare il programma ...

Страница 113: ...registrato sarà salvato nella cartella _MSTPVR sul dispositivo 1 La dimensione di archiviazione dell USB dev essere di una dimensione compresa tra 4GB e 500 GB 2 Il video potrebbe diventare pixellato quando il bit rate video è troppo basso 3 Non tutti i dispositivi USB sono compatibili Sotto trovate una lista dei Drive USB raccomandati I modelli che non sono qui elencati possono essere compatibili...

Страница 114: ...erita NOTA Il processo di formattazione impiegherà almeno 2 minuti Non spegnete l alimentazione o rimuovete il dispositivo USB durante la formattazione Durante la formattazione verrà fatto un test di velocità sul dispositivo USB Se fallisce significa che il dispositivo USB potrebbe non supportare la funzione differita Registrare un programma DTV in pausa in un dispositivo di archiviazione USB 1 Me...

Страница 115: ...USB dovrebbe essere 500MA Sotto trovate una lista dei Drive USB raccomandati I modelli che non sono qui elencati possono essere compatibili ma non è garantito SanDisk Extreme Contour USB Flash Drive 8GB SDCZ8 8192 E75 SanDisk Extreme Contour USB Flash Drive 16GB SDCZ8 016G A75 Kingston DataTraveler 410 USB 2 0 Flash Drive 8GB DT410 8GB Kingston DataTraveler 410 USB 2 0 Flash Drive 16GB DT410 16GB ...

Страница 116: ...rodurre il file a schermo intero Quando il file foto musica film o testo è in riproduzione premete il tasto OK o Info per visualizzare la barra di controllo Utilizzate il tasto per selezionare l icona funzione quindi premete OK per confermare la funzione Premete il tasto o EXIT per uscire dalla barra di controllo NOTA Potete regolare la traccia audio o il programma nel menù Info mentre riproducete...

Страница 117: ...onica auto moto luci fluorescenti Immagine normale Muto Volume controllate se il muto è attivato o se i collegamenti audio non siano corretti Nessuna immagine Muto La spina di alimentazione non è inserita il tasto di accensione non è attivo Impostazioni contrasto luminosità e volume Premete il tasto standby sul telecomando per controllare Nessun colore Audio normale Controllo Colore L immagine è s...

Страница 118: ...ratura di lavoro 5 C 35 C Umidità di lavoro 20 80 Temperatura di immagazzinamento 15 C 45 C Umidità di immagazzinamento 5 90 Accessori Manuale dell utente Telecomando Batterie x2 Guida rapida all avvio La specifica delle parti di questo televisore qui fornita è solo per riferimento Potrebbero verificarsi differenze via via che la tecnologia del prodotto viene aggiornata Il progetto e le specifiche...

Страница 119: ...G_DM OTG_DP1 OTG_DM1 IRIN ISP TXD ISP RXD AV1 Rin AV1 Lin HD1L HD1R VGA_AR VGA_AL MUX_AR MUX_AL AMP Rout AMP Lout AUOUTL1 AUOUTR1 SPDIF_O SCART_AV DVD_AV SIDE_AV REAR_AV CVBS_OUT POWERON OFF CLASS_EN PCM_RESET PCM_CE_N PCM_WE_N PCM_CD_N PCM_WAIT_N PCM_IOWR_N PCM_REG_N LCDON BKLON PCM_OE_N PCM_IORD_N PCM_IRQA_N TSCLK TSVALID TSSTART TS_D 7 3 TS_CLK TS_MOVAL TS_MOSTART IF_OUT IF_OUT IF_AGC RF_AGC VI...

Страница 120: ...TNL 23 PGND 24 OUTPL 25 BSPL 26 PVCCL 27 PVCCL 28 PVCCR 16 NC 13 PBTL 14 PVCCR 15 GND 29 R368 NC 15K R368 NC 15K R311 NC 0R R311 NC 0R R304 NC 10K R304 NC 10K C183 NC 1uF C183 NC 1uF C224 NC 1000P C224 NC 1000P R312 0R R312 0R R298 NC R298 NC R334 1K R334 1K C215 NC 100nF C215 NC 100nF C188 0 1uF C188 0 1uF C211 NC 1uF C211 NC 1uF R341 NC 0 22uF R341 NC 0 22uF C223 1000pF C223 1000pF R375 NC 22K R...

Страница 121: ...n R51 10K R51 10K C45 4 7uF 1206 C45 4 7uF 1206 C53 1uF C53 1uF R32 NC 150R R32 NC 150R C26 47n C26 47n R41 75R R41 75R PBINO PBIN PBIN PBIN PBIN YIN YIN YIN YIN YIN YIN YIN YIN YIN YIN YIN YIN YIN YIN YIN YIN YIN YIN YINO PRINO DVD_AVIN IRIN VSYNC HD1RIN HD1LIN DVD_AR DVD_AL DVD ON OFF PBIN YIN DVD_AVIN HD1RIN PRIN PRIN BAIN AV1 GAIN RAIN DVD_AV GRED GRED GRED GRED GRED GRED GGRN GGRN GGRN GGRN G...

Страница 122: ...9mA 5 04V POWER FOR ATV TUNER PAL DVB T SYSTEM RF Input Port Vdd_RF_VCO_LO_3V Put on digital GND plane 301RF V7 MM 301RF V8 Pin 1 RS5 0 DNP Pin 1 RS7 DNP 0 75 ohm Line LNA GND Important Analog GND and digital GND is still separate but through Paddle GND connecting them Vdd_IO CLOSE IC Close Silicon Tuner R131 10K R131 10K C113 47nF C113 47nF R146 NC 390R R146 NC 390R CS20 NC 2 2uF CS20 NC 2 2uF RS...

Страница 123: ...5 MIUA_BA2 MIUA_A7 MIUA_A3 MIUA_A1 MIUA_A12 MIUA_A9 MIUA_A10 MIUA_DQS0 MIUA_DQS0B MA_DQS0 MA_DQSB0 MIUA_DQS1 MIUA_DQS1B MA_DQ15 MA_DQ8 MA_DQ10 MA_DQ13 MIUA_DQ 0 15 MIUA_DQ11 MIUA_DQ12 MIUA_DQ9 MIUA_DQ14 MA_DQ11 MA_DQ12 MA_DQ9 MA_DQ14 MA_DQ6 MA_DQ1 MA_DQ3 MA_DQ4 MIUA_DQ6 MIUA_DQ1 MIUA_DQ3 MIUA_DQ4 MIUA_DQ7 MIUA_DQ0 MIUA_DQ2 MIUA_DQ5 MA_DQ5 MA_DQ2 MA_DQ7 MA_DQ0 MIUA_DQ15 MIUA_DQ8 MIUA_DQ10 MIUA_DQ13...

Страница 124: ...0PIN J20 2 20PIN GND 1 GND 2 RO0 3 RO0 4 RO1 5 RO1 6 RO2 7 RO2 8 ROC 9 ROC 10 RO3 11 RO3 12 RO4 13 RO4 14 GND 15 GND 16 RE0 17 RE0 18 RE1 19 RE1 20 RE2 21 RE2 22 REC 23 REC 24 RE3 25 RE3 26 RE4 27 RE4 28 GND 29 GND 30 LCDOP 31 GND 32 VCC 33 VCC 34 VCC 35 VCC 36 VCC 37 VCC 38 OP1 39 OP2 40 R222 10K R222 10K C275 0 1u C275 0 1u C304 NC C304 NC 7 5 3 1 8 6 4 2 RP7 22RX4 7 5 3 1 8 6 4 2 RP7 22RX4 C274...

Страница 125: ......

Отзывы: