background image

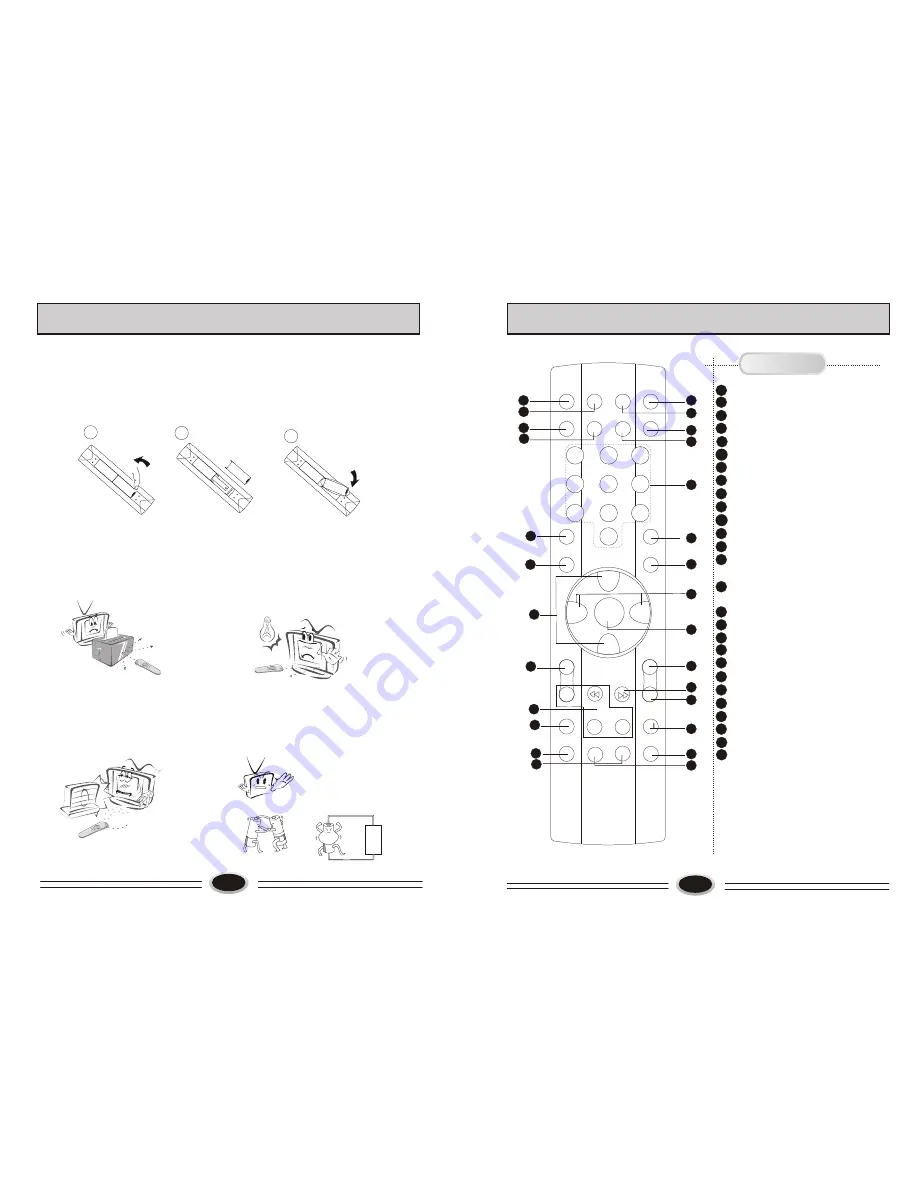
REMOTE CONTROLLER PANEL

1

2

3

4

7

8

9

11

12

13

14

15

16

17

18

20

21

23

22

24

10

25

19

5

6

11

Power button
Mute button
TV/AV switch button
Display button
Dynamic AAA HDTV on/off button
PIP function on/off button
PIP main/sub picture switch button
PIP sound selection button
One digit selection button
Program recall button
Child lock button
Picture mode selection button
Sound mode selection button
Program up/down button, direction 
selection button
Volume up/down button, direction 
selection button
Menu call/selection button
Color system selection button
Sound system selection button
Program scan button
Picture still button
This function is not available
Picture size selection button
Sleep timer button
This function is not available

Buttons and Descriptions

26

8

27

5

8

9

10

1

2

3

4

5

6

7

8

9

0

=

HYF-35R

1

3

7

2

6

4

PIP

AAA

25

24

23

22

21

20

19

18

17

16

15

14

13

12

11

MUTE

TV/AV

SOUND POWER

MAIN/SUB

DISPLAY

CHILD LOCK

P.STD

RECALL

S.STD

CH+

CH-

VOL-

VOL+

MENU

C.SYS

S.SYS

STILL

SCAN

BACK

ZOOM

SLEEP 

SIZE

27

26

I-II

6

PREPARATION FOR REMOTE CONTROLLER

3

2

1

+

+

Remote control installation

1. According to the figure display below, place the remote controller with face down,  
    then open the cover of  battery apartment. 
2. As in the figure display below, install two AA batteries. (The + and - symbol of 
    battery must match with the marks on the remote).
3.Close the cover of battery apartment.

Cautions for using remote controller
Confirm there is no object between the
remote controller and the remote sensor
of TV set.

Sunshine or other strong light will 
interfere the signal sent by the remote
controller. In this situation turn the TV
set to avoid the direct light source.

Do not put the remote controller in 
direct heat or a damp place, or 
potential damage to the remote may 
occur.

Please use two AA  1.5V batteries.
Do not mix battery types.
Install the batteries as the correct 
polarities.
Do not use the rechargeable batteries.

Содержание L37A8A-A1

Страница 1: ...L37A8A A1 L40A8A A1 L37A8A A1 L40A8A A1 LCD COLOR TELEVISION OPERATING INSTRUCTIONS Wide view angle display high contrast AAA function HDMI input 01 0090508732 Made In China ...

Страница 2: ...audio and video equipment connection 19 Using your TV as a computer display 20 Specifications 21 Trouble shooting guide 22 2 WARNING AND CAUTION CAUTION TO REDUCE THE RISK OF ELECTRIC SHOCK DO NOT REMOVE COVER OR BACK NO USER SERVICEABLE PARTS INSIDE FOR ANY PROBLEM REFER SERVICING TO QUALIFIED SERVICE PERSONNEL THERE IS A LIGHTNING ARROW SYMBOL IN THE TRIANGLE THIS SYMBOL INDICATES HIGH VOLTAGE I...

Страница 3: ... at once then contact with the registered electrical service person to repair 3 WARNING AND CAUTION 4 Do not use or store the flammable material or it will cause explosion or fire Do not place near the damp wall or it will cause fire The antenna of this TV set is far away from power supply wire in order to avoid touching each other when the wind blows and cuts off the wire Or it will cause electri...

Страница 4: ... 5 7 9 10 8 6 3 HDMI 12 L AUDIO OUT R AV2 L AUDIO2 IN R AV OUT L AUDIO IN R AV1 L AUDIO1 IN R 6 BASE DISASSEMBLY ASSEMBLY METHOD 1 As figure removing the four M4 20 screws the base will be disassembled 2 As figure mounting the four M4 20 screws the base will be assembled Note The arrow indicates the position of screw Complete set Power indicator Remote sensor Power button Program down up button Vo...

Страница 5: ...R 1 3 7 2 6 4 PIP AAA 25 24 23 22 21 20 19 18 17 16 15 14 13 12 11 MUTE TV AV SOUND POWER MAIN SUB DISPLAY CHILD LOCK P STD RECALL S STD CH CH VOL VOL MENU C SYS S SYS STILL SCAN BACK ZOOM SLEEP SIZE 27 26 I II 6 PREPARATION FOR REMOTE CONTROLLER 3 2 1 Remote control installation 1 According to the figure display below place the remote controller with face down then open the cover of battery apart...

Страница 6: ...RATION TRANSPARENCY SCREEN DISPLAY 10 For your convenient operation and in order to know the TV set we offer the below menus Picture setting menu Sound setting menu Menu setting menu Function setting menu Source setting menu PICTURE MODE PERSONAL CONTRAST BRIGHTNESS SATURATION TINT SHARPNESS NOISE REDUCE SIZE MODE STRONG FULL PICTURE MOVE SELECT MENU EXIT PICTURE SOURCE TV PIP MODE OFF SUB PICTURE...

Страница 7: ...s normal it will recover after finishing searching CURRENT CHANNEL 10 SKIP OFF TARGET CHANNEL 10 EXCHANGE AFC OFF FINE TUNE SEARCH NEXT 471 2MHZ SOURCE MOVE SELECT MENU EXIT TV PROGRAM SETTING TV PROGRAM SETTING 12 CURRENT CHANNEL 10 SKIP OFF TARGET CHANNEL 10 EXCHANGE AFC OFF FINE TUNE SEARCH NEXT 471 2MHZ SOURCE MOVE SELECT MENU EXIT CURRENT CHANNEL 10 SKIP OFF TARGET CHANNEL 10 EXCHANGE AFC OFF...

Страница 8: ...TTING IMAGE CONTROL SET YOUR FAVOURITE PICTURE MODE MOVE SELECT MENU EXIT SOUND SOUND SOURCE MAIN SOUND MODE NEWS BALANCE EQUALIZER PICTURE MODE SOUND MODE SELECTION 14 0 移动 选择 菜单 退出 0 TRANSPARENCY 63 50 75 100 300 1K 3K 5K 10K 15K LANGUAGE ENGLISH H POSITION V POSITION DURATION TRANSPARENCY OSD MOVE SELECT MENU EXIT MOVE SELECT MENU EXIT MOVE SELECT MENU EXIT Press P STD button on the remote cont...

Страница 9: ...NG SLEEP TIMER SETTING PIP SETTING 16 This TV set support PIP function it can display picture of two sources at the same time 1 Press MENU button to select source menu 2 Select PIP mode use VOL button to select P1S1 P1S2 P2S1 P2S2 P3S1 P3S2 P4S1or P4S2 mode open PIP function 3 Select PICTURE SOURCE use VOL button to change the input source of main picture such as TV AV1 AV2 and so on 4 Select SUB ...

Страница 10: ...CTION 18 HDMI The HDMI logo and High Definition Multimedia Interface is a trademark or registered trademark of HDMI Licensing This TV can receive the High Definition Multimedia Interface HDMI This TV supports HDCP High bandwidth Digital Contents Protection Protocol for 720x480p 1280x720p and 1920x1080i resolution When you connect this TV with a source device DVD player Set Top Box or PC supporting...

Страница 11: ...LAY button in DVD to broadcast At this time the image programs in DVD will broadcast in TV set DTV input 1 Component terminal Y PbCb PrCr connect to the component output of picture output device such as DVD HDTV TUNER and so on the sound is input from AUDIO IN 2 Press TV AV button to select HDTV mode 3 Press PLAY button on the external device to start watching HDMI input 1 Connect HDMI signal sour...

Страница 12: ...fore you call for service Picture with Snow No Color No Picture Normal Disturb Double or Triple Image Noise Normal Noise No Sound No Sound Normal Volume Normal or Weak Volume Scramble 3 Do not let the TV set stay on a static images as this can lead to permanent residual images If this situation occurs the TV set may recover normal automatically after 12 hours if you switch the TV set to dynamic pr...

Отзывы: