background image

11-Installation

NZ   AU

31


Note: Keep in safe place

Keep all parts of the transport protection in a safe place for later use.Whenever the 

appliance is to be moved at first reinstall the protection parts.

This appliance is intended to be used in household and similar applications such as:

– staff kitchen areas in shops, offices and other working environments;

– farm houses;
– by clients in hotels, motels and other residential type environments;
– bed and breakfast type environments;

– areas for communal use in blocks of flats or in launderettes.

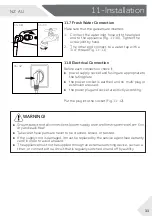
11.5 Aligning the appliance

Adjust


all


feet


(Fig.


11-6)


to


achieve


a


complete


level


position.


This


will


minimize


vibrations


and


thus


noise


during


use.


It


will


also


reduce wear


and


tear.


We


recom-

mend


to


use


a


spirit


level


for


adjustment.


Floor


should 

be as stable and  at as possible.

1. Loose the locknut (1) by using a wrench.
2. Adjust the high by turning the foot (2).
3. Tighten lock ut (1) against the housing.

11.4 Moving the appliance

If


the


machine


is


to


be


moved


to


a


distant


location,


replace


the


transportation


bolts


removed 

before installation to prevent damage: The assembly takes place in reverse order.

11-6

Содержание HWD1050AN1

Страница 1: ...HWD9050AN1 Washer dryer HWD1050AN1 Washer dryer NZ AU ...

Страница 2: ...urchasing a Haier Product Please read these instructions carefully before using this appliance The instructions con tain important information which will help you get the best out of the appliance and ensure safe and proper installation use and maintenance Keep this manual in a convenient place so you can always refer to it for the safe and proper use of the appliance If you sell the appliance giv...

Страница 3: ...tdescription 9 3 Control panel 10 5 Programmes 15 6 Consumption 16 7 Daily use 17 8 Eco friendly washing 22 9 Care and cleaning 23 10 Troubleshooting 26 11 Installation 30 12 Technical data 34 13 Customer service 35 4 Wi Fi connection Remote mode 14 ...

Страница 4: ...perate the machine with wet hands or with bare feet to allow any moisture or dampness to evaporate Do not place dripping wet clothing on top of the appliance as it may create an electrical hazard Do not use or store detergent or dry cleaning agent in close vicinity to the appliance Donotuseany spraysinclosevicinitytotheappliance Do not wash any garments treated with solvents in the appliance witho...

Страница 5: ...taking ant routine maintenance and disconnect the appliance Never stop a tumble dryer before the end of the drying cycle unless all items are quickly removed and spread out so that the heat is dissipated Daliy Use ...

Страница 6: ...es such as cooking oil acetone alcohol petrol kerosene spot removers turpentine waxes and wax removers should be washed in hot water with ab extra amount of detergent before being dried in the appliance Items such as foam rubber latex foam shower caps waterproof textiles rubber backed articles and clothes or pillows fitted with foam rubber pads should not be dried in the appliance If it is unavoida...

Страница 7: ... on and off by a utility Install the appliance in a well ventilated dust free environment Makesurethattheelectricalinformationontheratingplateagrees withthepowersupply Ifitdoesnot contactanelectrician e g The appliance must not be installed behind a lockable door sliding door or a door with a hinge on the opposite side to the of the appliance in such a way that a full opening of the appliance door ...

Страница 8: ...rechangedevery5years WARNING Failuretodosomayresultinafloodanddamagetoproperty Servicing Disposal AdamagedelectricalcablemustbereplacedbyaHaierservice technicianorsimilarlyqualifiedperson Donotusetheapplianceuntil ithasbeenrepaired Watersupplyrequirements Inletwaterpressure Max 1MPa Xpsi Min 0 05MPa Xpsi Inletwaterflowrate Min 0 15litres minute Apressure reducingvalvemustbeinstalledifpressureishigher...

Страница 9: ...plugs Drain hose bracket User manual Warranty card Noisereduc tionpads 2x 2x 7 6 T1 T2 T3 S1 S2 S6 S4 T4 1 3 4 2 6 5 1 Transportation bolts T1 T4 2 Back cover 3 Back cover screws S1 S6 4 Power cord 5 Water inlet valve 6 Drain hose S3 S5 3 1 4 2 5 Durable Wool Wash Delicate Synthetic Cotton Bulky Allergy Express 15 Rinse Spin Drum Clean Sense Dry Time Dry 30 Care Options Spin Speed Dry Level Temp D...

Страница 10: ...on and the APP will be displayed on the screen to turn on the network function 3 1 Power button Eco 40 60 Refresh Cotton 20 C Delicate Dry Baby Care Shirt Quick 15 Self clean Wool 1 6 5 4 3 2 Power button Programme selector Display Detergent softener drawer Function buttons Start Pause button 6 Durable Wool Wash Delicate Synthetic Cotton Bulky Allergy Express 15 Rinse Spin Drum Clean Sense Dry Tim...

Страница 11: ...s not enough to complete the cycle will flash every second To set up level detergent The Smart Dose function dispenses the right amount of detergent for the clothes according to the weigh and load type The default setting is D 3 which is the average amount of detergent needed to launder a medium soiled load There are 3 additional levels that allow to change the way the washer calculates the volume ...

Страница 12: ...ng soak for your mixed daily loads in a normal wash action Use the Extra Rinse to rinse the laundry more intense with fresh water This is recommended for people with sensitive skin Extra Rinse UV Sanitise 3 13 3 5 5 UV Sanitise button Touch this button Fig 3 13 the ultraviolet light turns on during wash and rinses UV Sanitisation is by default ON in the Allergy programme Temp 3 14 3 5 6 Temp butto...

Страница 13: ...utton Press this button Fig 3 16 gently to start or inter rupt the current programme During pro gramme setting and during programme run the LED above the button is shining or if interrupted blinking 3 16 This function drying time can not be selected 30 60 90 120 3 18 3 9 Add clothes halfway When the program is running long press the start stop button for 3S the Add will be displayed and the door w...

Страница 14: ...r co nz smart 2 Register and create an account 3 Add your appliance and set up the Wi Fi connection Connecting to your home Wi Fi When your machine is connected to Wi Fi successfully the icon lights up 4 1 Dry On Off SpinSpeed 1 Press and hold Dry On Offf and Spin speed combination keys for three seconds and the icon lights up Remote Mode is now enabled certain functions that your washer can now be...

Страница 15: ...cs type Dry level HWD1050AN1 Yes º Optional No Cotton 10 5 3 5 5 to 90 20 Cotton 1400 Synthetic or mixed fabric 1400 Synthetics to 60 30 10 to 90 30 Delicate laundry and silk 1400 10 Durable Bulky 1000 Cotton Synthetic Cotton Synthetic Rinse Spin Delicate 2 5 600 to 30 30 1000 1 Machine washable fabric made of wool or with wool content Wool Wash 800 5 Time Dry 30 Sense Dry 10 Non fragile fabric 1 ...

Страница 16: ...e the detergengt first and pour the dissolved detergent into the machine when the main wash starts The washing operation starts at the end of the first water filling The warm wash eco cycle Cotton Dry Off and Smart Dose Off 40 1400rpm others are default setting is the recommended cycle for a normally soiled load equal to the rated load capacity 10kg Actual water temperature may differ from declared cycl...

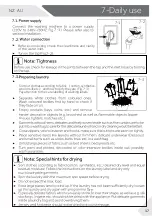
Страница 17: ...2 7 3 7 3 7 2 7 1 Before connecting check the cleanliness and clarity of the water inlet Sortoutclothesaccordingtofabric cotton synthetics woolorsilketc andhowtodirtytheyare Fig 7 3 Payattentiontothecarelabellingofwashinglabels tis machine ...

Страница 18: ...dryingpossible normal temperature Tumbledryingpossible lower temperature Do not tumble dry Line drying Flat drying Ironing Iron at a maximum temperature up to 200 C Iron at a medial tem perature up to 150 C Iron at a low temper ature up to 110 C withoutsteam steam ironing may cause irre versibledamage Do not iron Professional Textile Care Dry cleaning in tetra chloroethene Dry cleaning in hy droca...

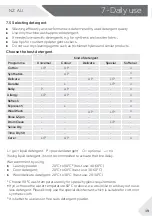
Страница 19: ...no If using liquid detergent it is not recommendedto activate the time delay We recomment by using Laundry powder 20 C to 90 C best use 40 60 C Color detergent 20 C to 60 C best use 30 60 C Wool delicate detergent 20 C to 30 C best use 20 30 C Choose 90 C wash temperature only for special hygienic requirements If you choose the water temperature 60 C or above we would like to advise you to use les...

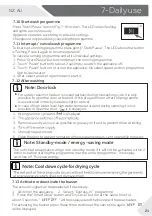
Страница 20: ...elect a programme type Turn the programme knob Fig 7 6 to select the right programme Related programme LED lights up and the default settings are displayed 7 5 7 6 Note Odour removal amount of detergent in washing agent compartment 2 or special Cotton 90 C 600rpm cleaner to remove possib machine ly corruptive residues 7 7 Touch the Power button to switch on the appliance Fig 7 5 The LED of the Sta...

Страница 21: ...Note Door lock Note Standby mode energy saving mode The switched on appliance will go into standby mode if it will not be activated within 2 7 10 Start wash programme ashing and lights up continuously Appliance operates according to present settings Changesareonlypossiblebycancellingtheprogramme 7 11 Interrupt cancel wash programme 7 8 Touch Power button to turn on the appliance No select speed an...

Страница 22: ...arance above laundry For slightly soiled laundry select the Express 15 programme Apply exact dosages of each washing agent Raise default settings only due to heavy staining To achieve best use of energy water detergent and time you should use the recommended maximum load size Choose the lowest adequate washing temperature modern detergents are efficiently cleaning below 60 C ...

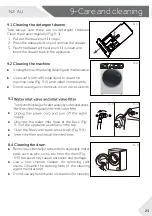
Страница 23: ... as on the tap 8 4 Cleaning the drum Remove accidentally washed items especially metal parts such as pins coins etc from the drum Fig 9 5 because they cause rust stains and damage Use a non chloride cleaner for removing rust stains Observe the warning hints of the cleaning agent manufacturer 9 5 9 2 9 1 9 4 9 3 9 3 9 4 Durable Wool Wash Delicate Synthetic Cotton Bulky Allergy Express 15 Rinse Spin...

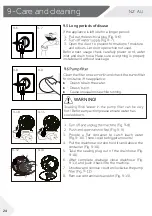
Страница 24: ...g 9 9 3 Provide a at container to catch leach water Fig 9 10 There could be bigger amounts 4 Pull the drainhose out and hold its end above the container Fig 9 10 5 Take the sealing plug out of the drainhose Fig 9 10 6 After complete drainage close drainhose Fig 9 11 and push it back into the machine 7 Unscrewandremovecounterclockwisethepump 8 Remove contaminants and dirt Fig 9 13 WARNING hot Befor...

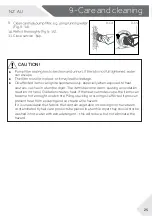
Страница 25: ...n the oil Oxidation creates heat If the heat cannot escape the items can become hot enough to catch fire Piling stacking or storing oil affected items can prevent heat from escaping and so create a fire hazard If it is unavoidable that fabrics that contain vegetable or cooking oil or have been contaminated by hair care products be placed in a tumble dryer they should first be washed in hot water with ...

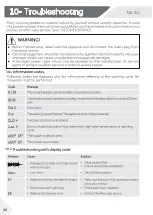
Страница 26: ...10 Troubleshooting NZ AU 26 10 1 10 2 ...

Страница 27: ...10 Troubleshooting NZ AU 27 10 3 ...

Страница 28: ...chineloadandlaundry andrunaspinningprogrammeagain Unsatisfactorywashing result Insolubleparticlesofdetergentcan remainaswhitespotsonthelaundry Should the error messages reappear even after the taken measures switch off the appliance disconnect the power supply and contact the customer service ...

Страница 29: ...10 Troubleshooting NZ AU 29 10 4 10 1 10 1 The current programme and its setting will be saved When power supply is restored operation will be resumed ...

Страница 30: ...the washing machine cabinet as shown in Figure 3 two longer pads in position 1 and 3 two shorter pads in position 2 and 4 Finally set the machine upright again 11 3 Dismantle the transportation bolts The transportation bolts are designed for clamping anti vibration components inside the appliance during transportation to prevent inner damage 1 2 Remove all 4 bolts on the rear side and take out pla...

Страница 31: ...ronments areas for communal use in blocks of flats or in launderettes 11 5 Aligning the appliance Adjust all feet Fig 11 6 to achieve a complete level position This will minimize vibrations and thus noise during use It will also reduce wear and tear We recom mend to use a spirit level for adjustment Floor should be as stable and at as possible 1 Loose the locknut 1 by using a wrench 2 Adjust the hi...

Страница 32: ...uously drain while being lled self siphoning Drain hose is not to be extended If necessary contact after sales service 11 6 3 Drain hose to sink connection The junction must lie above the siphon A spigot connection is usually closed by a pad A That must be removed to prevent any disfunction Fig 11 9 Secure the drain hose with a clamp 11 6 Drain Water Connection Fix the water drain hose properly to...

Страница 33: ...inserted 1 Connect the water inlet hose with the angled end to the appliance Fig 11 10 Tighten the screw joint by hand 2 The other end connect to a water tap with a 3 4 thread Fig 11 11 11 10 11 11 WARNING dry and leack free Take care these parts are never to be crushed kinked or twisted If the supply cord is damaged it must be replaced by the service agent see warranty card in order to avoid a ha...

Страница 34: ...e The exact height of your washer is dependent on how far the feet are extended from the base of the machine The space where you install your washer needs to be at least 40mm wider and 20mm deeper than its dimensions TOP VIEW L L A W FRONT VIEW A B HWD1050AN1 B Overall width of product mm A Overall height of product mm C Overall depth of product Overall depth of product To main control board size ...

Страница 35: ...claim To contact our Service ensure that you have the following data available The information can be found on the rating plate Model ____________________ Serial No _____________________ Also check the Warranty Card supplied with the product in case of warranty contact our Customer Care Centre according to For more information please refer to www haier com Warranty Card ...

Страница 36: ...0020507792AV ...
Отзывы: