


9-Installation
●
Followi
●
ng connections are possible:
9.6.1 D
●
rain hose to sink
edge
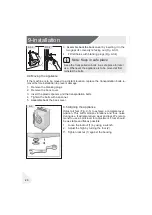
Protect the U-support sufficiently against slipping.
●
Hang the drain hose with the U-support over the
of a sink with adequate size (Fig. 9-6.1).
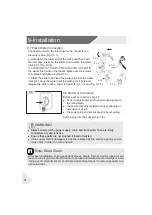
9.6.2 Drain hose to waste water connection
The internal diameter of the stand pipe with
vent-hole must be minimum 40 mm.
Put the drain hose for approx. 80 mm in the waste
Attach the U-support and secure it sufficiently
water pipe.
(Fig. 9-6.2).
9-6.2
9-6.1
9.6 Drain Water Connection
Fix the water drain hose properly to the piping. The hose has to reach at one point
a height between 80 and 100 cm above the appliance bottom line!
WARNING!
O
Never reuse old hose sets!
Use only the supplied hose set for the connection.
nly connect to cold water supply.
Before connection, check whether the water is clean and clear.
C
●
AUTION!
D
The Drain hose should not be submerged in water and should be securely fixed
and leak-free. If the drain hose is placed on the ground or if the pipe is at a height
of less than 80 cm, the washing machine will continuously drain while being filled
(self-siphoning).
rain hose is not to be extended. If necessary contact after sales service.
9.6.3 Drain hose to sink connection
The junction must lie above the siphon
A spigot connection is usually closed by a pad (A).
That must be removed to prevent any disfunc
tion (Fig. 9-6.3).
Secure the drain hose with a clamp.
9-6.3
30
If possible always keep drain hose fixed to the clip at the back of the appliance.
Содержание HW100-BDV14979S8U1
Страница 1: ...User manual W ashing machine HW100 BDV14979S8U1 ...
Страница 34: ...11 After sale service 33 ...
Страница 35: ...11 After sale service 34 ...
Страница 37: ......
Страница 38: ......
Страница 39: ......
Страница 40: ...0020509929 ...