background image

23

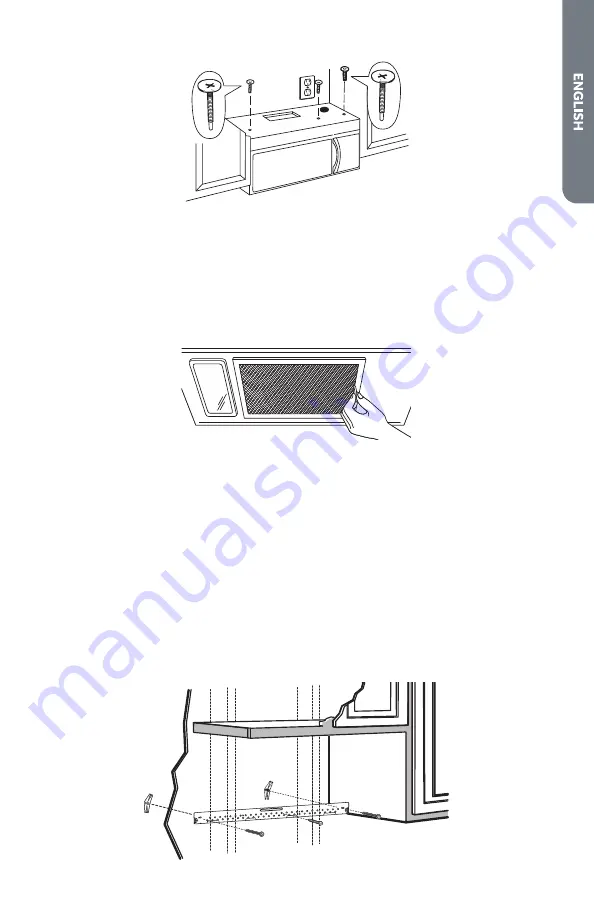
7.  Tighten center screw completely.
8.  Tighten the outer two screws to the top of the microwave oven. (While 

tightening screws, hold the microwave oven in place against the wall and the top 

cabinet).

Install grease filters. 
For instructions, see the User Manual packed with the microwave.

METHOD C - RECIRCULATING (NON-VENTED, DUCTLESS)

IMPORTANT:

• 

Make sure the screws for the blower motor and blower plate are securely 

tightened when they are reinstalled. This will help to prevent excessive vibration.

• 

Make sure the motor wiring has been properly routed and secured, and that the 

wires are not pinched.

Attach the mounting plate to the wall using toggle bolts. 
NOTE:
 At least one wood screw must be used to attach the plate to a wall stud.
1.  Remove the toggle wings from the bolts.
2.   Insert the bolts into the mounting plate through the holes designated to go into 

drywall and reattach the toggle wings onto each bolt.

Содержание HMV1652

Страница 1: ...Microwave Oven Four Micro Onde Horno Microondas Installation Instructions Instructions d installation Instrucciones De Instalación HMV1652 Part 0570000005 ...

Страница 2: ......

Страница 3: ...l or Replace Charcoal Filter 27 Step 7 Complete Installation 28 RECORD KEEPING Thank you for purchasing this Haier product This user manual will help you get the best performance from your new microwave For future reference record the model and serial number located on the inside frame of the microwave and the date of purchase Staple your proof of purchase to this manual to aid in obtaining warran...

Страница 4: ...e safety alert symbol and either the word DANGER WARNING or CAUTION These words mean An imminently hazardous situation You could be killed or seriously injured if you don t immediately follow instructions A potentially hazardous situation which if not avoided could result in death or serious bodily injury A potentially hazardous situation which if not avoided may result in moderate or minor injury...

Страница 5: ...ibility of electric shock hazard from this appliance You should have the wall receptacle and circuit checked by a qualified electrician to make sure the receptacle is properly grounded Where a standard two prong wall receptacle is encountered it is very important to have it replaced with a properly grounded 3 prong wall receptacle installed by a qualified electrician Do not under any circumstances...

Страница 6: ...acked Grease Filters Exhaust Adaptor Glass Tray Turntable Ring TOOLS AND MATERIALS NEEDED Phillips Screwdriver Pencil Ruler or Tape Measure and Straight Edge Carpenter Square optional Tin Snips for cutting damper if required Scissors to cut template if necessary Electric Drill with 3 16 1 2 and 5 8 drill bits Filler blocks or scrap wood pieces if needed for top cabinet spacing used on recessed bot...

Страница 7: ...r more from the cooking surface NOTES The space between the cabinets must be 30 76 2 cm wide and free of obstructions If you are going to vent the microwave oven to the outside see Install Microwave Oven for exhaust and duct preparation When installing the microwave oven beneath smooth flat cabinets be careful to follow the instructions on the top cabinet template for power cord clearance ...

Страница 8: ...an and conform to the National Electrical Code or the prevailing local code GROUNDING INSTRUCTIONS For all cord connected appliances The microwave oven must be grounded In the event of an electrical short circuit grounding reduces the risk of electric shock by providing an escape wire for the electric current The microwave oven is equipped with a cord having a grounding wire with a grounding plug ...

Страница 9: ...ions filters glass tray and the small hardware bag Do not remove the foam packaging from the front of the oven 3 Fold back all four carton flaps fully against carton sides Then carefully roll the oven and carton over onto the top The oven should be resting in the foam packaging a b a Styrofoam b Carton 4 Pull the carton up and off the oven 5 Cut the middle of plastic bag to remove the mounting pla...

Страница 10: ... center by probing the wall with a small nail to find the edges of the stud Then place a mark halfway between the edges The center of any adjacent studs should be 16 40 6 cm or 24 61 cm from this mark 3 Draw a line down the center of the studs STEP 3 PREPARE OVER MICROWAVE CABINET Overhead cabinet styles vary Follow the instructions that apply for the cabinet style in your home IMPORTANT Disconnec...

Страница 11: ...ill a 3 16 hole for wood screws For holes that do not line up with a stud drill 5 8 holes for toggle bolts DO NOT INSTALL THE MOUNTING PLATE AT THIS TIME 4 Remove the template from the rear wall 5 Review the Installation Instruction book for your installation situation Locate and mark holes to align with holes in the mounting plate IMPORTAN T LOCATE AT LEAST ONE STUD ON EITHER SIDE OF THE CENTERLI...

Страница 12: ...S REAR WALL TEMPLATE This Rear Wall Template serves to position the bottom mounting plate and to locate the horizontal exhaust outlet 1 Use a level to check that the template is positioned accurately 2 Locate and mark at least one stud on the left or right side of the centerline It is important to use at least one wood screw mounted firmly in a stud to support the weight of the microwave Mark two ...

Страница 13: ...D IMPORTANT This microwave oven is shipped assembled for Recirculating Installation however it is designed for adaptation to the following methods of ventilation Select the ventilation method required for your installation and follow the instructions specific to your method Method A Outside Top Exhaust Vertical Duct a a Adaptor in place for Outside Top Exhaust Method B Outside Back Exhaust Horizon...

Страница 14: ...m the bolts 2 Insert the bolts into the mounting plate through the holes designated to go into drywall and reattach the toggle wings onto each bolt 3 Place the mounting plate against the wall and insert the toggle wings into the holes in the wall to mount the plate NOTE Before tightening toggle bolts and wood screw make sure the tabs on the mounting plate touch the bottom of the cabinet when pushe...

Страница 15: ...wave in its upright position with the top of the unit facing up 2 Remove the screw that holds the blower plate to the microwave 3 Remove and save the screw holding the blower motor to the microwave a c b a Blower Plate b Back of Microwave c Blower Motor Screw 4 Carefully pull out the blower unit The wires will extend far enough to allow you to adjust the blower unit b a c a End A b End B c Back of...

Страница 16: ...he guides of the blower plate 10 Push in firmly until the exhaust adapter is in the locking tabs Ensure that the damper hinge is installed so that the damper swings freely c a b d a Guide b Adapter c Back of Microwave d Locking Tab Check for proper damper operation 1 Make sure the tape securing the damper is removed and the damper pivots easily before mounting the microwave 2 Make adjustments to e...

Страница 17: ... Keep the power cord tight while mounting the oven NOTE If the overhead cabinet is metal use the nylon grommet around the power cord hole to avoid cutting the power cord 2 Using two or more people lift the microwave tilt it forward and hook slots at back bottom edge onto four lower tabs of mounting plate 3 Rotate front of oven up against cabinet bottom 4 Insert a self aligning screw through top ce...

Страница 18: ...abinet 6 Insert 2 self aligning screws through outer top cabinet holes Turn two full turns on each screw 7 Tighten center screw completely Adjust the exhaust adaptor 1 Open the overhead cabinet and then adjust the exhaust adaptor to connect to the house duct a b c d a Blower Plate b Damper c Back of Microwave d For Front to Back or Side to Side Adjustment Slide the Exhaust Adaptor as Needed ...

Страница 19: ... horizontal exhaust outlet 1 Use a level to check that the template is positioned accurately 2 Locate and mark at least one stud on the left or right side of the centerline It is important to use at least one wood screw mounted firmly in a stud to support the weight of the microwave Mark two additional evenly spaced locations for the supplied toggle bolts 3 Drill holes in the marked locations Wher...

Страница 20: ...ounting plate through the holes designated to go into drywall and reattach the toggle wings onto each bolt 3 Place the mounting plate against the wall and insert the toggle wings into the holes in the wall to mount the plate NOTE Before tightening toggle bolts and wood screw make sure the tabs on the mounting plate touch the bottom of the cabinet when pushed flush against the wall and that the pla...

Страница 21: ...emplate Drill holes for the top support screws Drill a hole large enough for the power cord to fit through Drill a cutout large enough for the exhaust adaptor Adapt microwave blower for outside back exhaust 1 Remove and save screw that holds blower motor to microwave b a c a Blower Motor b Back of Microwave c Blower Motor Screw 2 Carefully pull out the blower unit The wires will extend far enough ...

Страница 22: ...sRoutedThroughLeftSide 6 Roll the blower unit 90 so that fan blade openings are facing out the back of the microwave Before Rolling After Rolling a a a Back of Microwave 7 Remove the knockout plates in the back of the unit with snips a a Knockout Plates 8 Place the blower unit back into the opening IMPORTANT Make sure the wires are not pinched and that they are properly secured The blower unit exh...

Страница 23: ...h in securely until it is in the lower locking tabs Take care to assure that the damper hinge is installed so that it is at the top and that the damper swings freely e c a d b a Adaptor b Back of Microwave c Guide d Locking Tabs e Guide Mount the Microwave Oven WARNING Excessive Weight Hazard Use two or more people to move and install microwave oven Failure to do so can result in back or other inj...

Страница 24: ...et bottom 4 Insert a self aligning screw through top center cabinet hole Temporarily secure the oven by turning the screw at least two full turns after the threads have engaged It will be completely tightened later Be sure to keep power cord tight Be careful not to pinch the cord especially when mounting flush to bottom of cabinet a b c f d e a Cabinet Front b Cabinet Bottom Shelf c Filler Block d...

Страница 25: ...screws for the blower motor and blower plate are securely tightened when they are reinstalled This will help to prevent excessive vibration Make sure the motor wiring has been properly routed and secured and that the wires are not pinched Attach the mounting plate to the wall using toggle bolts NOTE At least one wood screw must be used to attach the plate to a wall stud 1 Remove the toggle wings f...

Страница 26: ...ful to avoid pinching fingers between the back of the mounting plate and the wall 4 Tighten all bolts Pull the plate away from the wall to help tighten the bolts Prepare Top Cabinet 1 Read the instructions on the template and then tape the template underneath the overhead cabinet 2 Drill the holes following the instructions on the template Drill holes for the top support screws Drill a hole large ...

Страница 27: ...blocks to avoid damage to the case from over tightening the screws 1 Thread the power cord through the hole in the bottom of the overhead cabinet Keep the power cord tight while mounting the oven Do not pinch cord or lift oven by pulling cord NOTE If the overhead cabinet is metal use the nylon grommet around the power cord hole to avoid cutting the power cord 2 Using two or more people lift the mi...

Страница 28: ...Cabinet Front b Cabinet Bottom Shelf c Filler Block d Equivalent to Depth of Cabinet Recess e Self Aligning Screw f Microwave Oven Top 5 Attach the microwave oven to the top cabinet 6 Insert two self aligning screws through outer top cabinet holes Turn two full turns on each screw 7 Tighten center screw completely 8 Tighten the outer two screws to the top of the microwave oven While tightening scr...

Страница 29: ...ented model to a recirculating operation 1 Remove screws on top of grille using a Phillips screwdriver 2 Open the door 3 Remove the grille Pull the grille straight off a a Charcoal Filter 4 Install the charcoal filter When properly installed the wire mesh of the filter should be visible from the front Insert mesh side up 5 Replace the grille and the screws 6 Close the door ...

Страница 30: ...y placing 1 cup 250 mL of water on the turntable and programming a cook time of 1 minute at 100 power Test vent fan and exhaust by operating the vent fan 4 If the microwave oven does not operate Check that a household fuse has not blown or that a circuit breaker has not tripped Replace the fuse or reset the circuit breaker If the problem continues call an electrician Check that the power supply co...

Страница 31: ......

Страница 32: ...oblem with this product please contact the Haier Customer Satisfaction Center at 1 877 337 3639 DATED PROOF OF PURCHASE MODEL AND SERIAL REQUIRED FOR WARRANTY SERVICE Made in China Haier America Wayne NJ 07470 HMV1652 Issued July 2015 Printed in China Part 0570000005 ...

Отзывы: