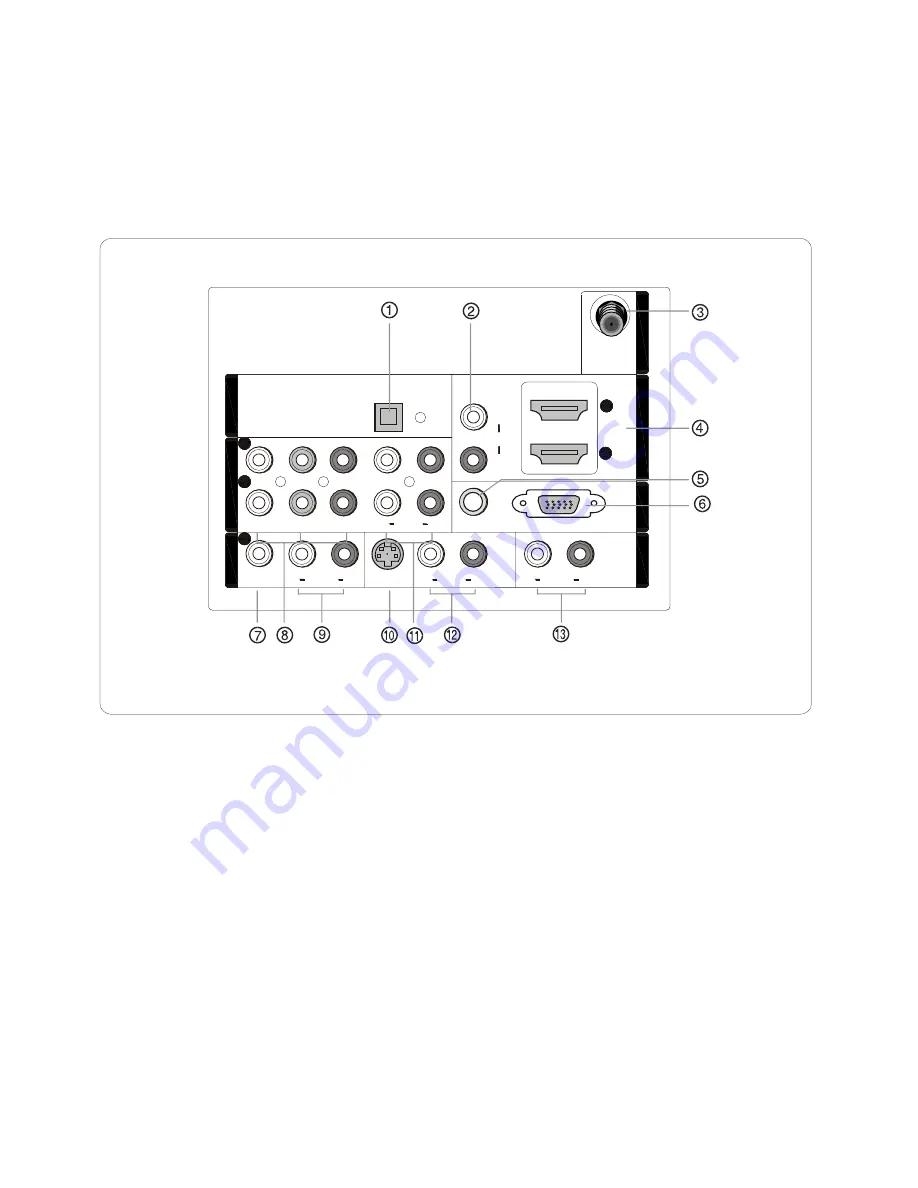
Back panel
connections
2
1
1
Y
Pb
Pr
L
R
L
L
R
R
VIDEO
VIDEO
S-VIDEO
S-VIDEO
VGA
VGA
VGA AUDIO
VGA AUDIO
AUDIO
AUDIO
AUDIO
AUDIO
L
R
DVI AUDIO
DVI AUDIO
AUDIO
AUDIO
2
L
R
AUDIO
AUDIO
COMPONENT
IN
COMPONENT
IN
VIDEO IN
1
AV
O
U
T
AV
O
U
T
VGA
IN
VGA
IN
HDMI IN
ANT
IN
ANT
IN
OPTICAL
OUT
OPTICAL
OUT
1.
Digital Audio Output:
NOTE:
In standby mode, these ports will not work.
2.
DVI Audio In:
3.
Antenna Input:
Connect cable or antenna signals to the TV, either directly or through your cable box.
4.
HDMI In
:
5.
VGA Audio In
: Connect the audio L/R cables from a computer to this jack.
6.
VGA Video In
: Connect a video cable from a computer to this jack.
7.
VIDEO In:
Connects the video signal from a video device.
8.
In
: Connect a component video device to these jacks.
9.
AUDIO In:
Connect the audio L/R cables from the video signal source to these jacks.
10.
S-VIDEO In:
Connect the S-Video cable from an external signal source to this jacks.
11.
COMPONENT AUDIO In:
Connect the audio L/R cables from the component video signal source to these jacks.
12.
AUDIO In:
Connect the audio L/R cables from the S-Video signal source to these jacks.
13.
AUDIO Out:
Connect the audio L/R cables to
Connect various types of digital audio equipment.
When using a DVI to HDMI adapter, connect the audio signal to these jacks.
Connect a HDMI device to receive digital audio and uncompressed digital video.
your audio equipment.
Component Video
6-2
Содержание HL42XK1
Страница 10: ...CON3 CON4 CON5 ...
Страница 11: ...3 4 LCD Panel 3 4 1 Function Description Display the signal 3 4 2 Connector definition AU T420HW02 V4 ...
Страница 12: ...4 Disassemble and assemble ...
Страница 26: ...7 Electrical parts 7 1 Block diagram 7 2 Circuit Diagram MTK5380L MT8292 TPA3101 ...
Страница 48: ...42 Clean Storage The function could make the model turn back to the factory default setting ...
Страница 54: ......
Страница 56: ...50 Sincere Forever ...


